
3D Cricut Card SVG Tutorial | How to Make Popup Cricut Cards
Publish Date:
May 12, 2021
Author:
By Crafting Spree
Want to learn how to make awesome 3D popup Cricut cards? SWEET! We wanna teach you! Which is why we made this easy to follow tutorial on how to transform 3D Cricut Card SVGs into beautiful 3D Cricut cards with no advanced level knowledge or experience required! This tutorial is SUPER beginner-friendly. You’ll quickly learn with our tutorials that just because some Cricut projects LOOK super hard or advanced, doesn’t mean they actually are! If you're interested in other rose inspired projects, you can also check out our tutorial on how to create DIY paper rose flowers.
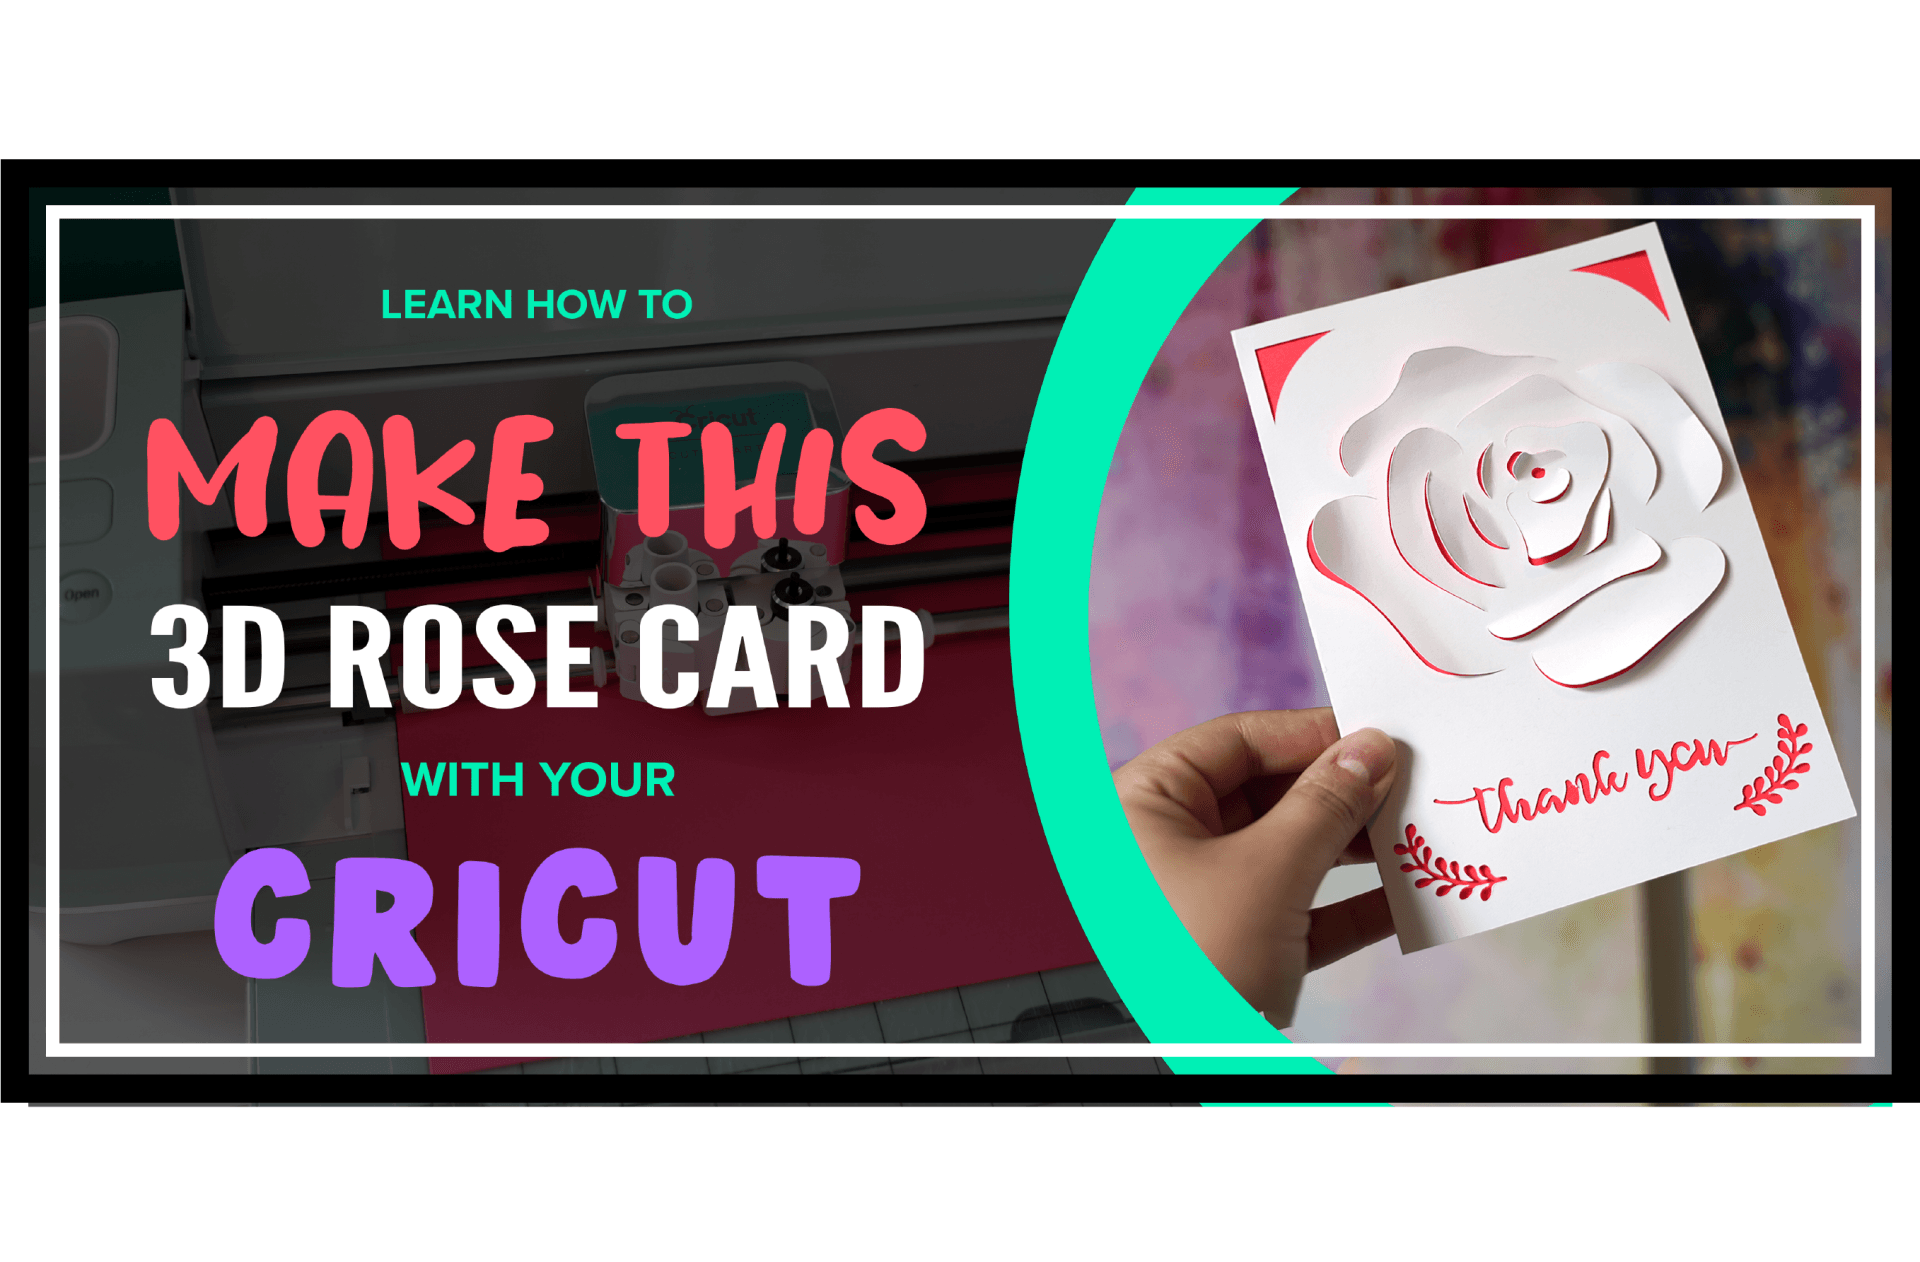
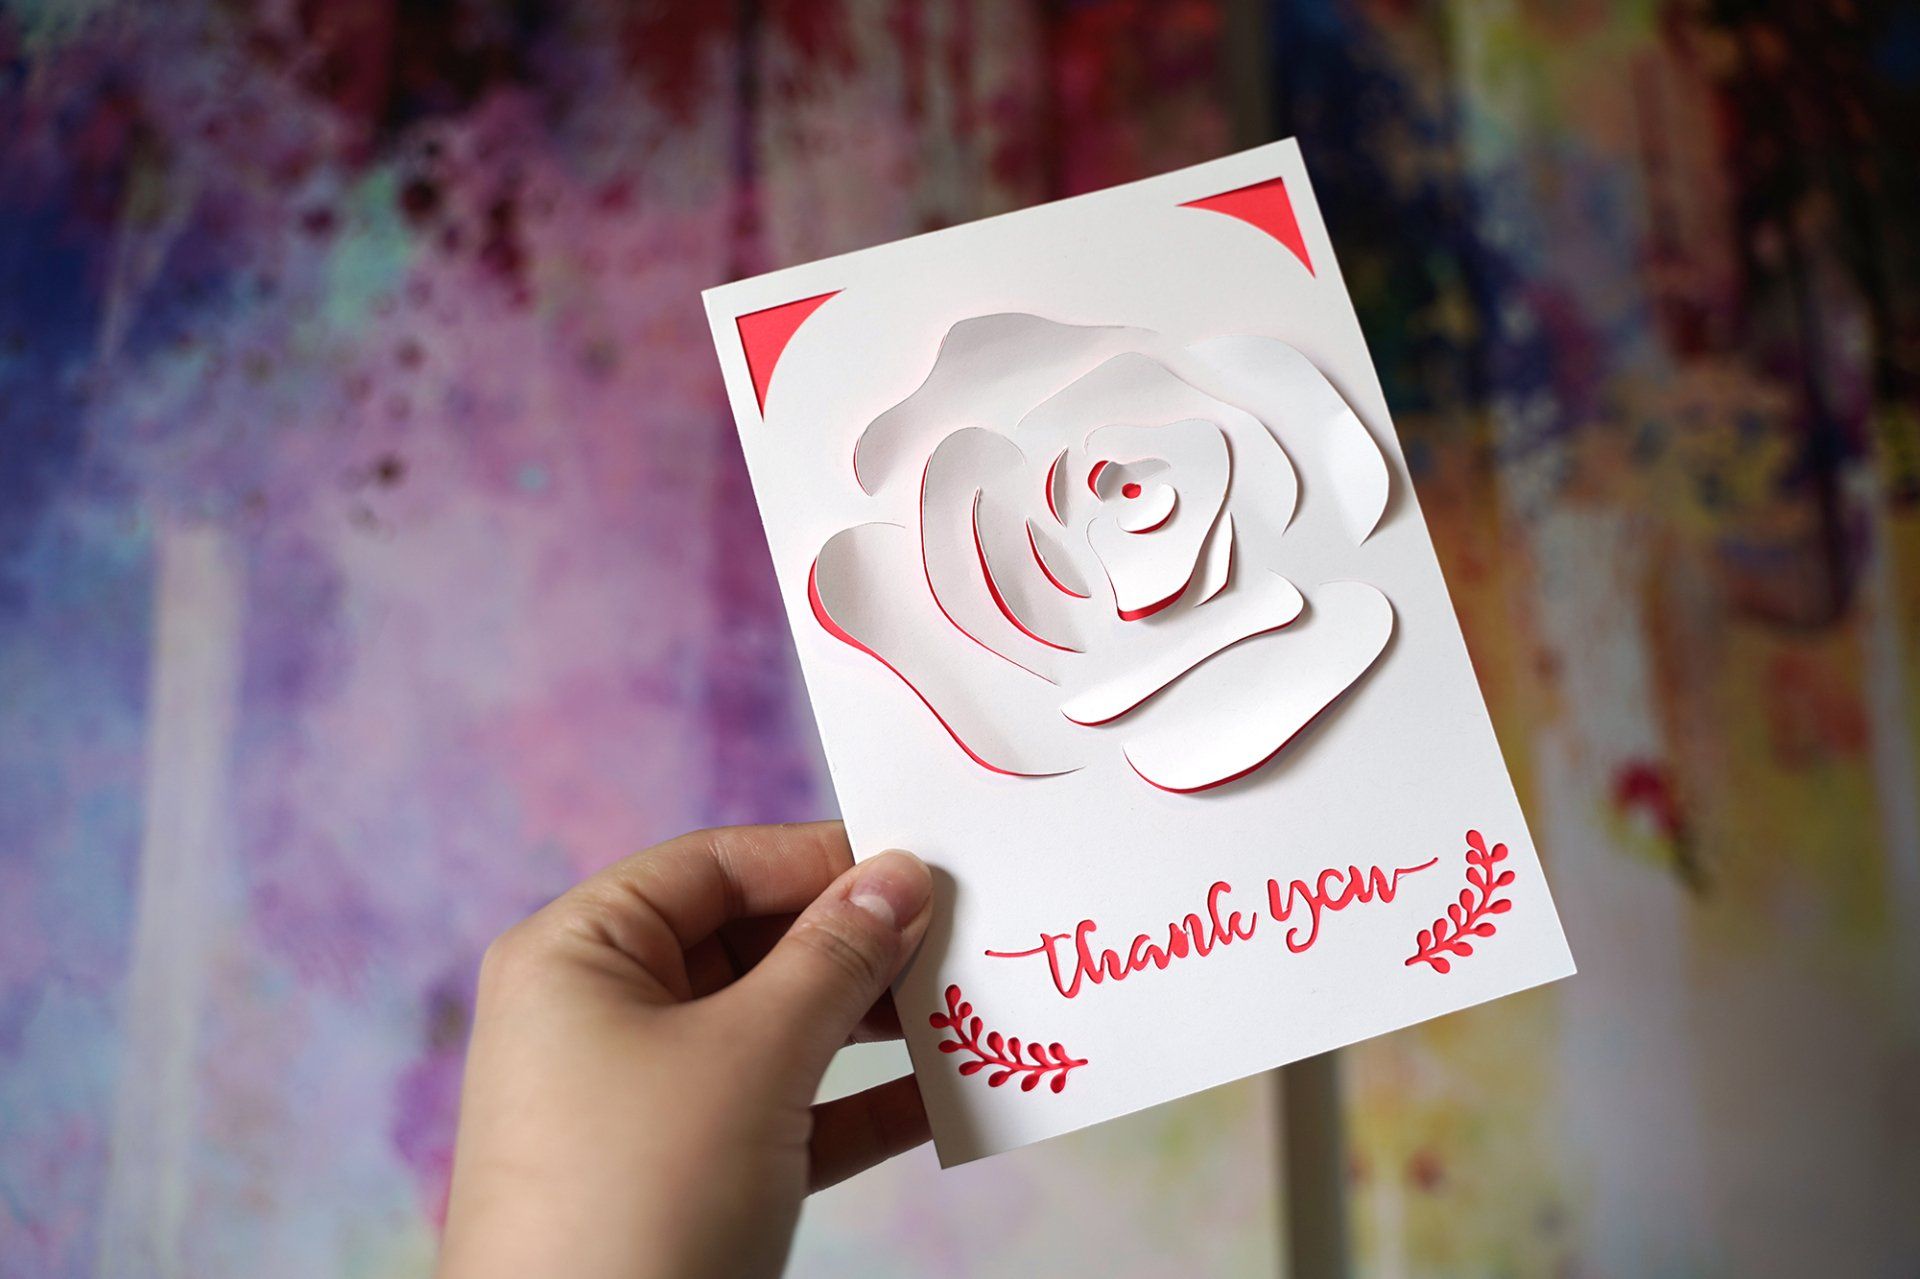
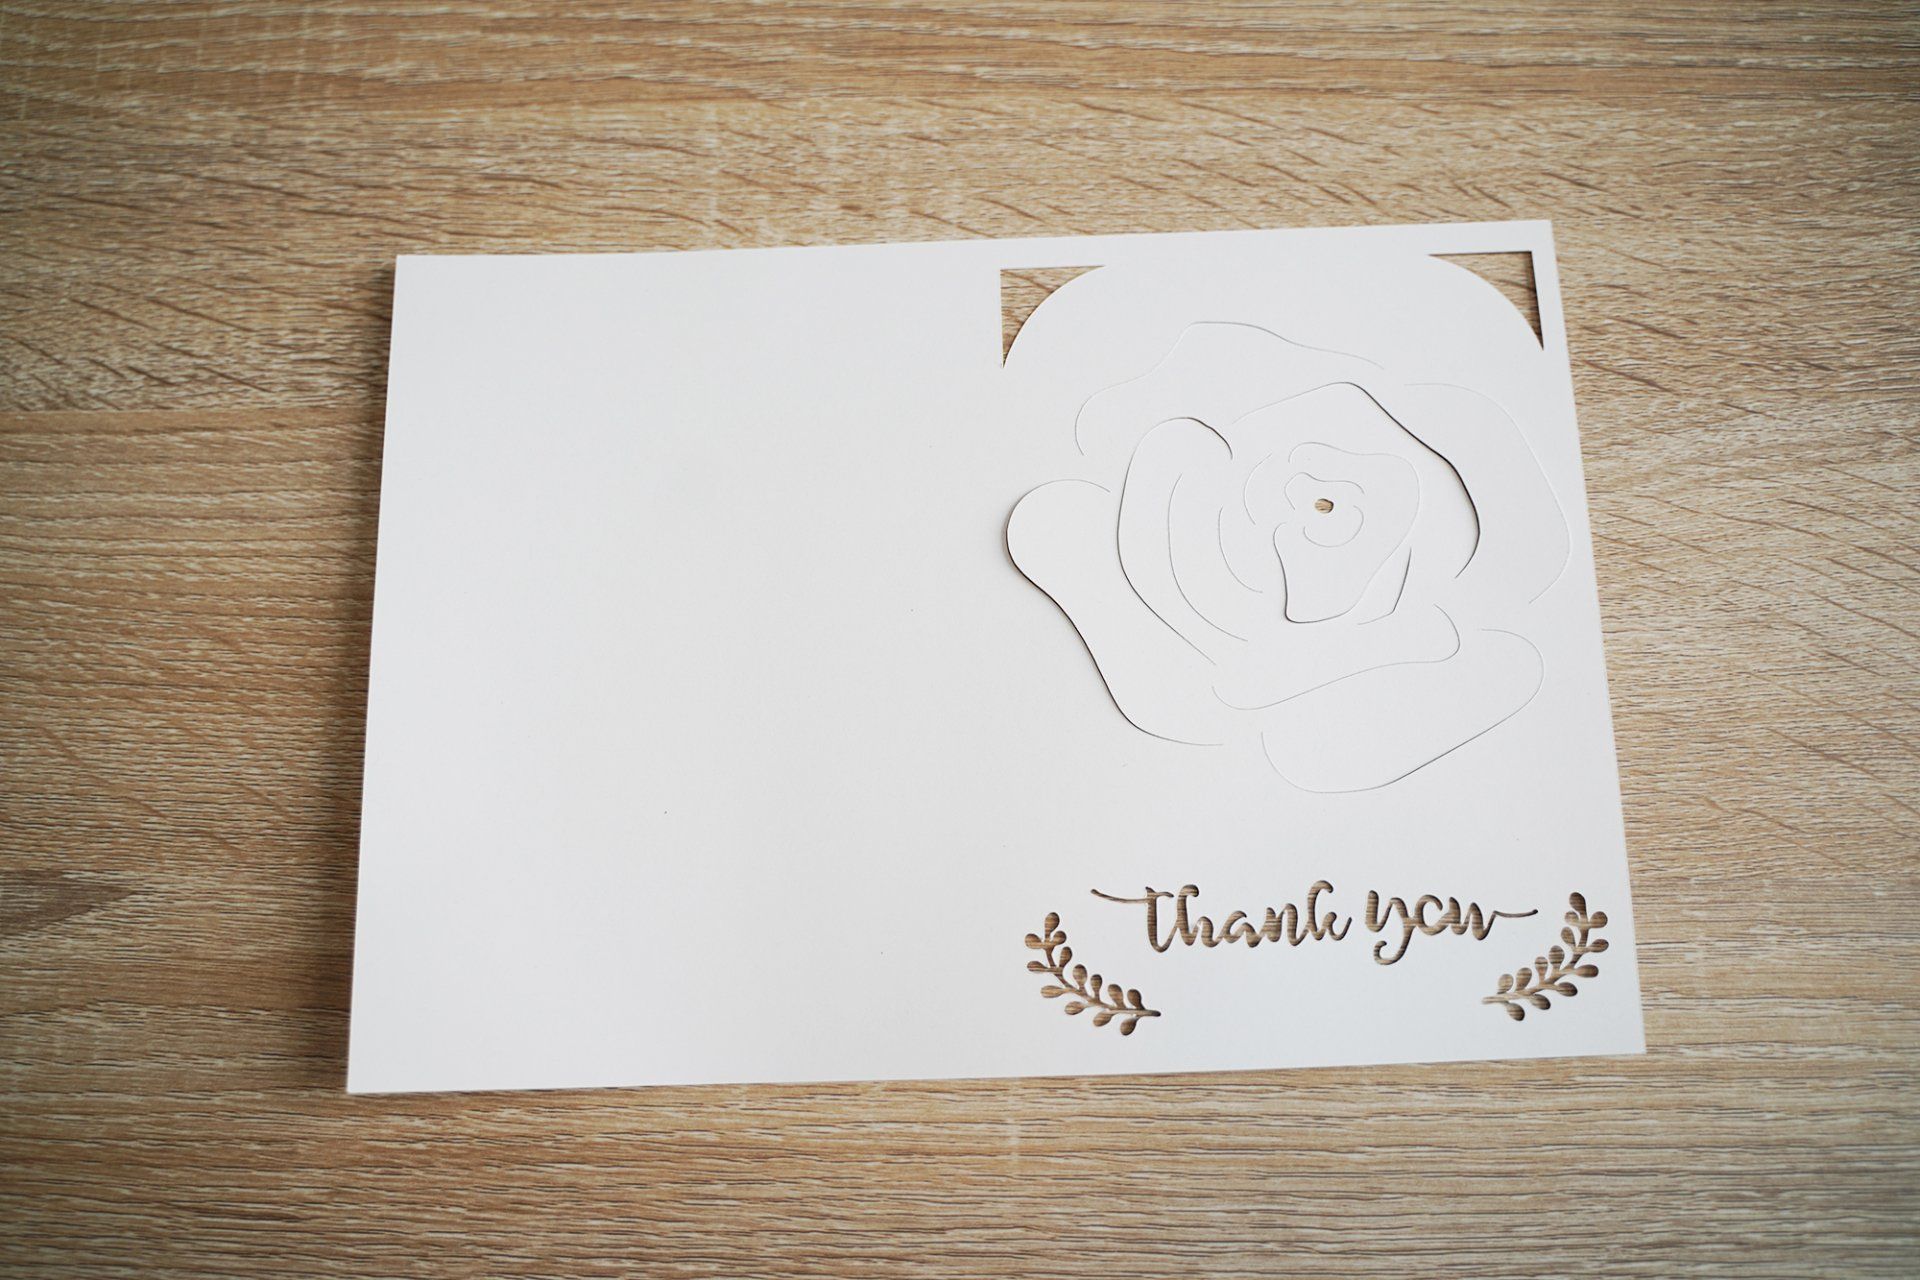
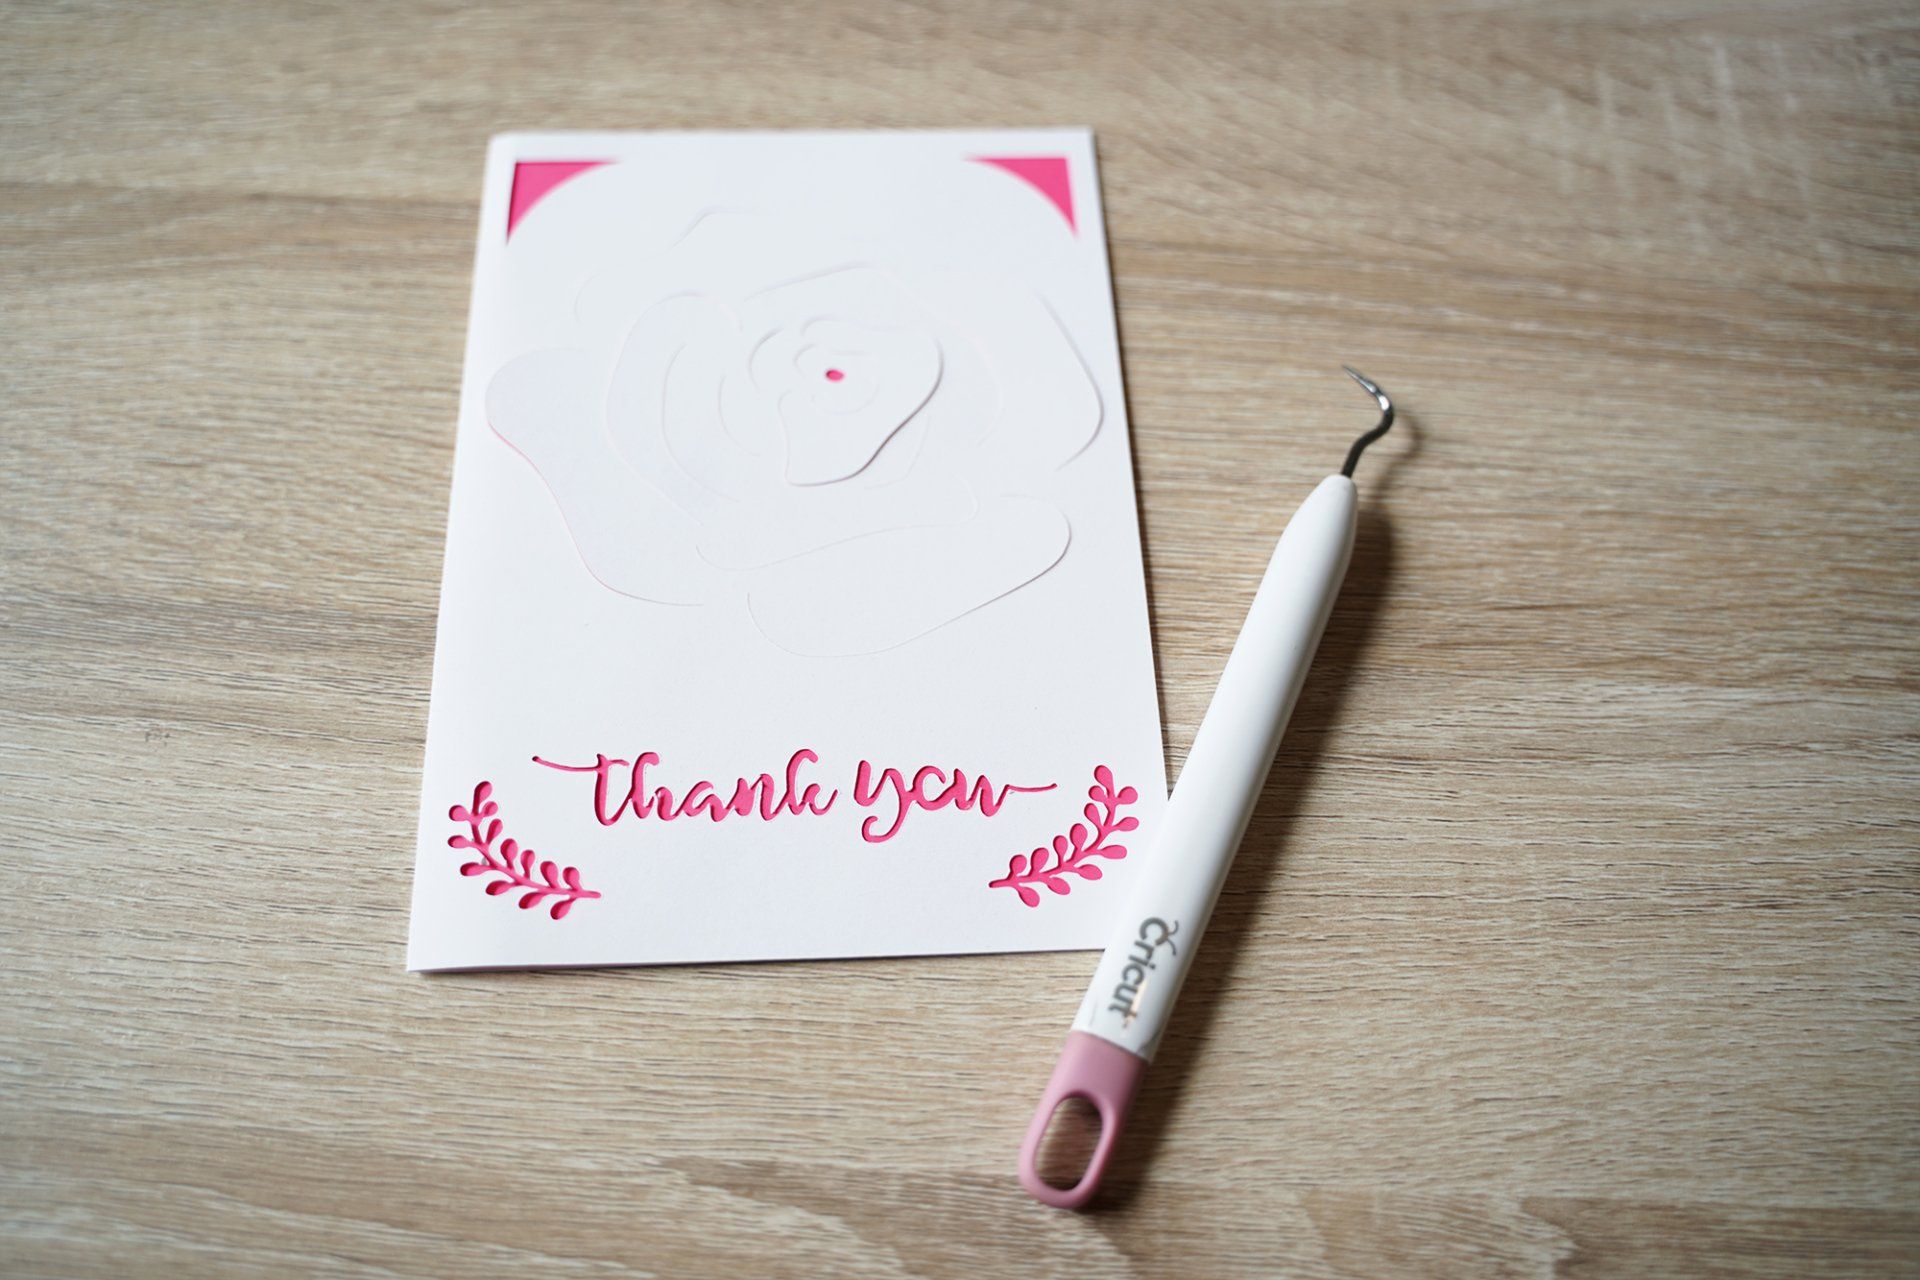
The card we’ll be walking you through how to make today is a stunning 3D rose thank you card. You can get the Cricut card SVG in our Etsy shop, as well as a number of other awesome 3D popup card SVGs. Get 25% off everything in our shop with promo code: CRAFTINGSPREE as a special thank you for being a part of the Crafting Spree fam!
So as you may, or may not know, we already did a tutorial on how to make this flower popup card with your Cricut:

We have some card designs similar to this one in our Etsy shop but we didn’t think they EACH required separate tutorials since the steps on how to make them are essentially the exact same. This card however, is a little different and requires a little more explaining. This is the card we'll be walking you through how to make today:
Step 1:
Get the SVG
You can get 25% off this 3D Cricut card SVG by using promo code: CRAFTINGSPREE during checkout
NOTE: If you run into any issues accessing your file after purchase, check out this guide on how to download purchased Etsy files)
LINK TO SVG: https://www.etsy.com/listing/1017412965/thank-you-rose-popup-card-svg-cricut

Step 2: Upload the SVG
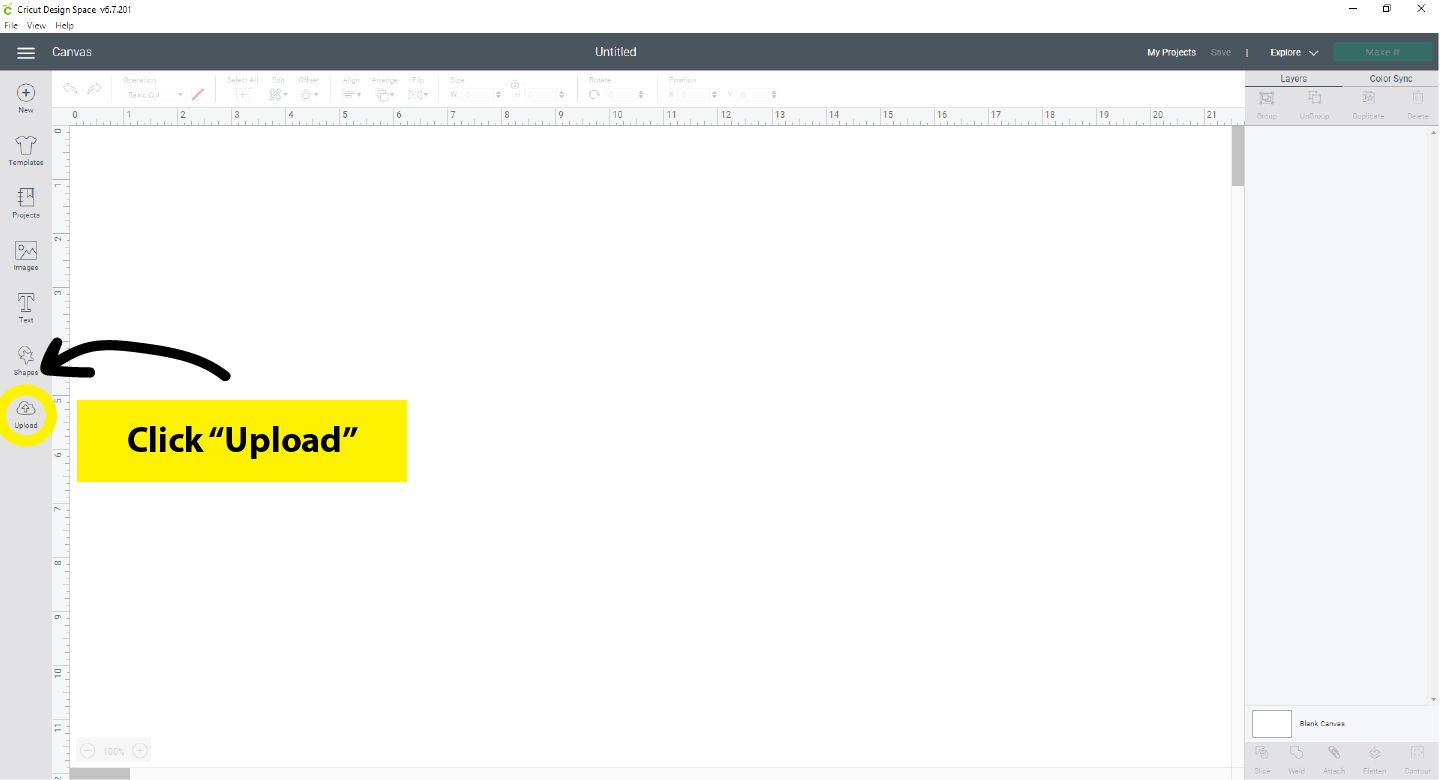
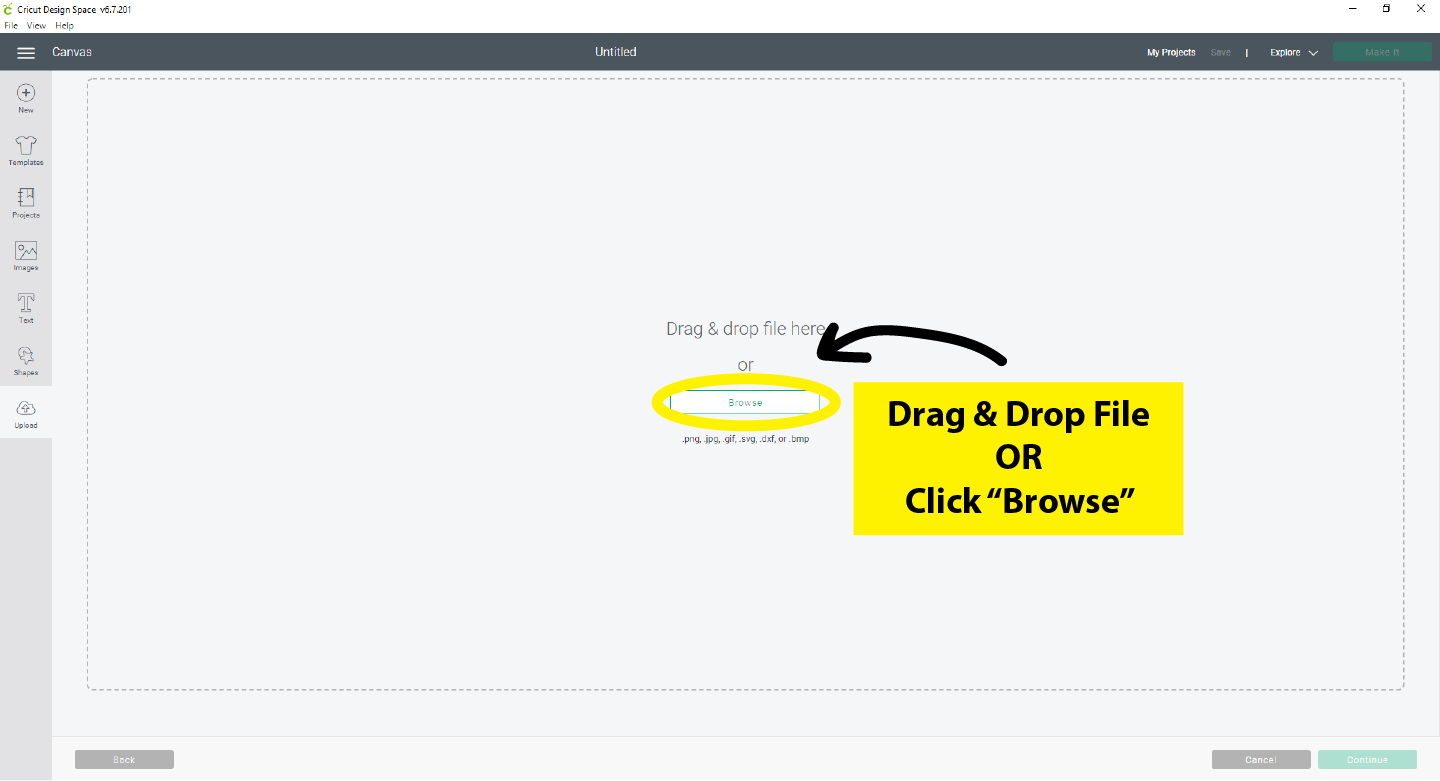
Next we’ll upload the card SVG to Cricut Design Space by opening Design Space, creating a new project, and selecting “upload” from the bottom of the left-hand menu.

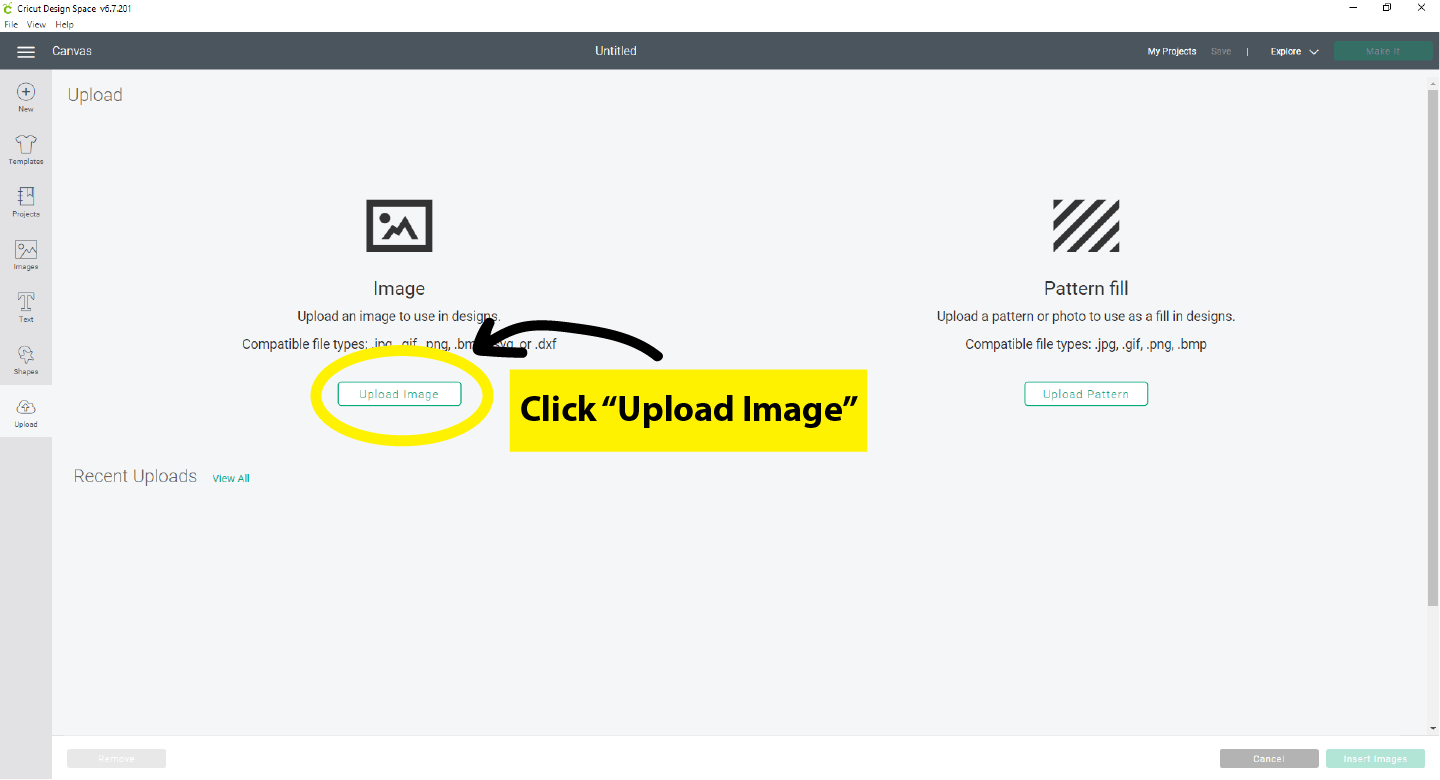
Then you’ll select “upload image”
Select "upload image" again.
And either drag and drop your SVG into the “Drag & drop file here” part of the screen if you have your file handy, or select “browse” and locate your downloaded SVG
(if you didn’t save it somewhere specific after downloading it from Etsy, it’s probably in your downloads folder. If you still can’t locate it, go back to Etsy and download it again paying special attention to where it saves on your device).
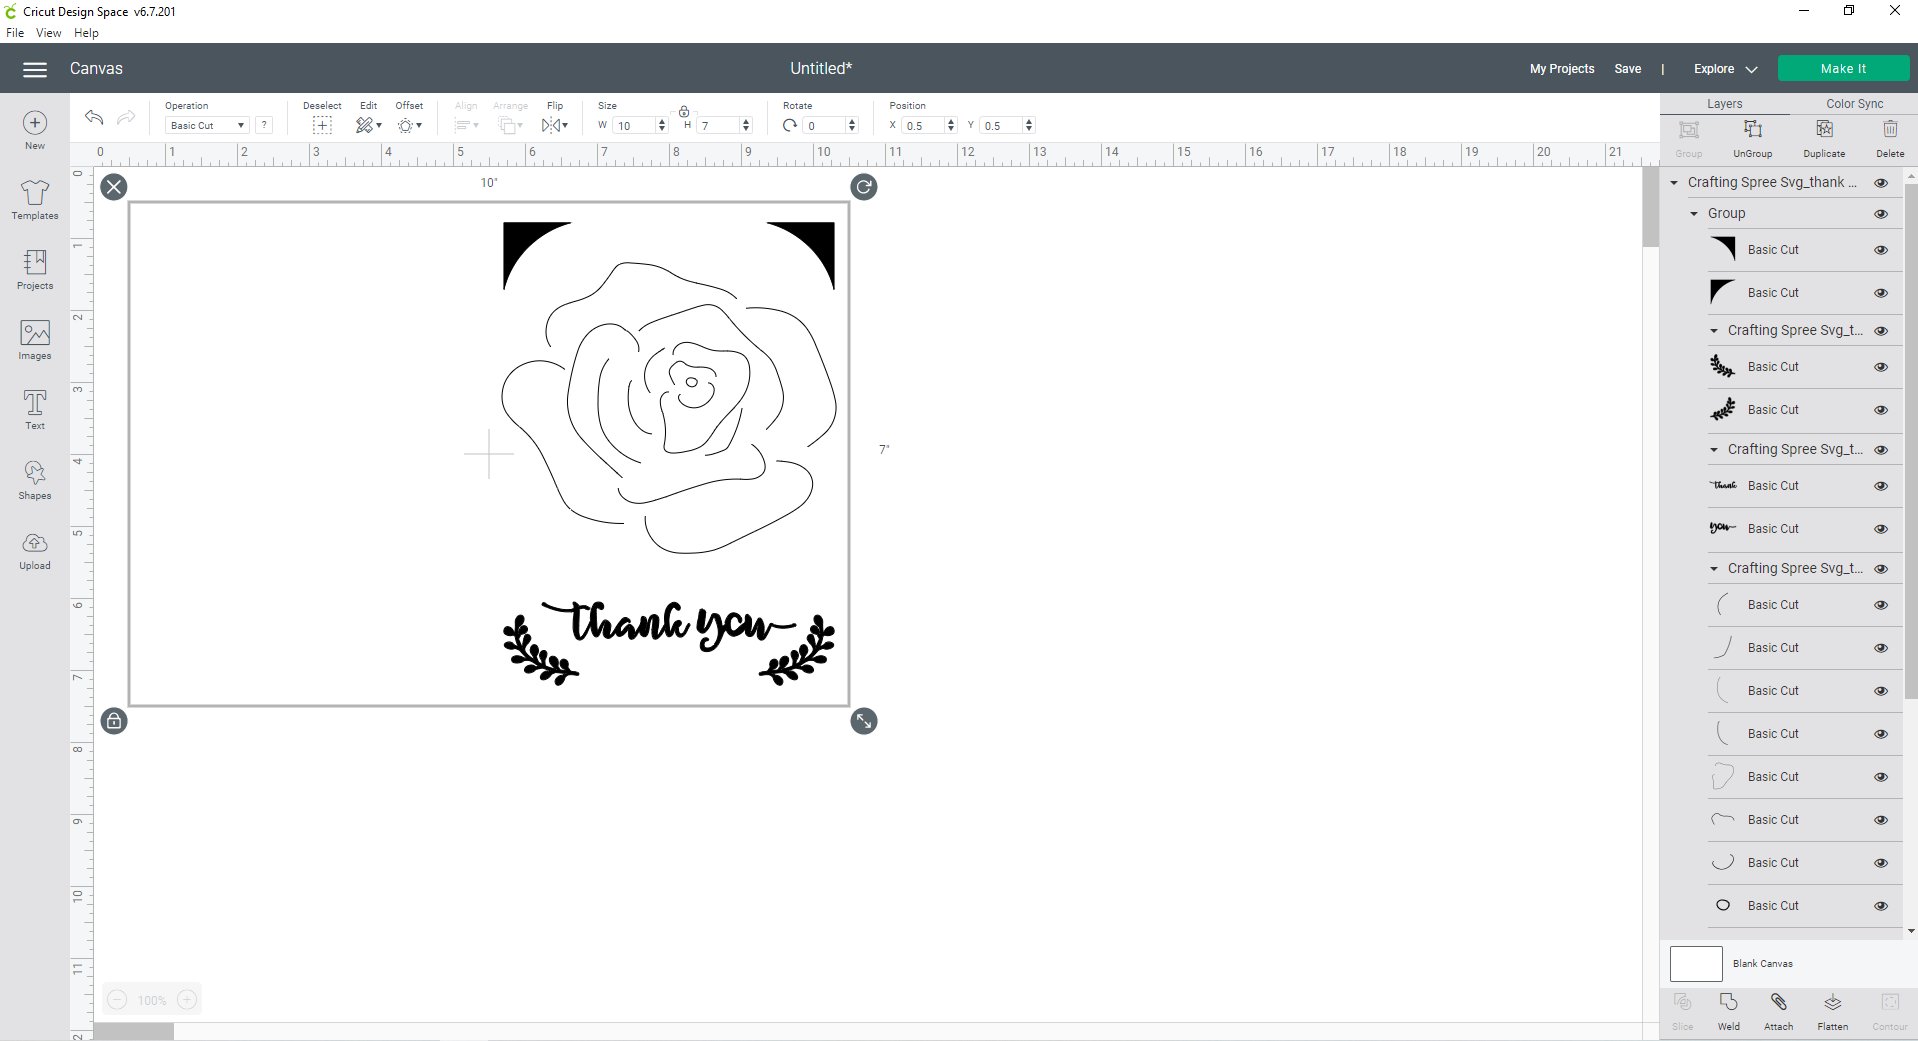
Once you’ve uploaded your card SVG, you’ll see a preview of it in Cricut Design Space, it should look like this:
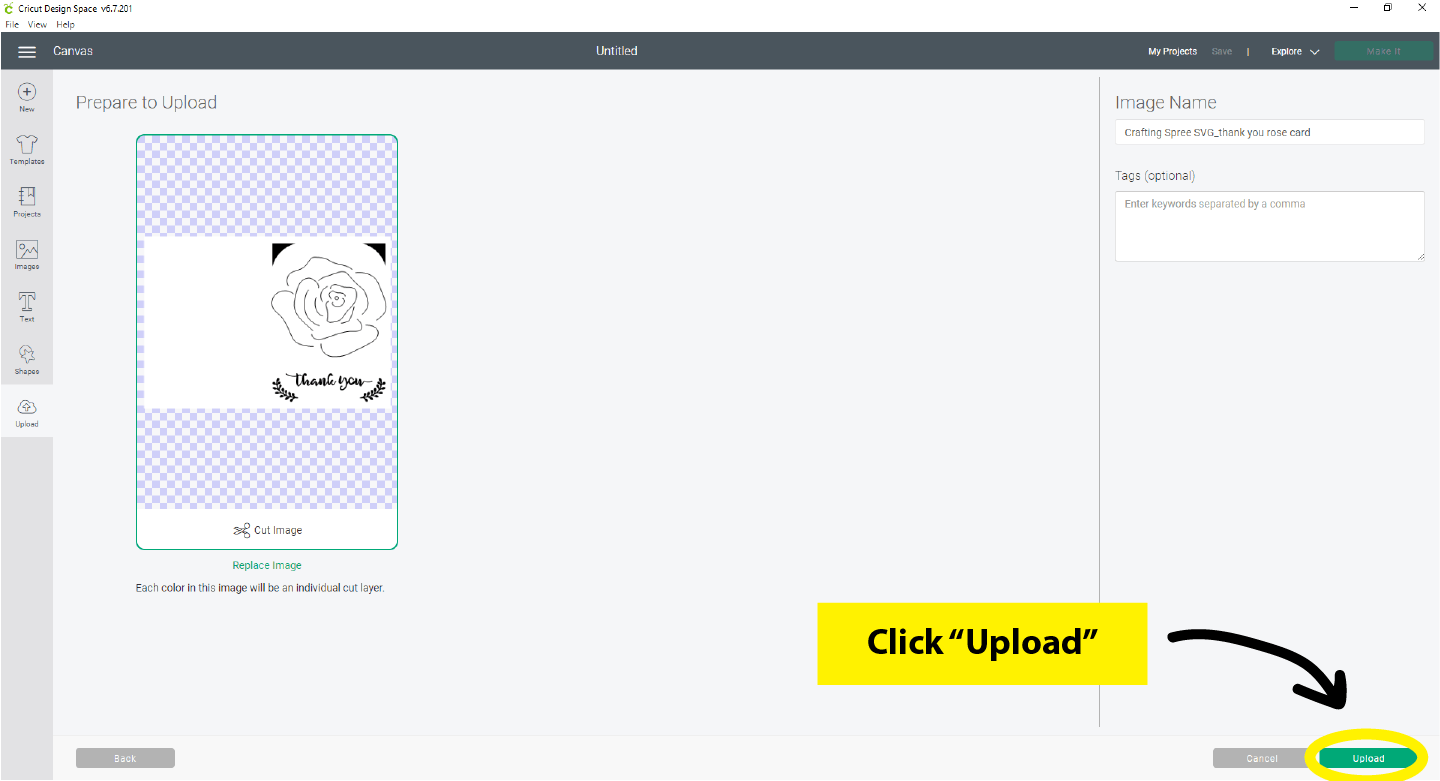
If it doesn’t look like this, and looks like a black rectangle instead, you’ve uploaded the colored insert SVG and need to upload the card SVG instead. We’ll upload the colored insert SVG later, but we don’t need it quite yet.
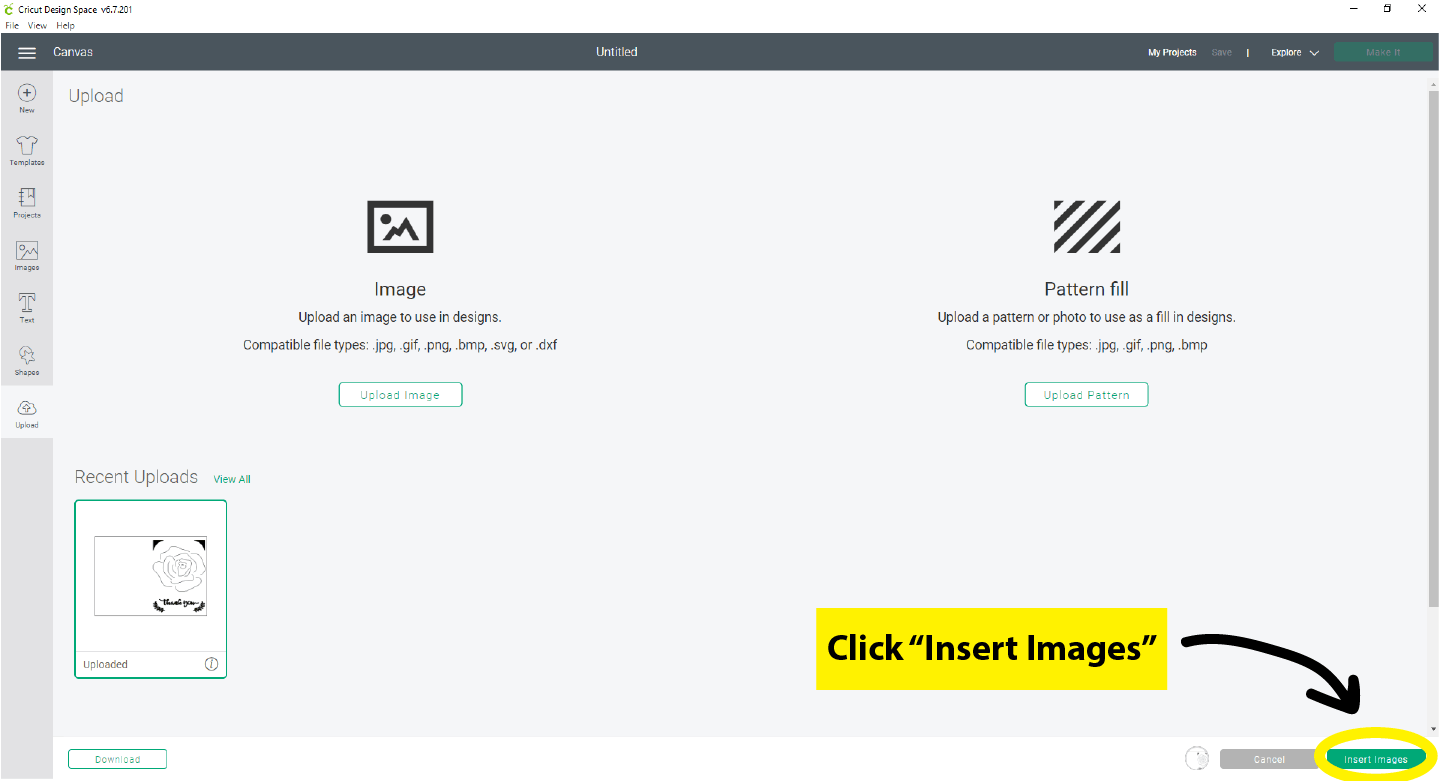
Once everything looks good, click the green “upload” button in the bottom right-hand corner of the screen. You should then see your card SVG under “Recent Uploads” where you will go ahead and select it by clicking on it one time, and then click the green “insert images” button in the bottom right-hand corner of the screen.
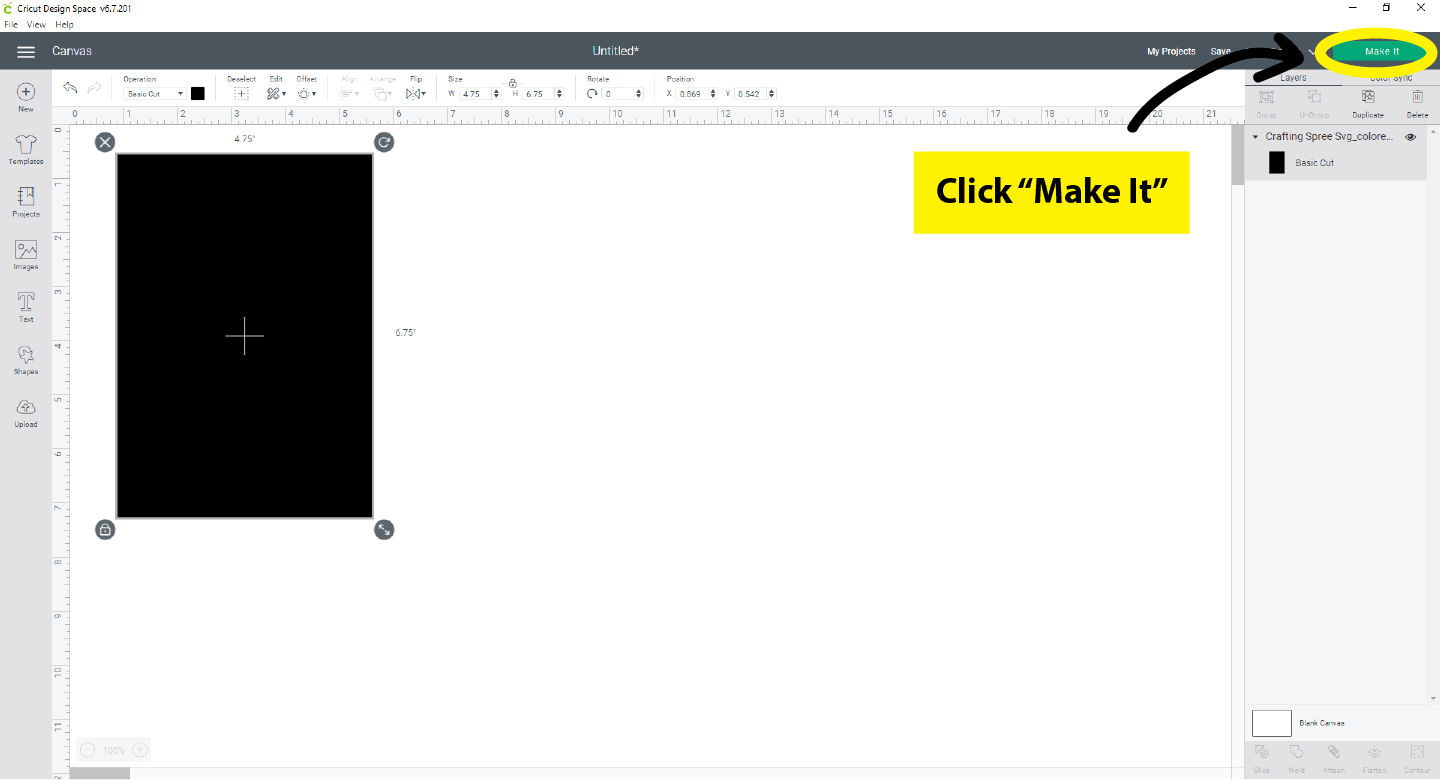
Step 3: Make It!
BUT FIRST! Before we jump right into clicking the ever-so-tempting “Make It” button, we need to attach everything.
Select the card design if it’s not already selected (you’ll know it’s selected when you see a grey bounding box around the entire design with a different symbol outside each corner of the bounding box).
Once it’s selected, click the “attach” button in the lower right-hand corner of the screen that has the paperclip icon above it.
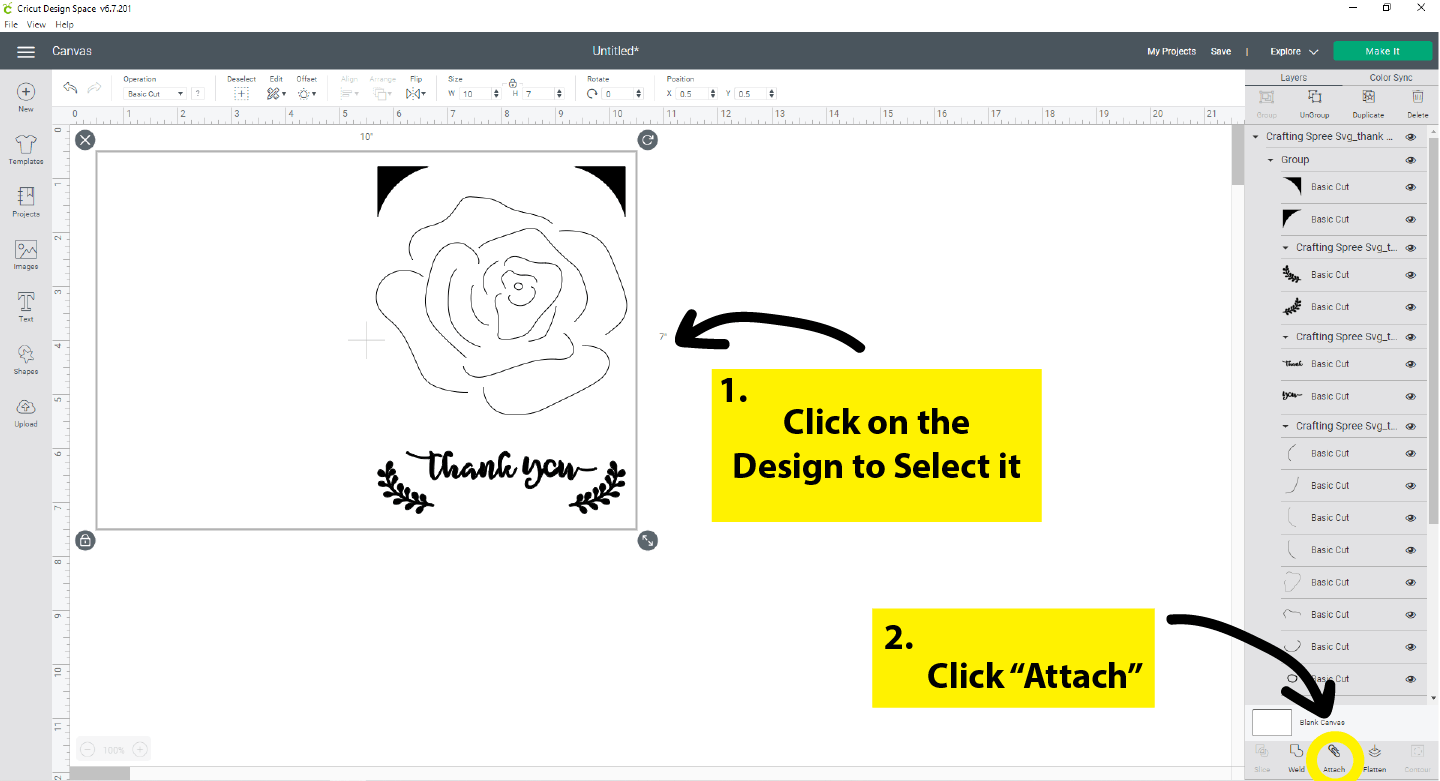
Whenever you have a project that has more than one layer to it (more than one shape showing in that far right-hand column) and you want it to be drawn or cut out exactly how you see it in front of you now, you need to attach them all together. Let me show you what our project would look like if we did NOT attach it, and went straight to “Make it”
Not Attached:
Attached:
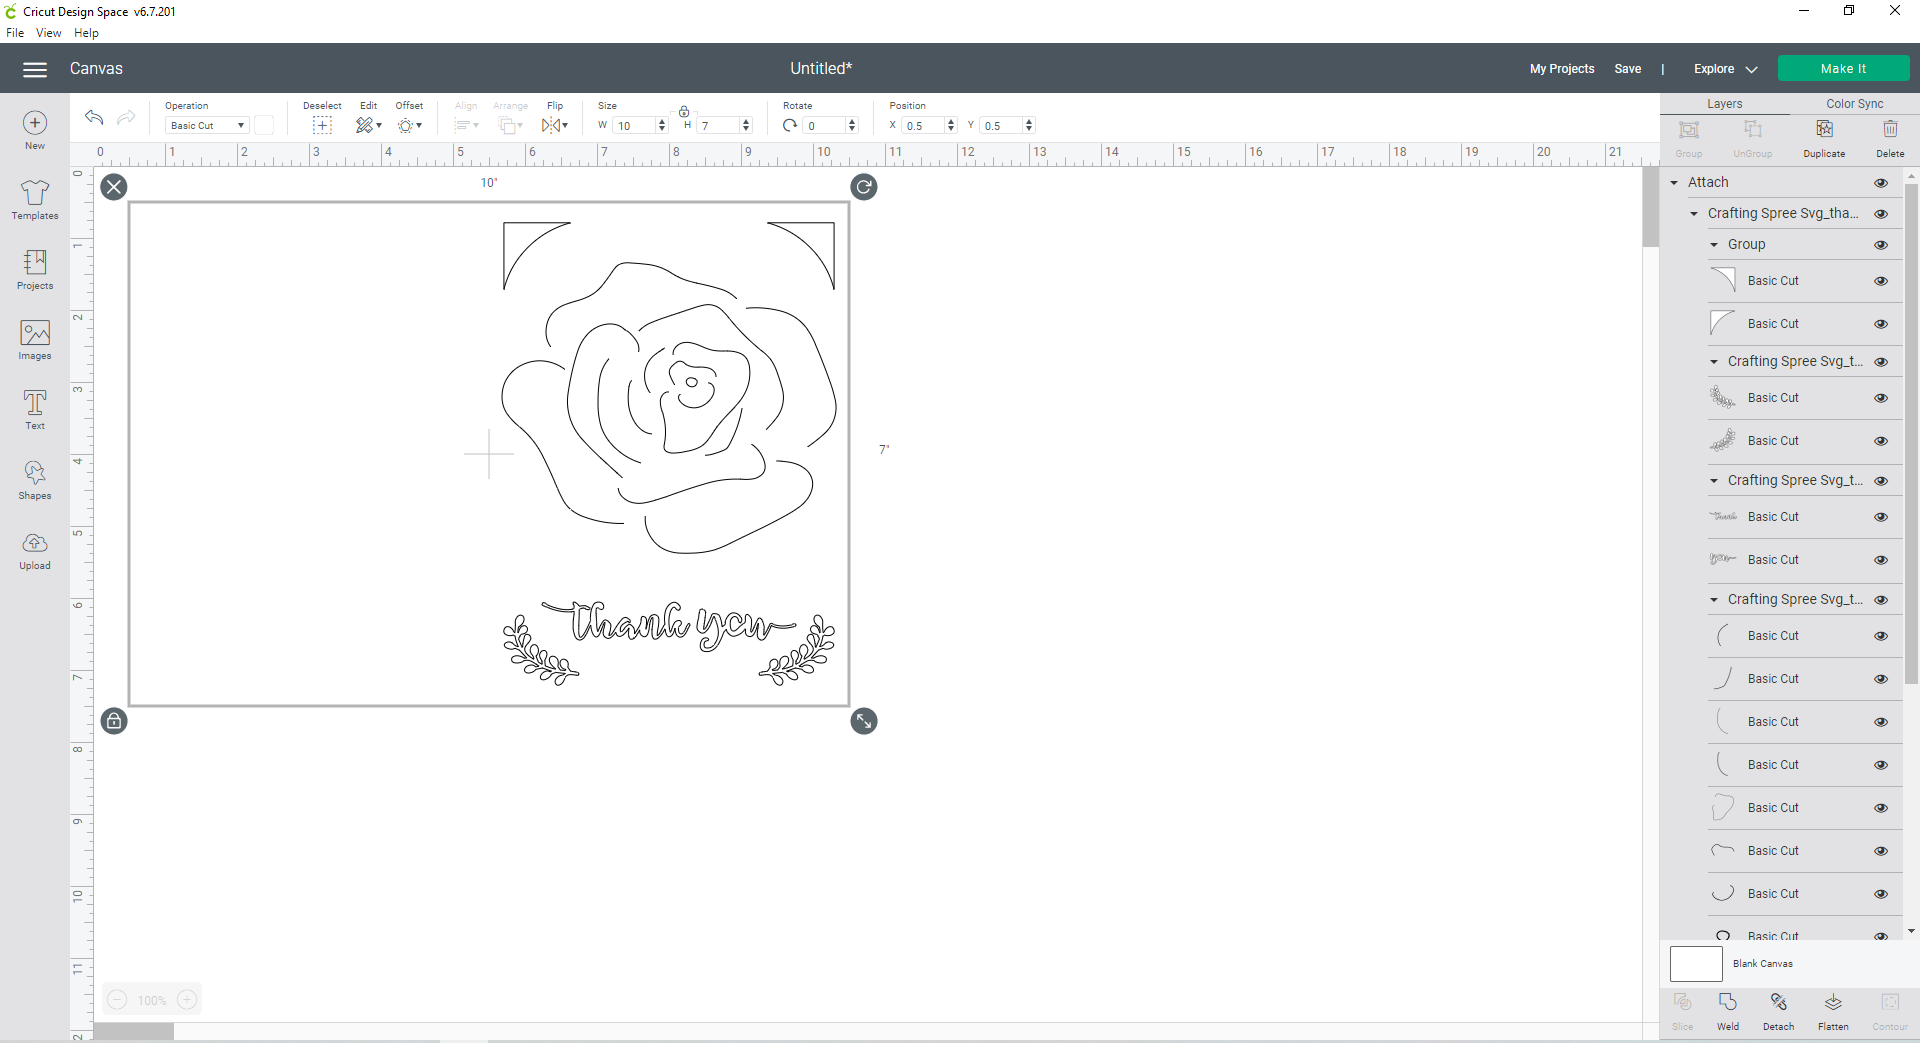

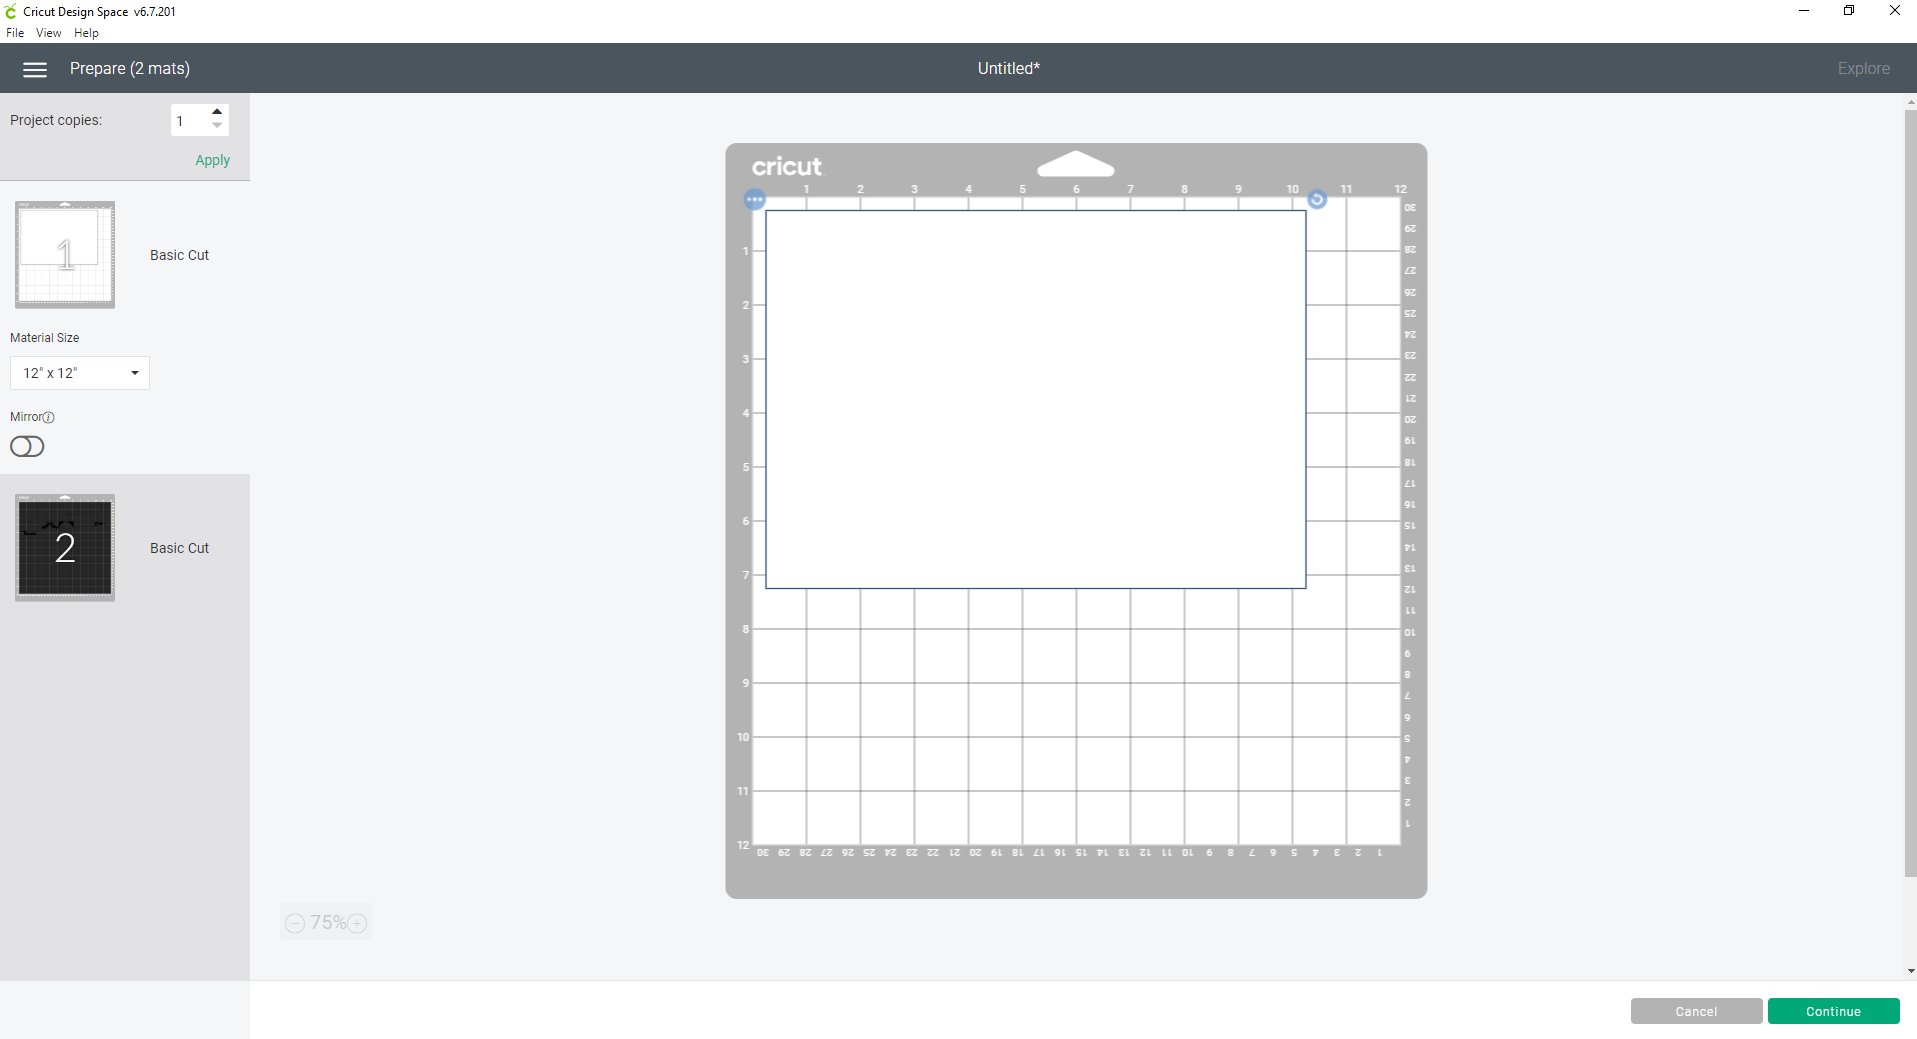
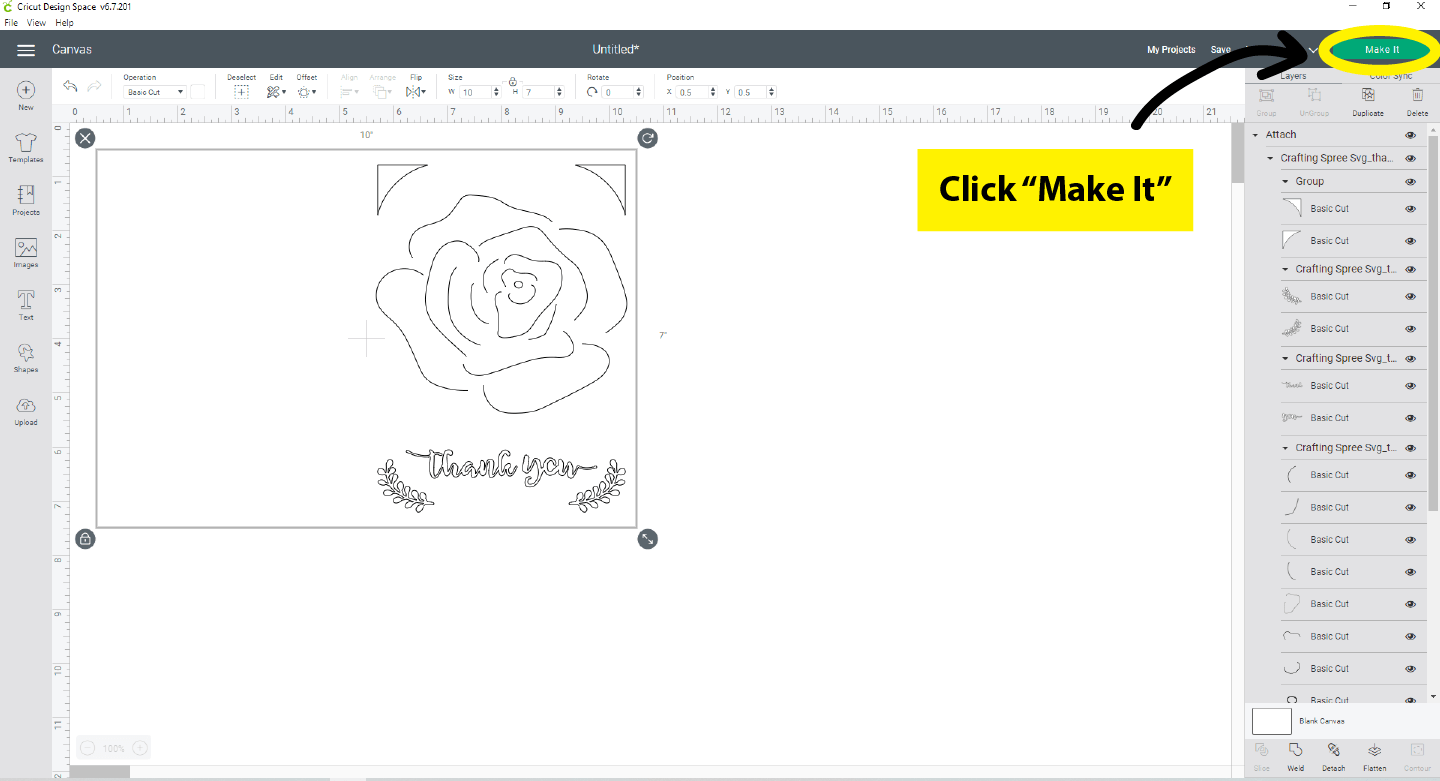
Once your card design is all attached and ready to go THEN you can click on the green button that says “Make It” in the top right-hand corner of your screen. From here, it should show you the correct preview with all our components still together on one page, not scattered about across 2 different grip mats. If your components are in fact scattered, then they are not attached and you will want to select “cancel” in the bottom-right corner, select your design again, and click “attach” before clicking “Make it” again.
If everything looks correct and attached in our first grip mat preview, we can click on “continue” in the bottom right and we’ll check our settings before beginning the cutting process. I was using what I believe is just standard cardstock (I use this
cardstock from Walmart), and in my previous tutorial I had noted my paper setting to be on “cardstock” however after creating several more cardstock projects, it appears that I have a higher success rate with smaller cuts turning out as they should (without ripping, or smushing) when I have the paper setting on “Light Cardstock +” for those of you with a Cricut Explore Air 2, this is the dial setting in between “Light Cardstock” and “Cardstock” shown below:

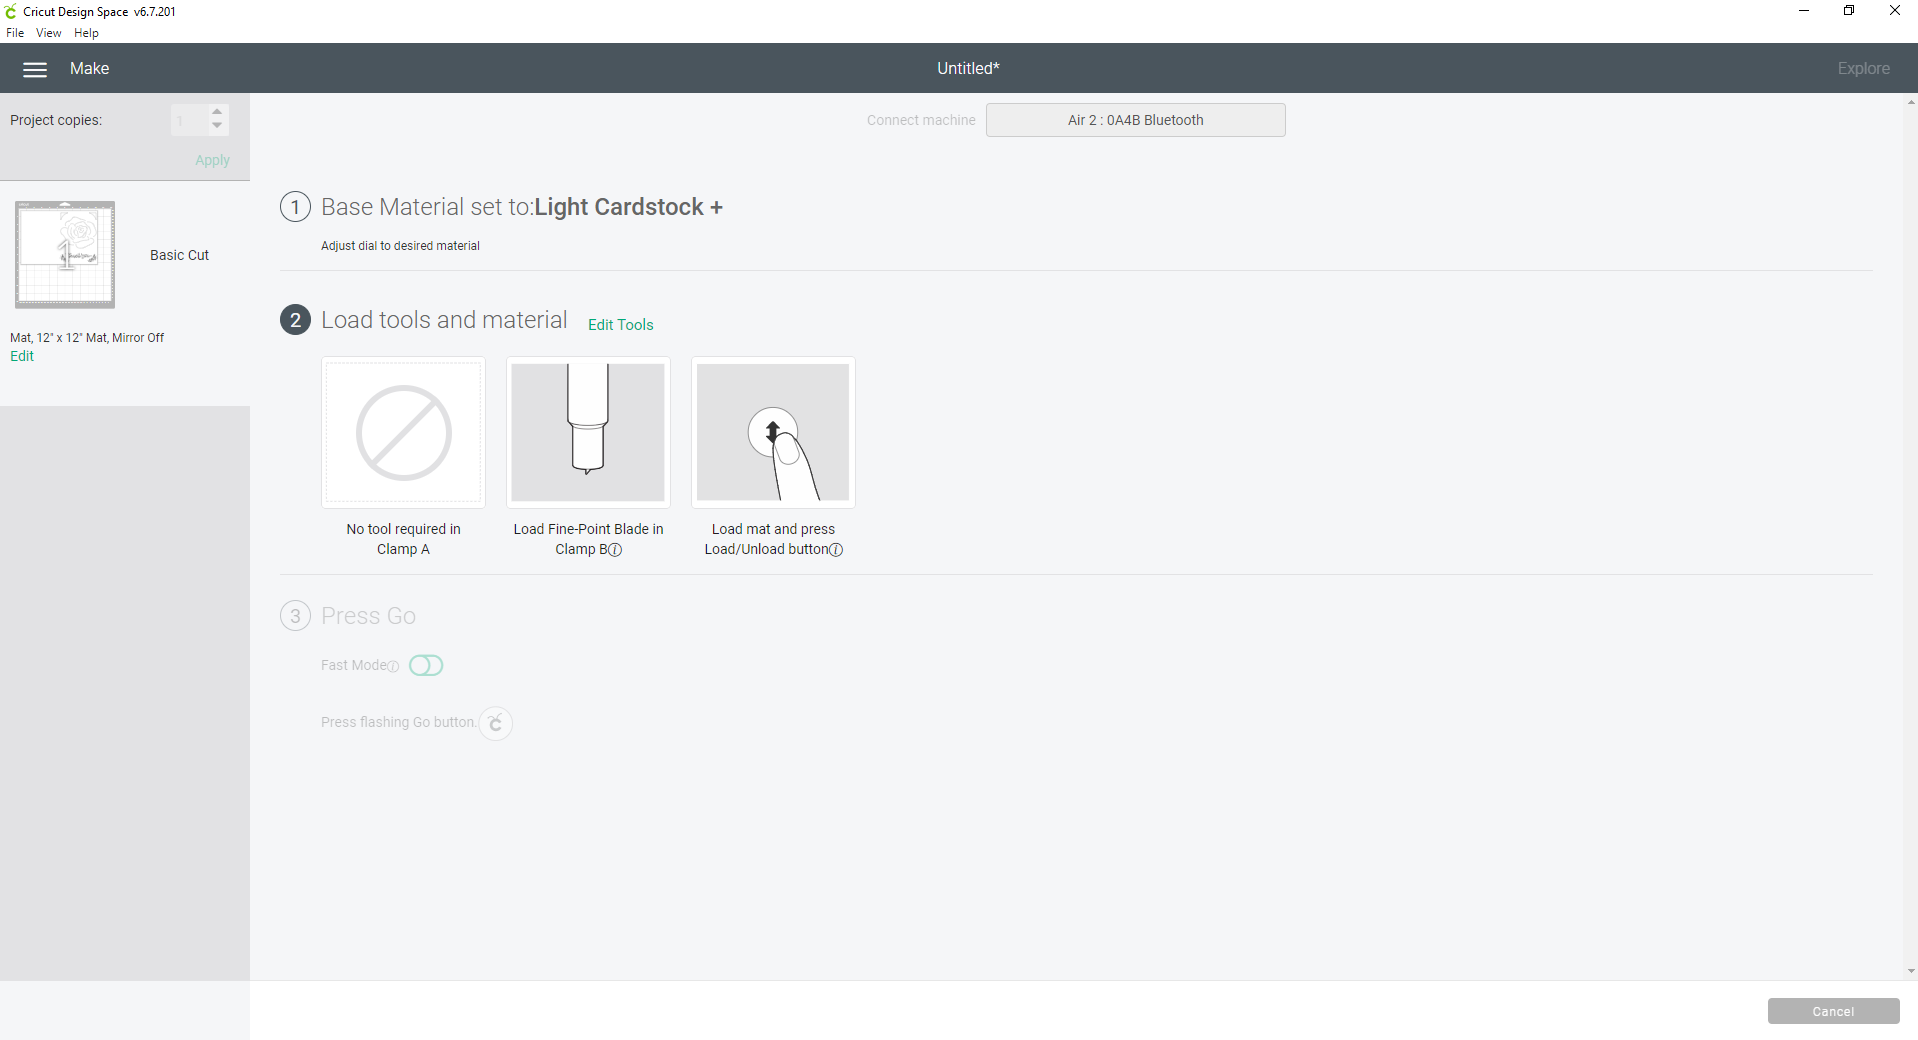
Once you’ve got your material set to Light Cardstock + (or on the proper setting if you’re using a different material than I am) and your blade is set to either the fine-point or deep-cut blade, you’ll be ready to load your machine and start the cut!
*I use the deep-cut blade for cardstock projects but I’ve never changed my blade setting off of fine-point. Cricut suggests using the fine-point blade for cardstock but I’ve had it give me grief before.
The following materials and setting are what I’ve
had the best luck with for cardstock card projects:
Blade: These WAY cheaper off-brand deep-cut blades:
Blade Setting: Fine-Point Blade (I actually didn’t even notice you could change this setting until over 5 years after I got my first Cricut… whoops! Good thing it seems to make no difference!)
Housing: Cricut-brand deep cut blade housing:
Material Setting: Light Cardstock + (when using regular cardstock. By regular I mean this ream of cheap white Walmart cardstock, and this pack of colored cardstock that seems to always be on sale on Amazon- hopefully I didn’t just jinx that!)
Material: This
plain cardstock from Walmart or this pack of colored cardstock from Amazon:
Grip Mat: Standard grip- I use these way cheaper off brand grip mats below, they save me around 50% compared to the Cricut brand ones and I prefer them- they’re not as sticky so paper projects like these don’t get too stuck down to the point where they curl or rip like they often did on the Cricut brand mats.
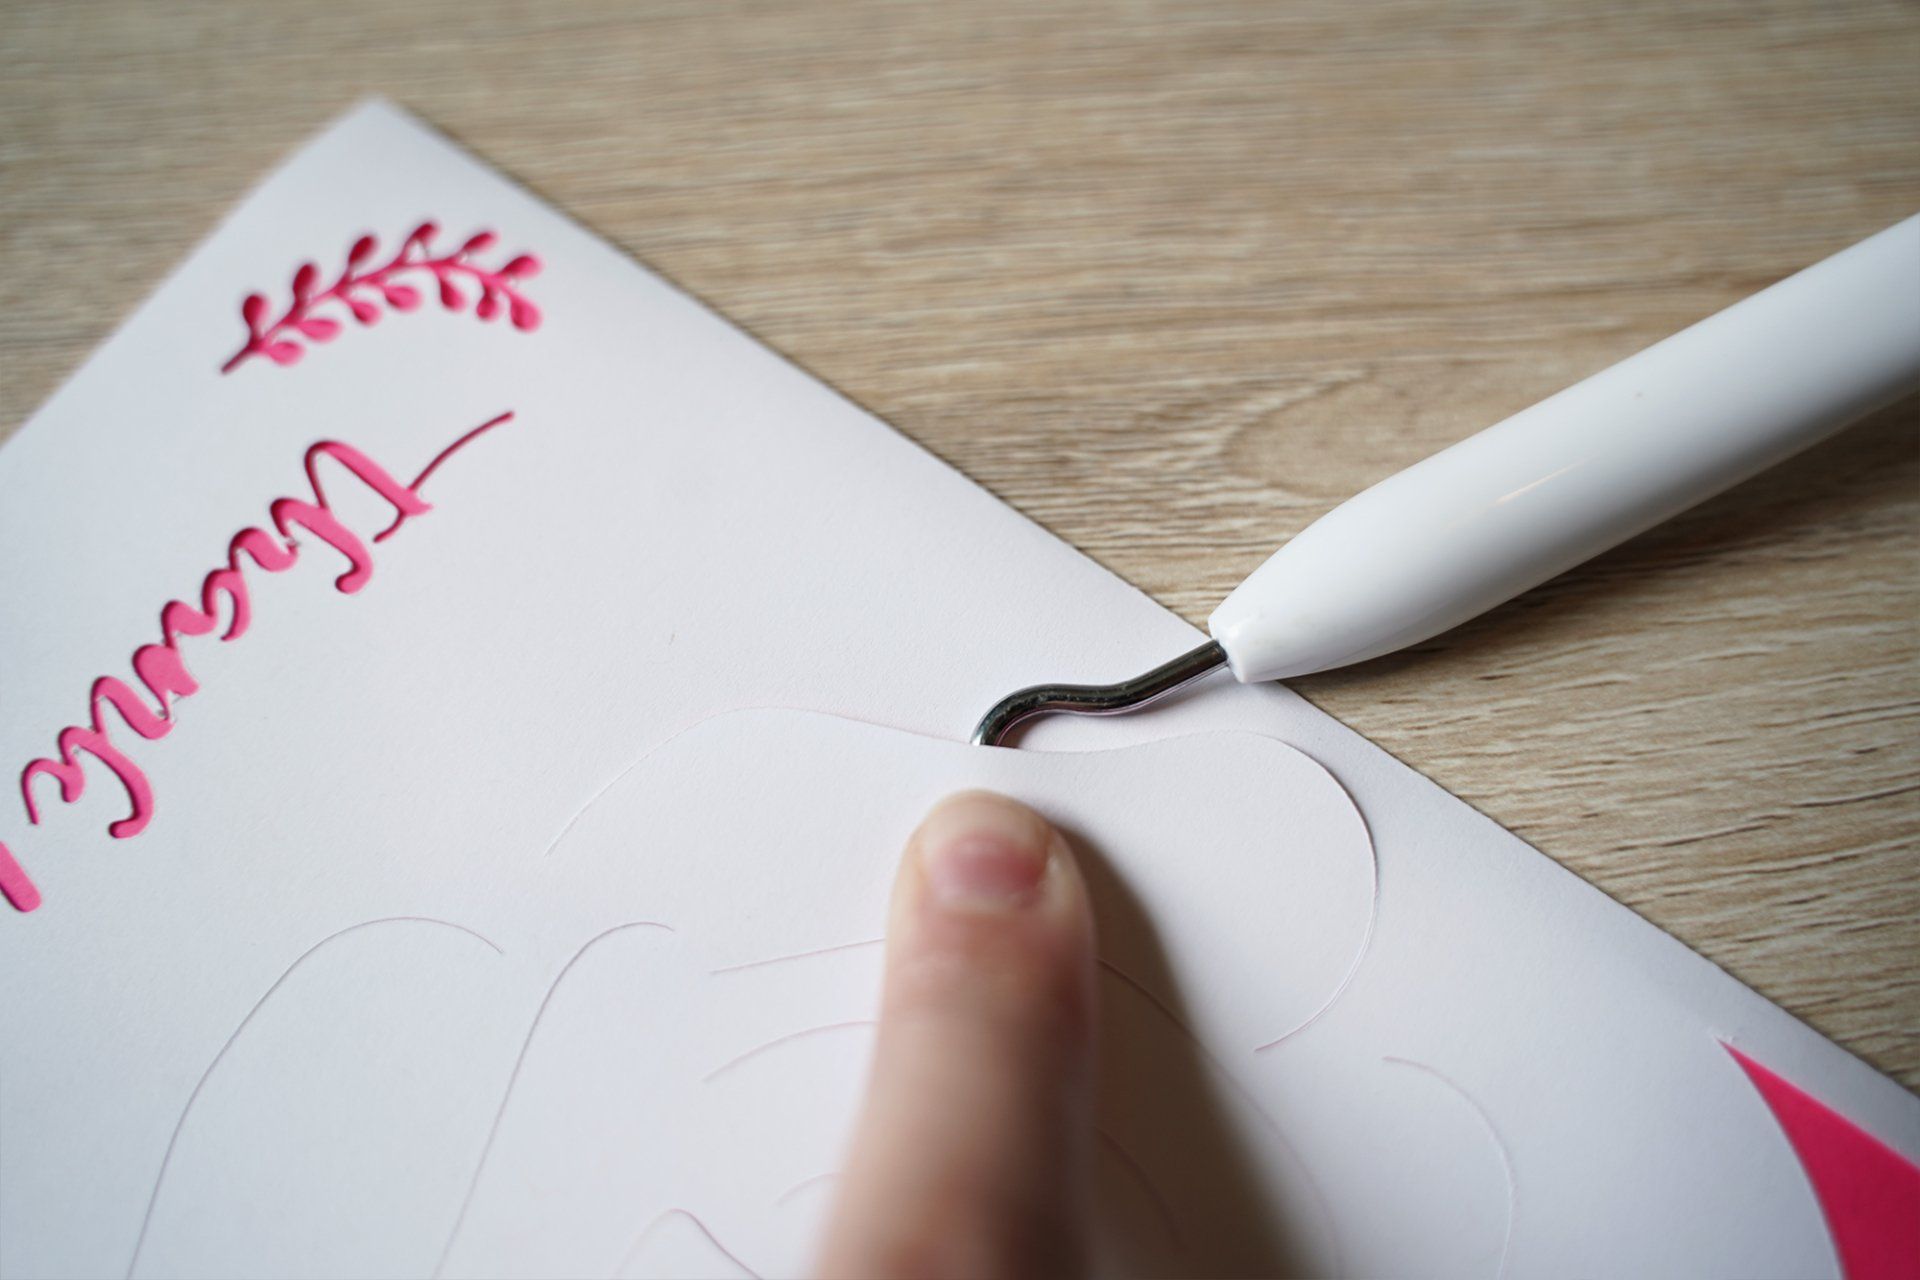
Step 4: Remove & Fold
Once your card is cut out, VERY carefully remove it from the mat. The petals are going to want to rip at the base- don’t let them! I just use my hands to remove the outer edges of the card and then as I get closer to the petals is when I find I need my curved weeding tool to help me lift the narrow parts in between each petal so they don’t tear.
Just take your time, don’t be in a rush and don’t panic if it does rip, cardstock is cheap! You can easily just recycle what is now your first test cut, and load up another sheet onto the mat and cut a fresh one. After all:
There are no
mistakes in crafting,
only unexpected learning opportunities!
Once it’s removed from the mat rip-free, you will want to fold it in half.
If you like a super crisp fold like me, you can fold it in half and then use your scraper tool on the fold, pressing down and running it up and down the crease to really crimp it down. I run my scraper tool across the card’s crease on the back just in case any grip mat gunk is hanging around on my scraper and decides to come off on my card, I’d rather any sort of smudge be super subtle on the back versus at all visible on the front:
Step 5: Add your Colored Insert
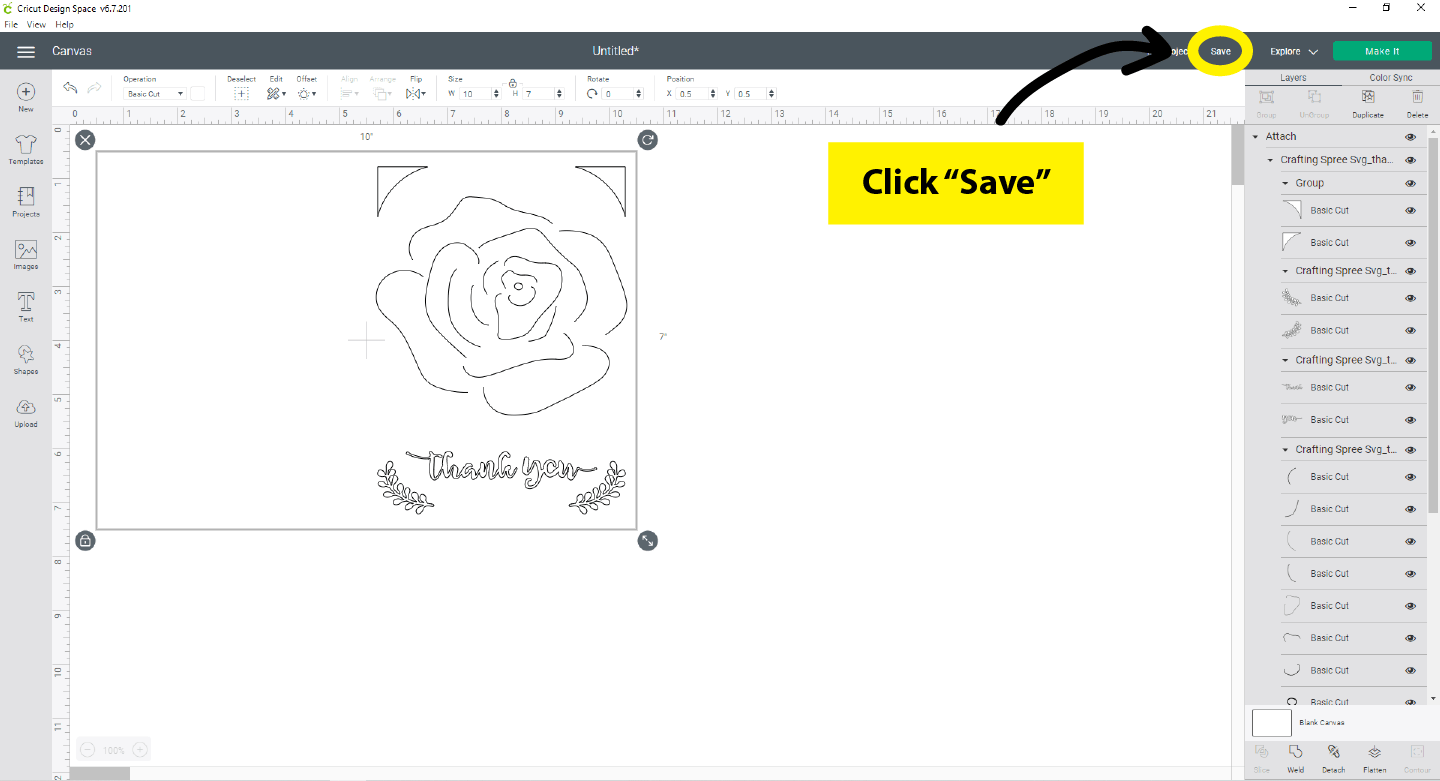
This step IS optional, you definitely can make this card without adding an insert, but it’ll be harder to read and to see the beautiful detail you’re about to work decently hard to make pop if there isn’t some or of contrast between our cuts and the card. SO, if you really make the details pop go ahead and head back to Cricut Design Space and we’ll click on “finished” in the bottom right hand corner of the screen and we can delete the card project that's in the project window OR you can save the project to Design Space to access and make again at a later date without needing to go back and hunt for the SVG in your previous Design Space uploads, or on your device.
To save your project, click on “save” in the top right-hand corner of the screen.
Next, give it a name that makes sense to you so you can search for it or at least generally be able to find it in your saved projects later. You can either choose to add it to a collection, or not. If you have a collection this project makes sense in you can go ahead and add it, or if you want to create a new collection click on the plus symbol next to where it says “new collection” then give that collection a name like “cards” and click “create” and then “save”

Now that the card project is saved, go ahead and delete it from our project by selecting it and clicking on the X in the top left-hand corner of the bounding box around the card template and it should disappear.
Once we have our clean slate again we’ll click on “upload” again and repeat the upload process we did for the card in step 2 only this time we’ll upload the Colored Insert SVG. Once you’ve uploaded it and inserted it into the project window, you’ll want to confirm that it’s 4.75” by 6.75” as our card after being folded is a 5x7, and we can go ahead and skip straight to clicking that “Make It” button since this IS a one layer project as it’s literally just a rectangle.
It’ll show you a preview of our rectangle colored insert image and we’ll repeat the same process as we did in step 3, double checking that our settings are the same as when we cut out the card. Once everything looks good, go ahead and load up your mat.
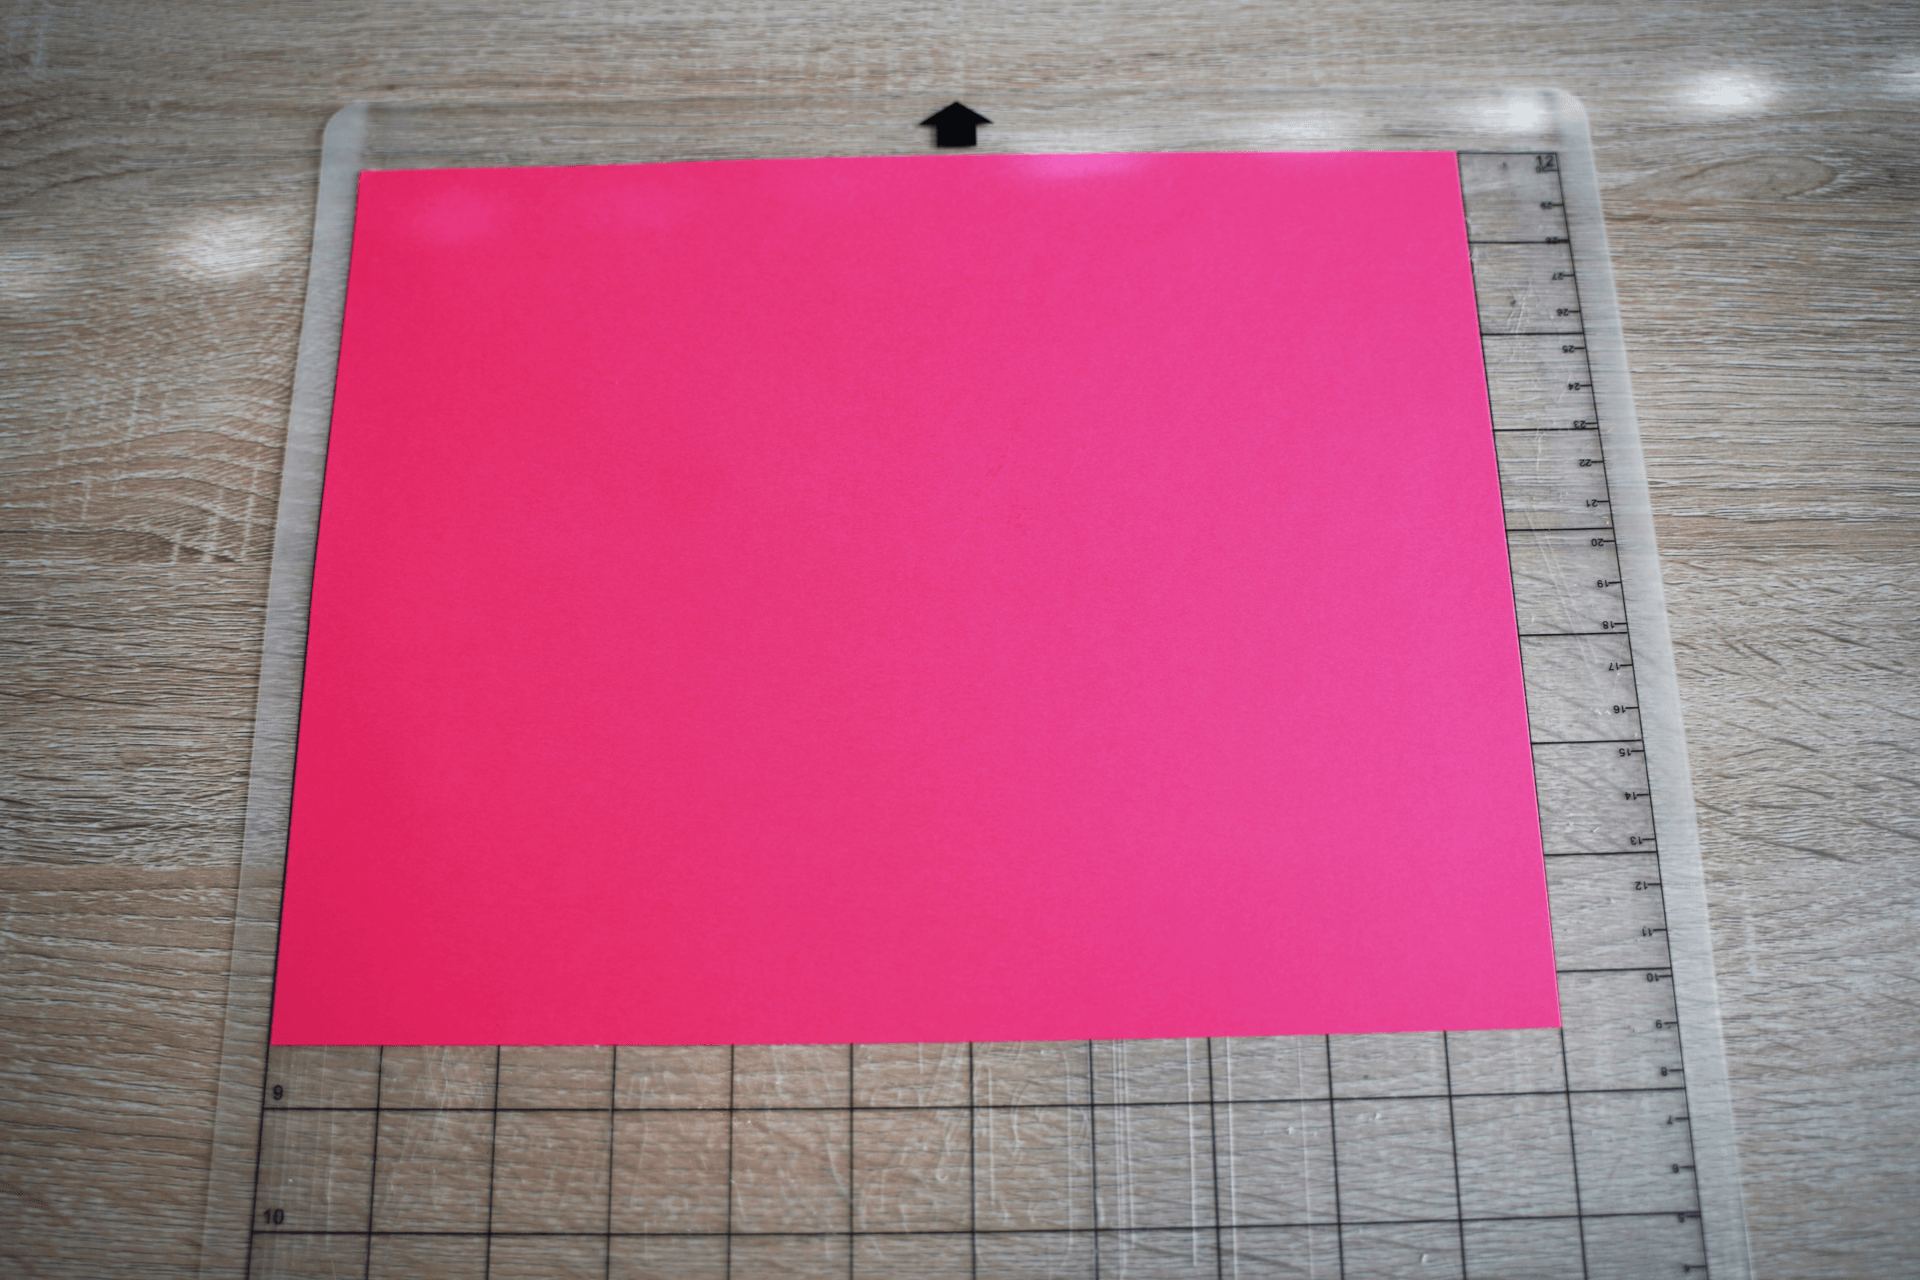
TIP: When using an 8.5” x 11” piece of cardstock for your colored insert, if you orient it landscape on your mat, you will be able to use the leftover scrap to cut out a SECOND colored insert for a future card project BUT if you orient the paper portrait on your grip mat and it cute the colored insert out portrait as well, you will be left with more of an L-shaped scrap that will not be able to have another 4.75”x6.75” rectangle cut out of it later.
SO, if you’re like me and love getting the most for your money and minimizing waste, try to keep in mine the best way to orient your paper on the mat so you’re left with the biggest, most functional scrap. I've found that the more square-like the scrap is, the more opportunities there are to use it for future projects.
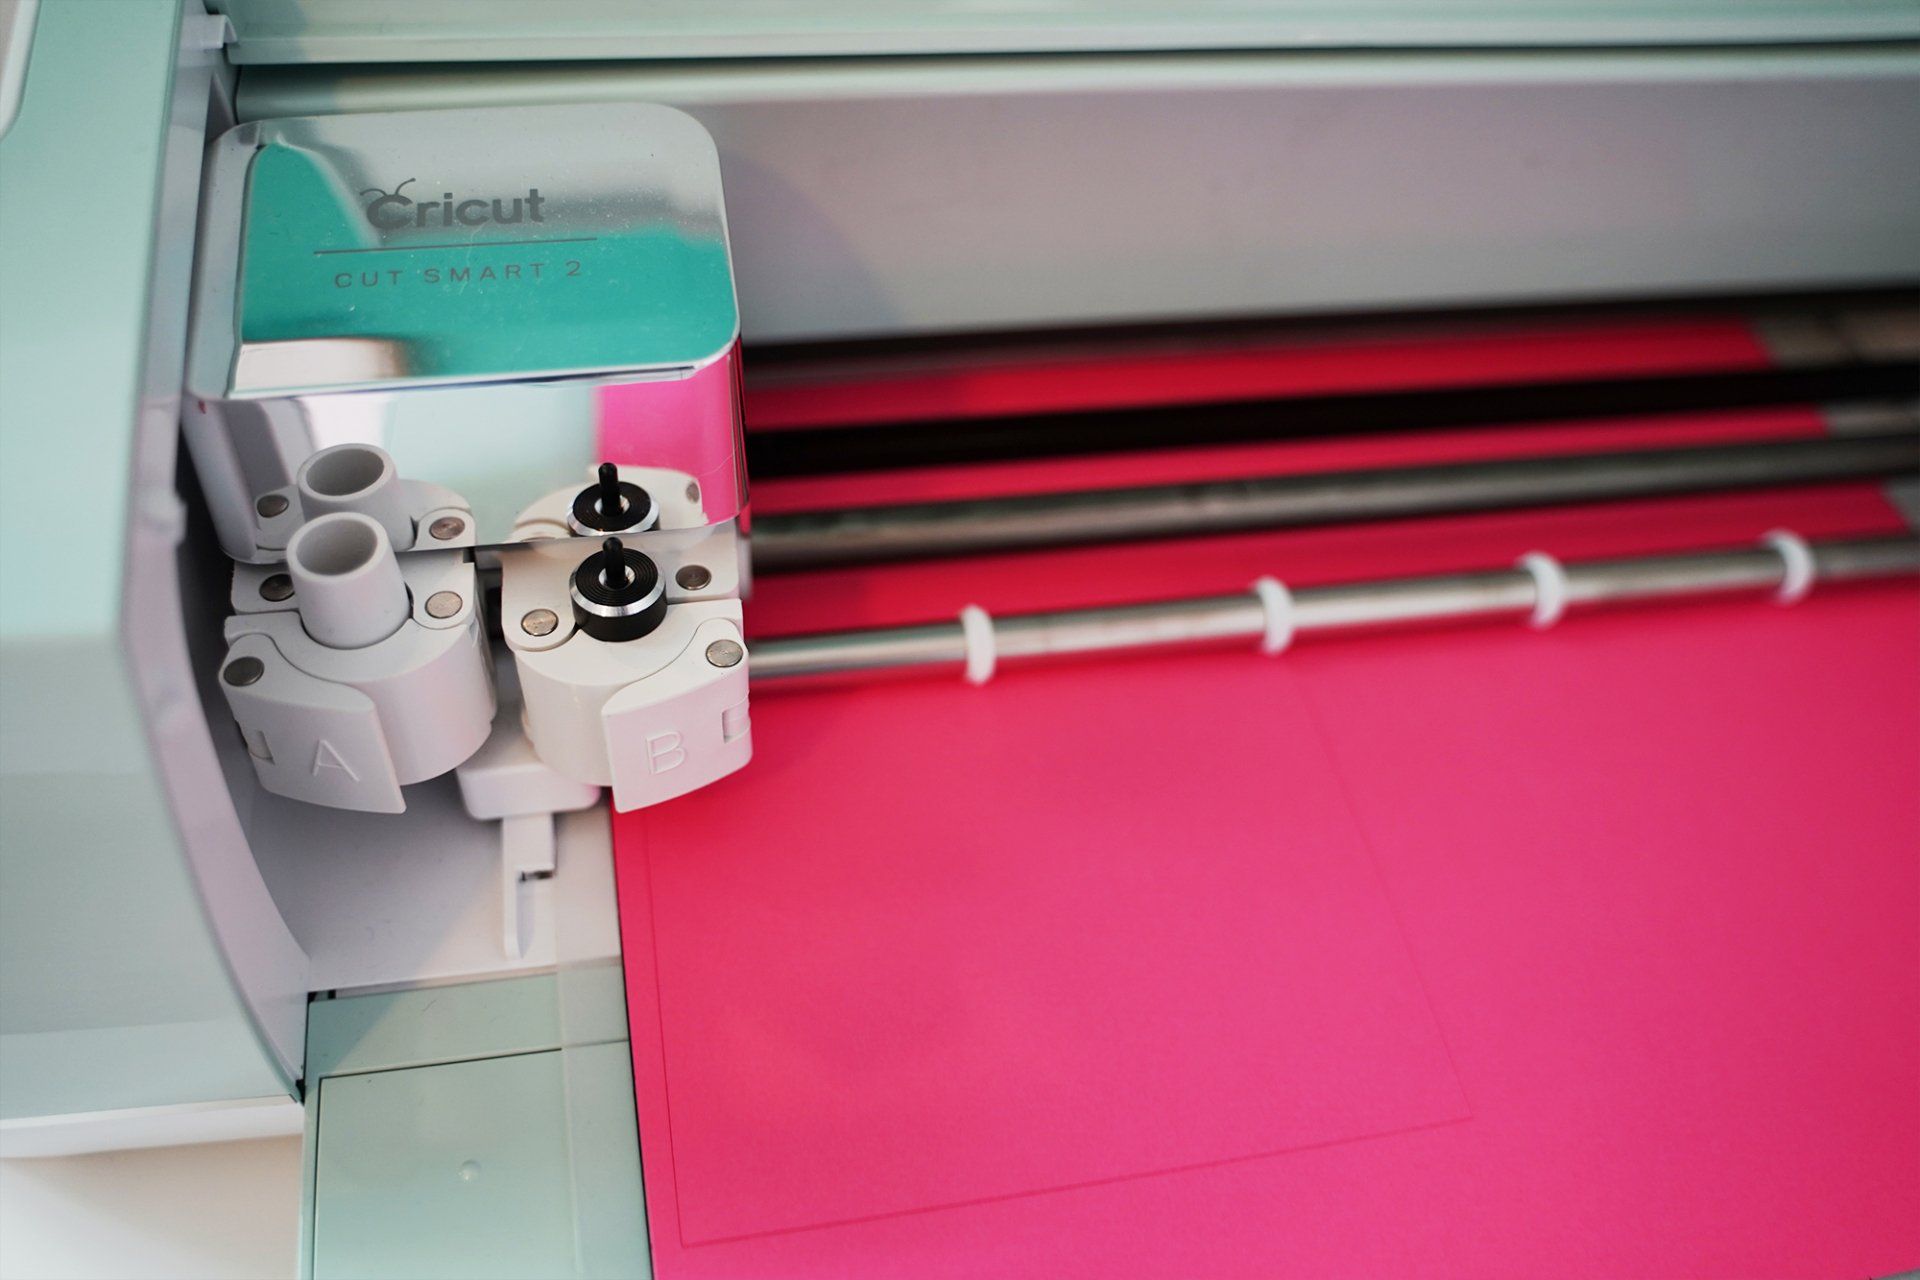
Once your mat is loaded with your colored cardstock you can start the cut job by clicking the flashing Cricut button on your machine and watch it do it’s thing!
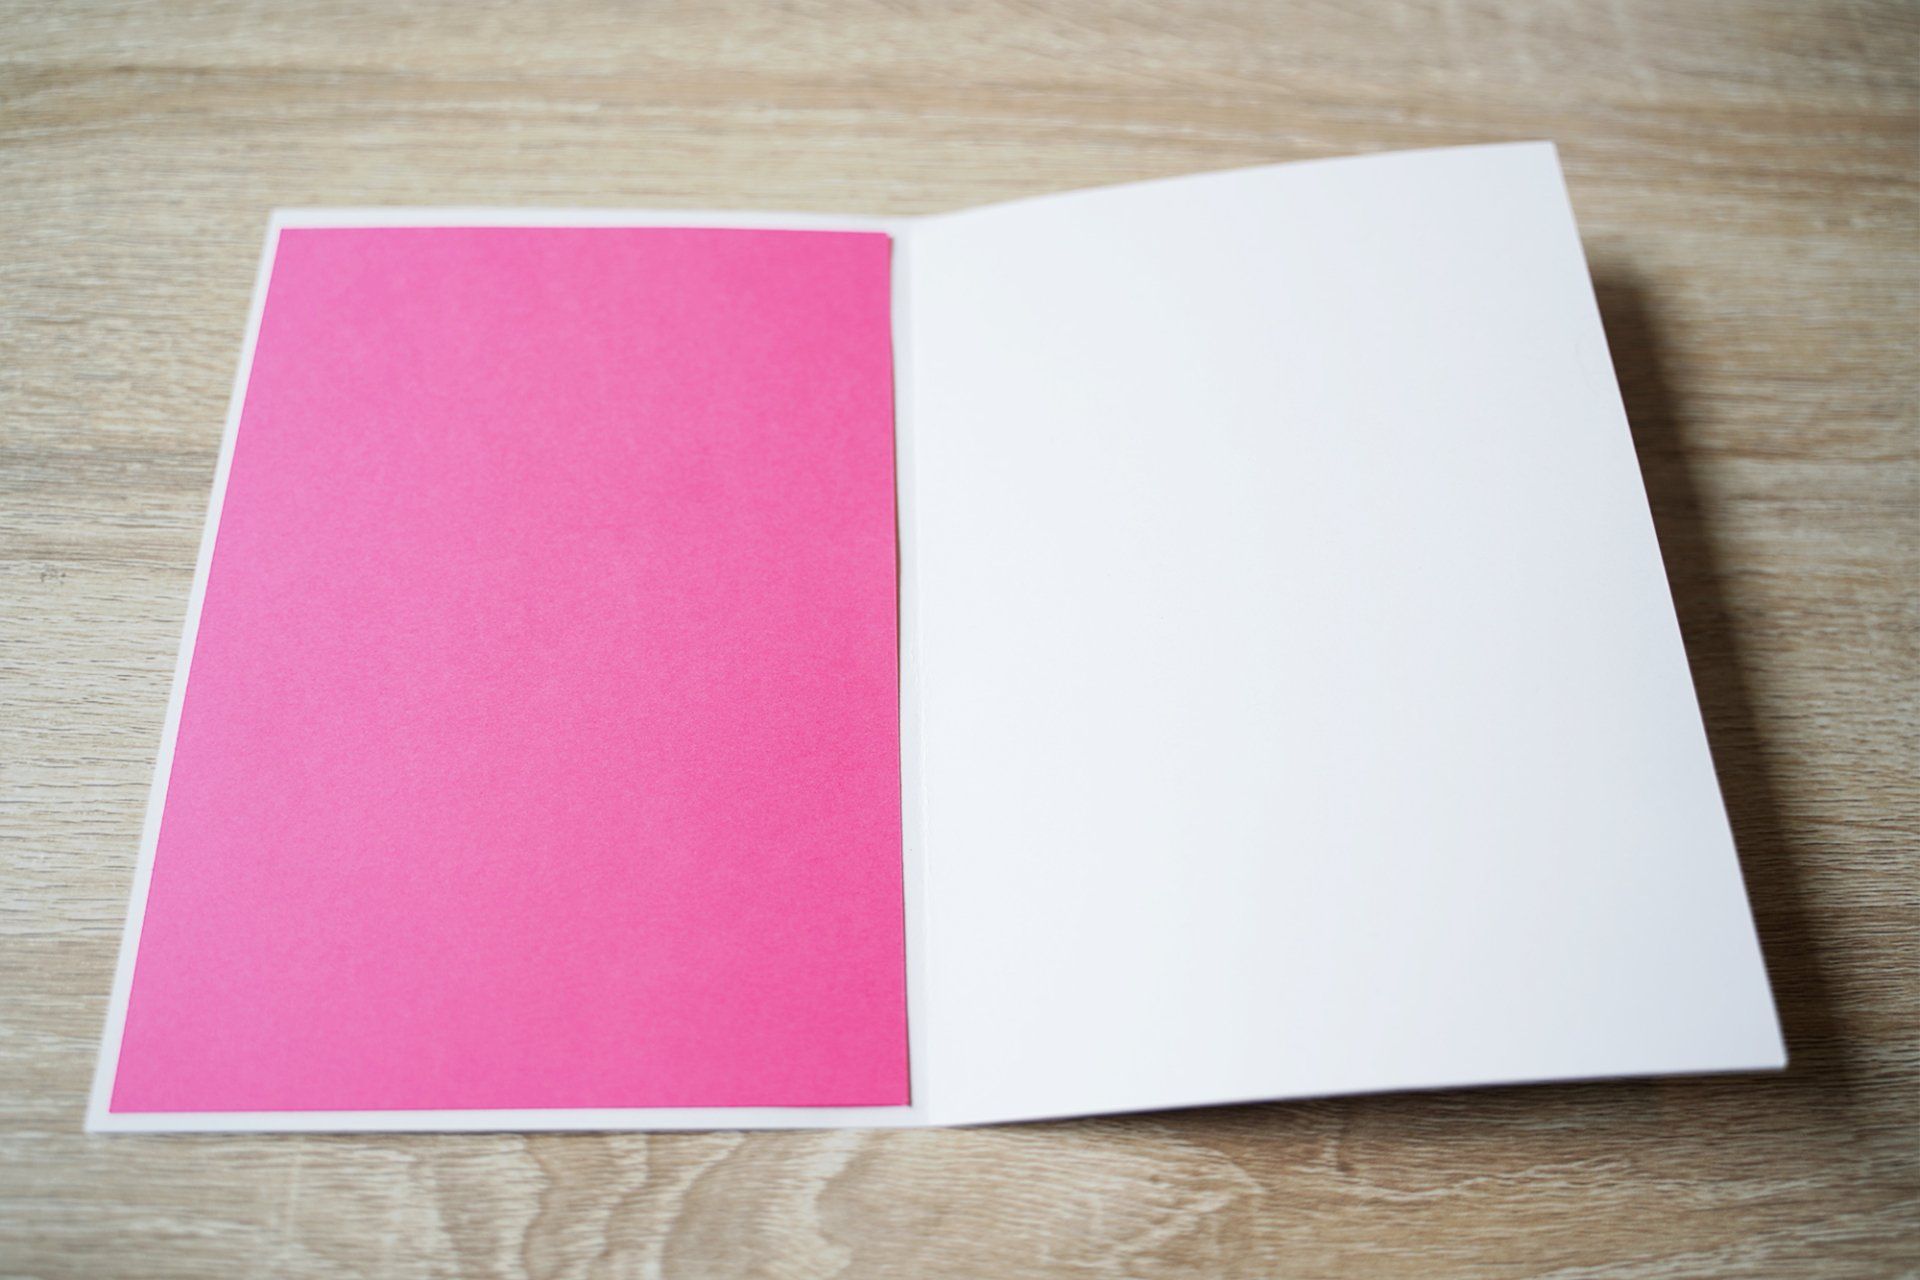
Next, remove it from the mat and grab your white card that should be folded and ready to have that insert put in place. You’ll want to open it up and place some small pieces of double-sided tape around the cut out design, but don’t put them too close to the edge of the card because remember our colored insert is slightly smaller than the cover of our card so it’s not going to reach all the way to the edges and we don’t want any double sided tape left exposed to catch on other parts of our card or collect dust (or cat hair LOL!).
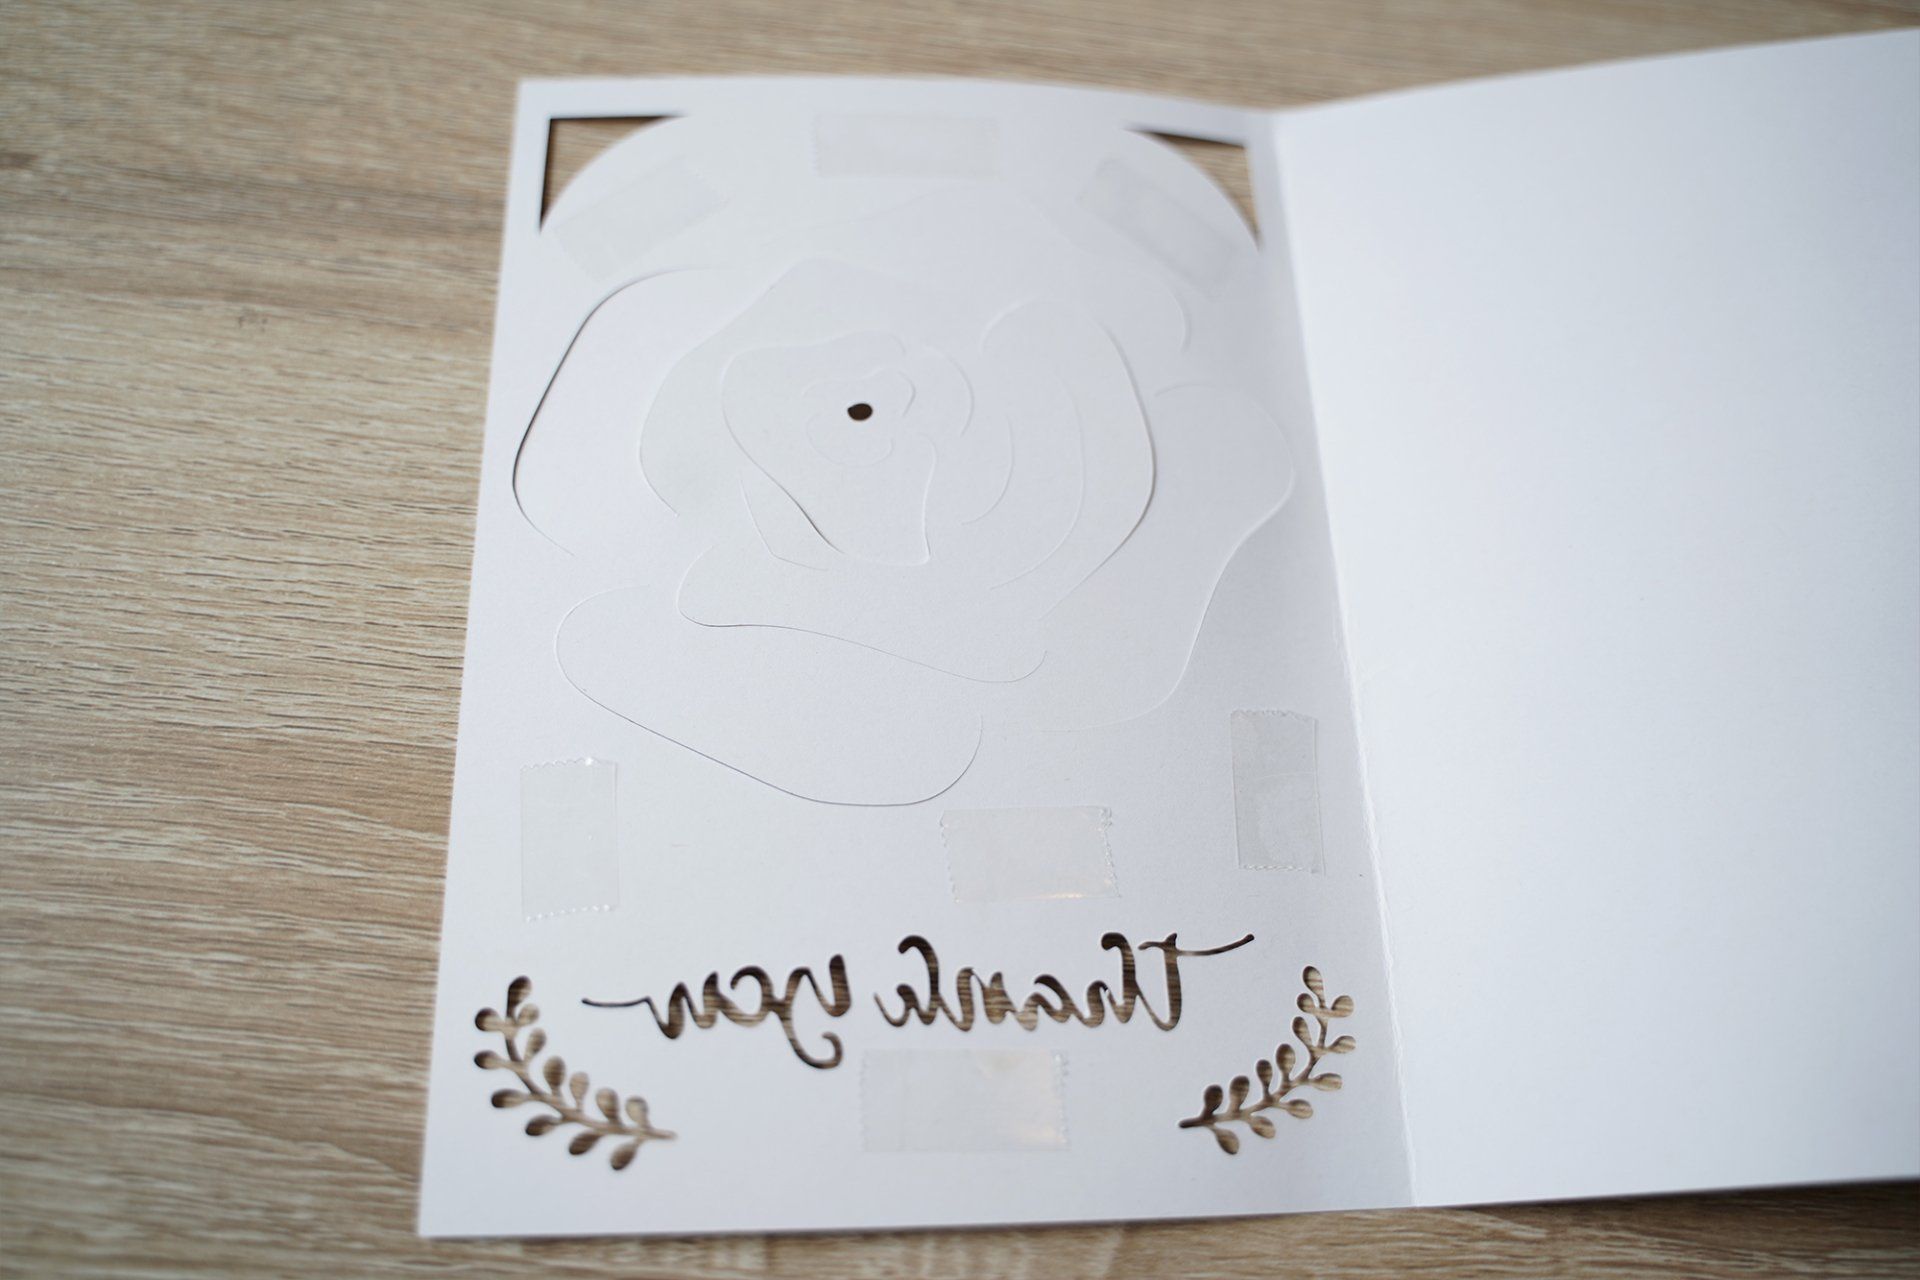
Next, we’ll just line up our colored insert and stick it down! You could also cut out a second insert if you wanted both sides of the card on the inside to be colored, that’s totally up to you! You can do that, or not, they could be the same color, or different- have fun with it! Make it yours!
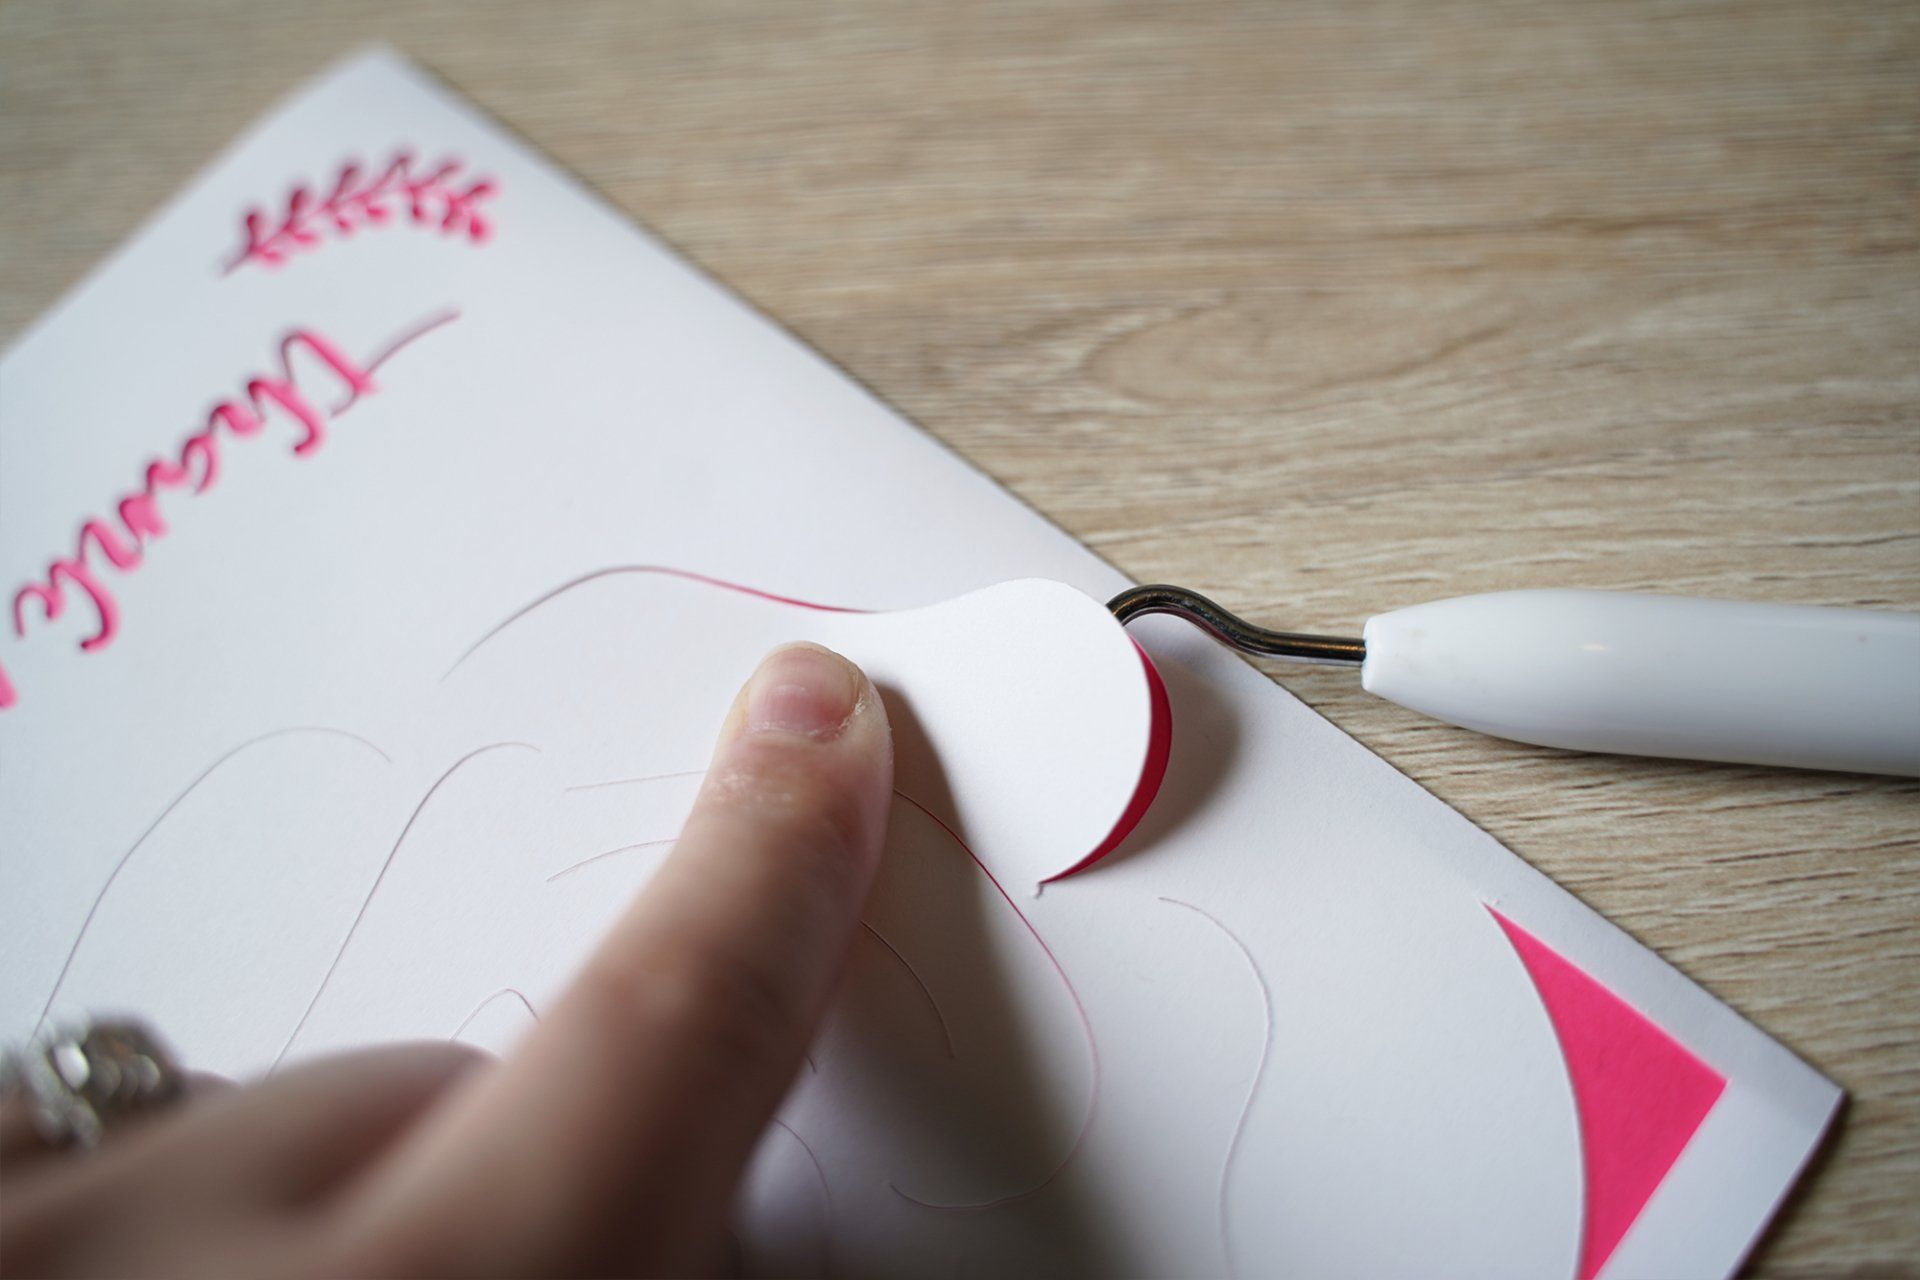
Step 6: Curl Petals!
Once our insert or inserts are placed, it’s time to start curling those petals up! The best way I’ve found to do this is by using this curved Cricut weeding tool:
Use your weeding tool (or makeshift weeding tool if you don’t have one, a straightened out paperclip or a toothpick should work!) And carefully lift the edges of one petal at a time. I found the easiest process was to use one hand to press down on the center of one petal, and use my other hand with the weeding tool to lift up the sides of the petal on either side of my finger so one petal has two curves to it like so:
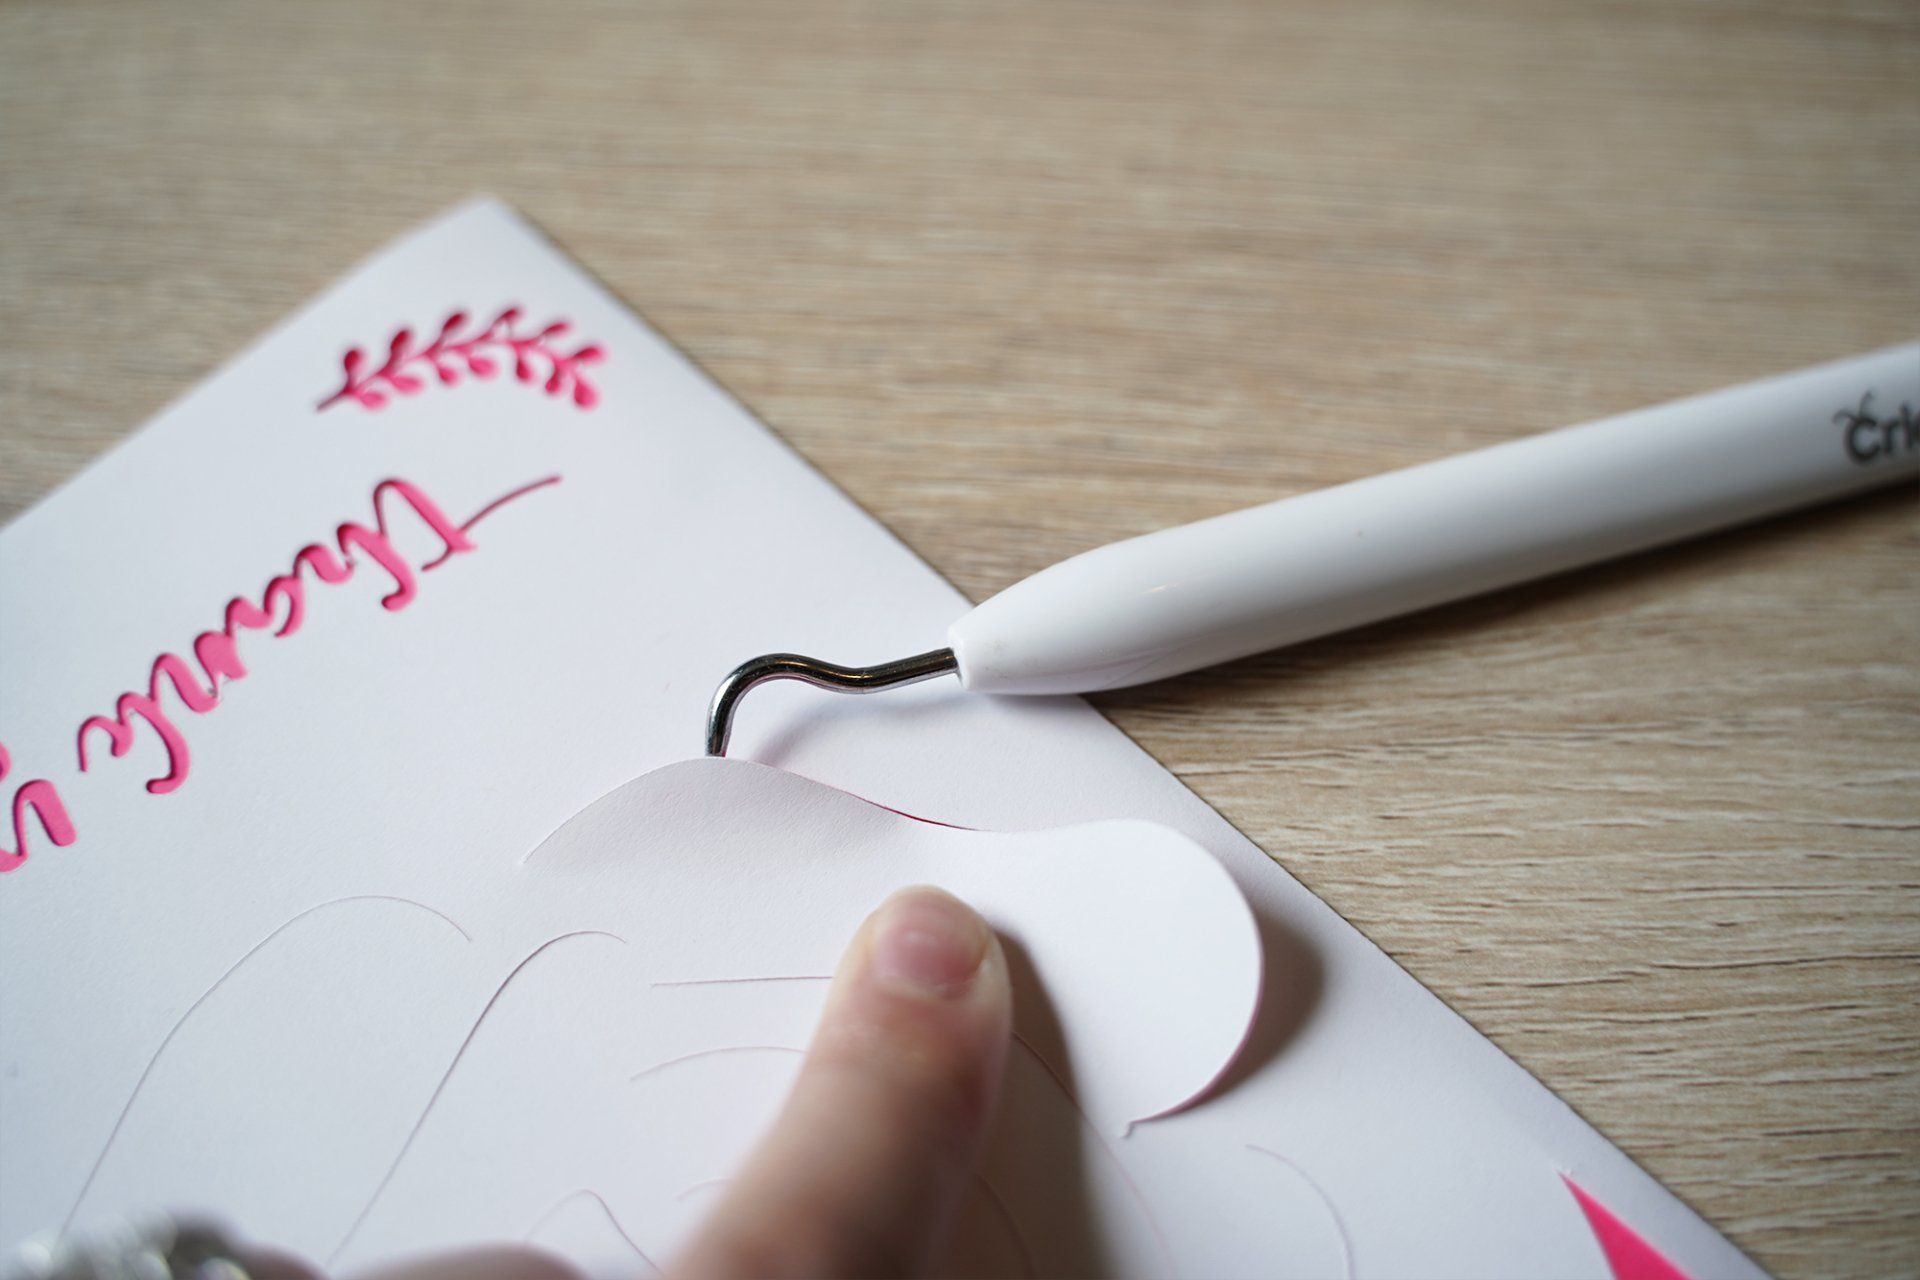
Ultimately, play around with it and see what works for you. In general, the idea is to use a weeding tool to lift the petal from the page and gently curl it without giving it a harsh crease (easier said than done) but I believe in you! You might find that just using your hands and YOLOing it works best for you, try different things and do whatever you like best!
TIP: I found that working from the outer petals in, worked the best for me. When I worked from the inside out, I found myself squishing down the inner petals I had curled first, while trying to curl the outer petals. I found it easier to avoid squishage by starting from the outside and working my way in but again just do what works best for you!
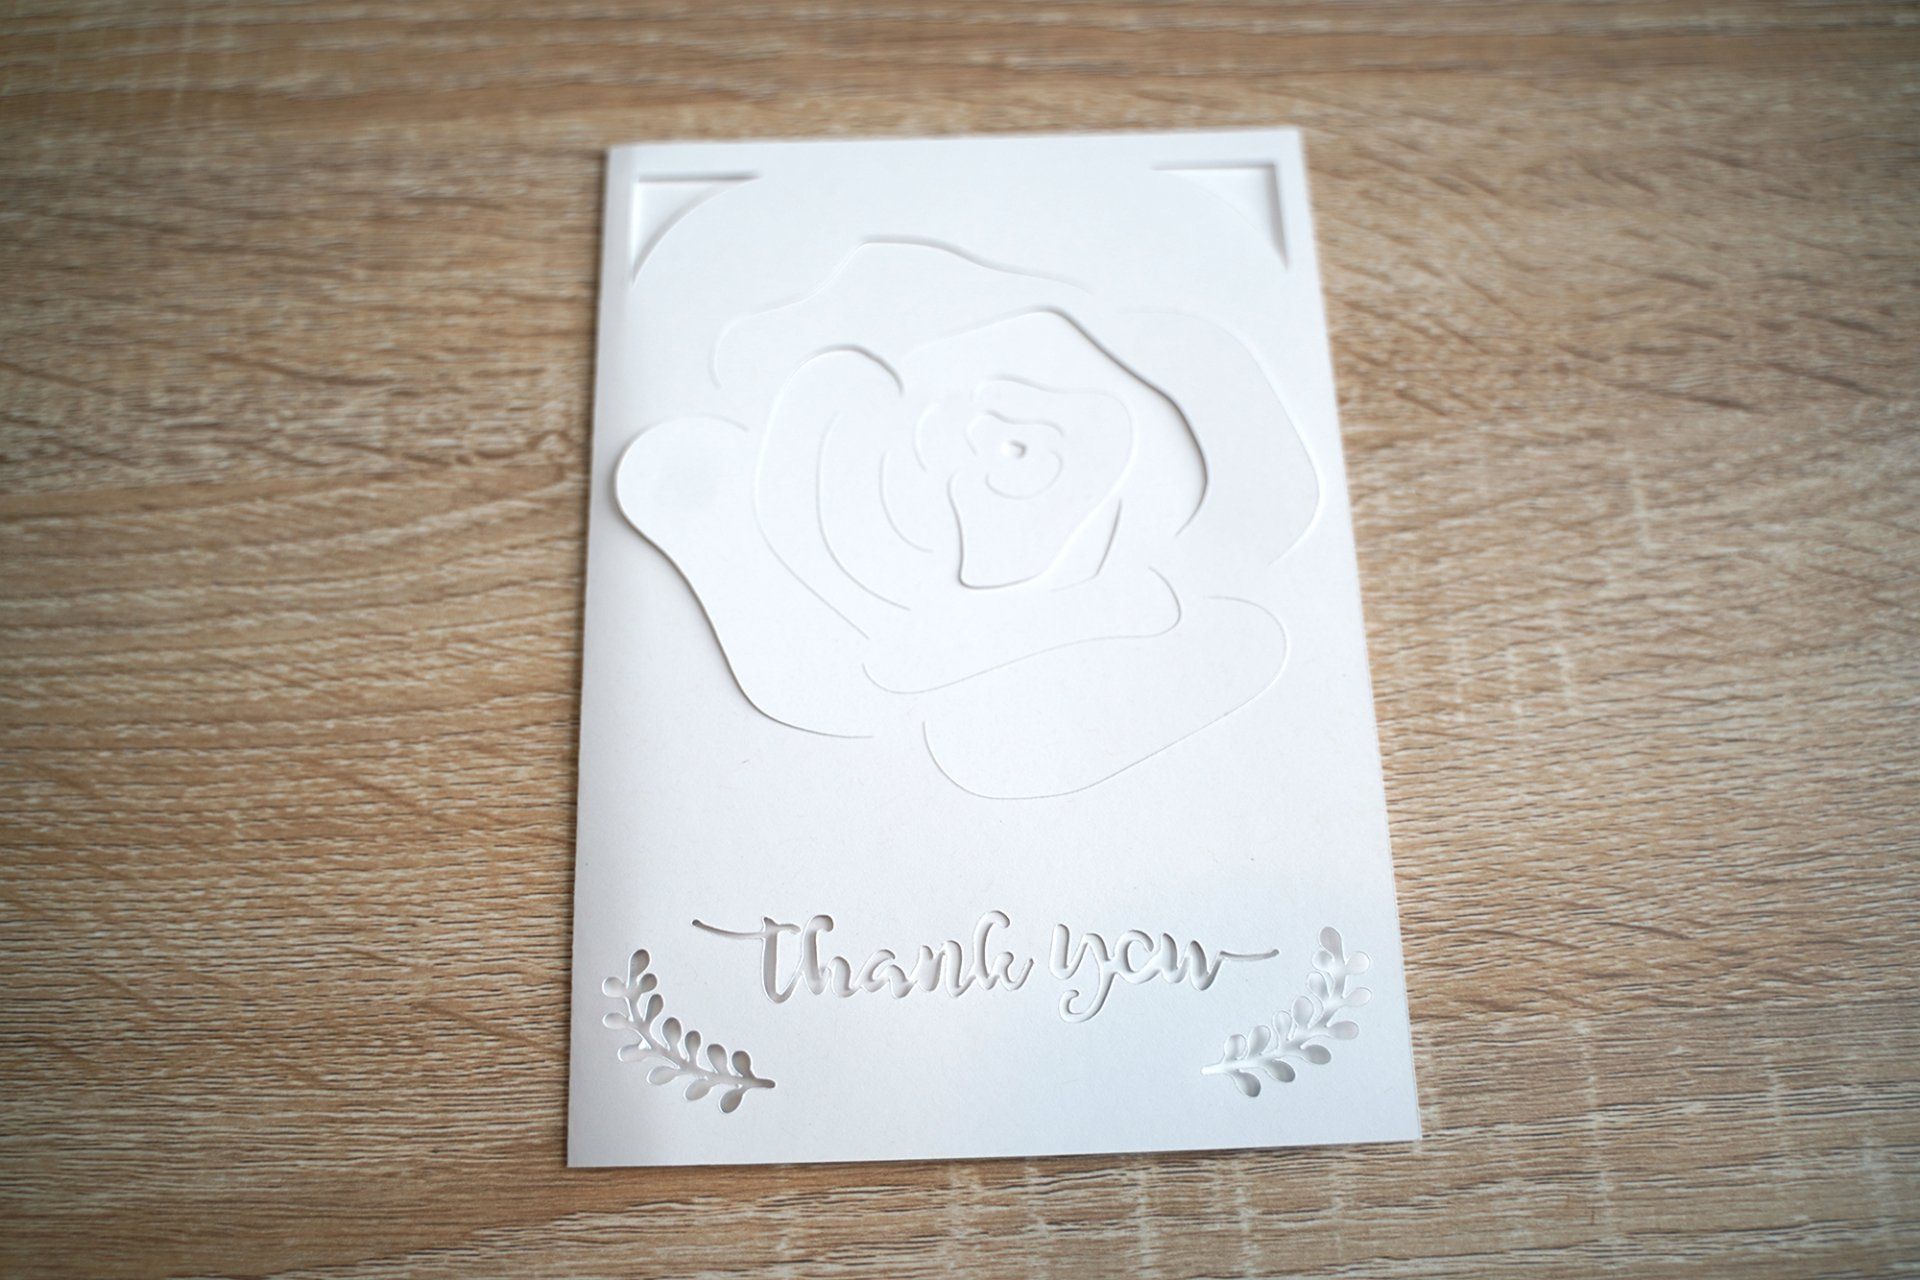
There really is no “right” or “wrong” way to do this but hopefully my process explanation on how I do it helps you figure out at least a good starting process that you can adapt and make work for you! Once your petals are all curled and looking FABULOUS, you’re amazing handmade card is complete! WOOHOO!
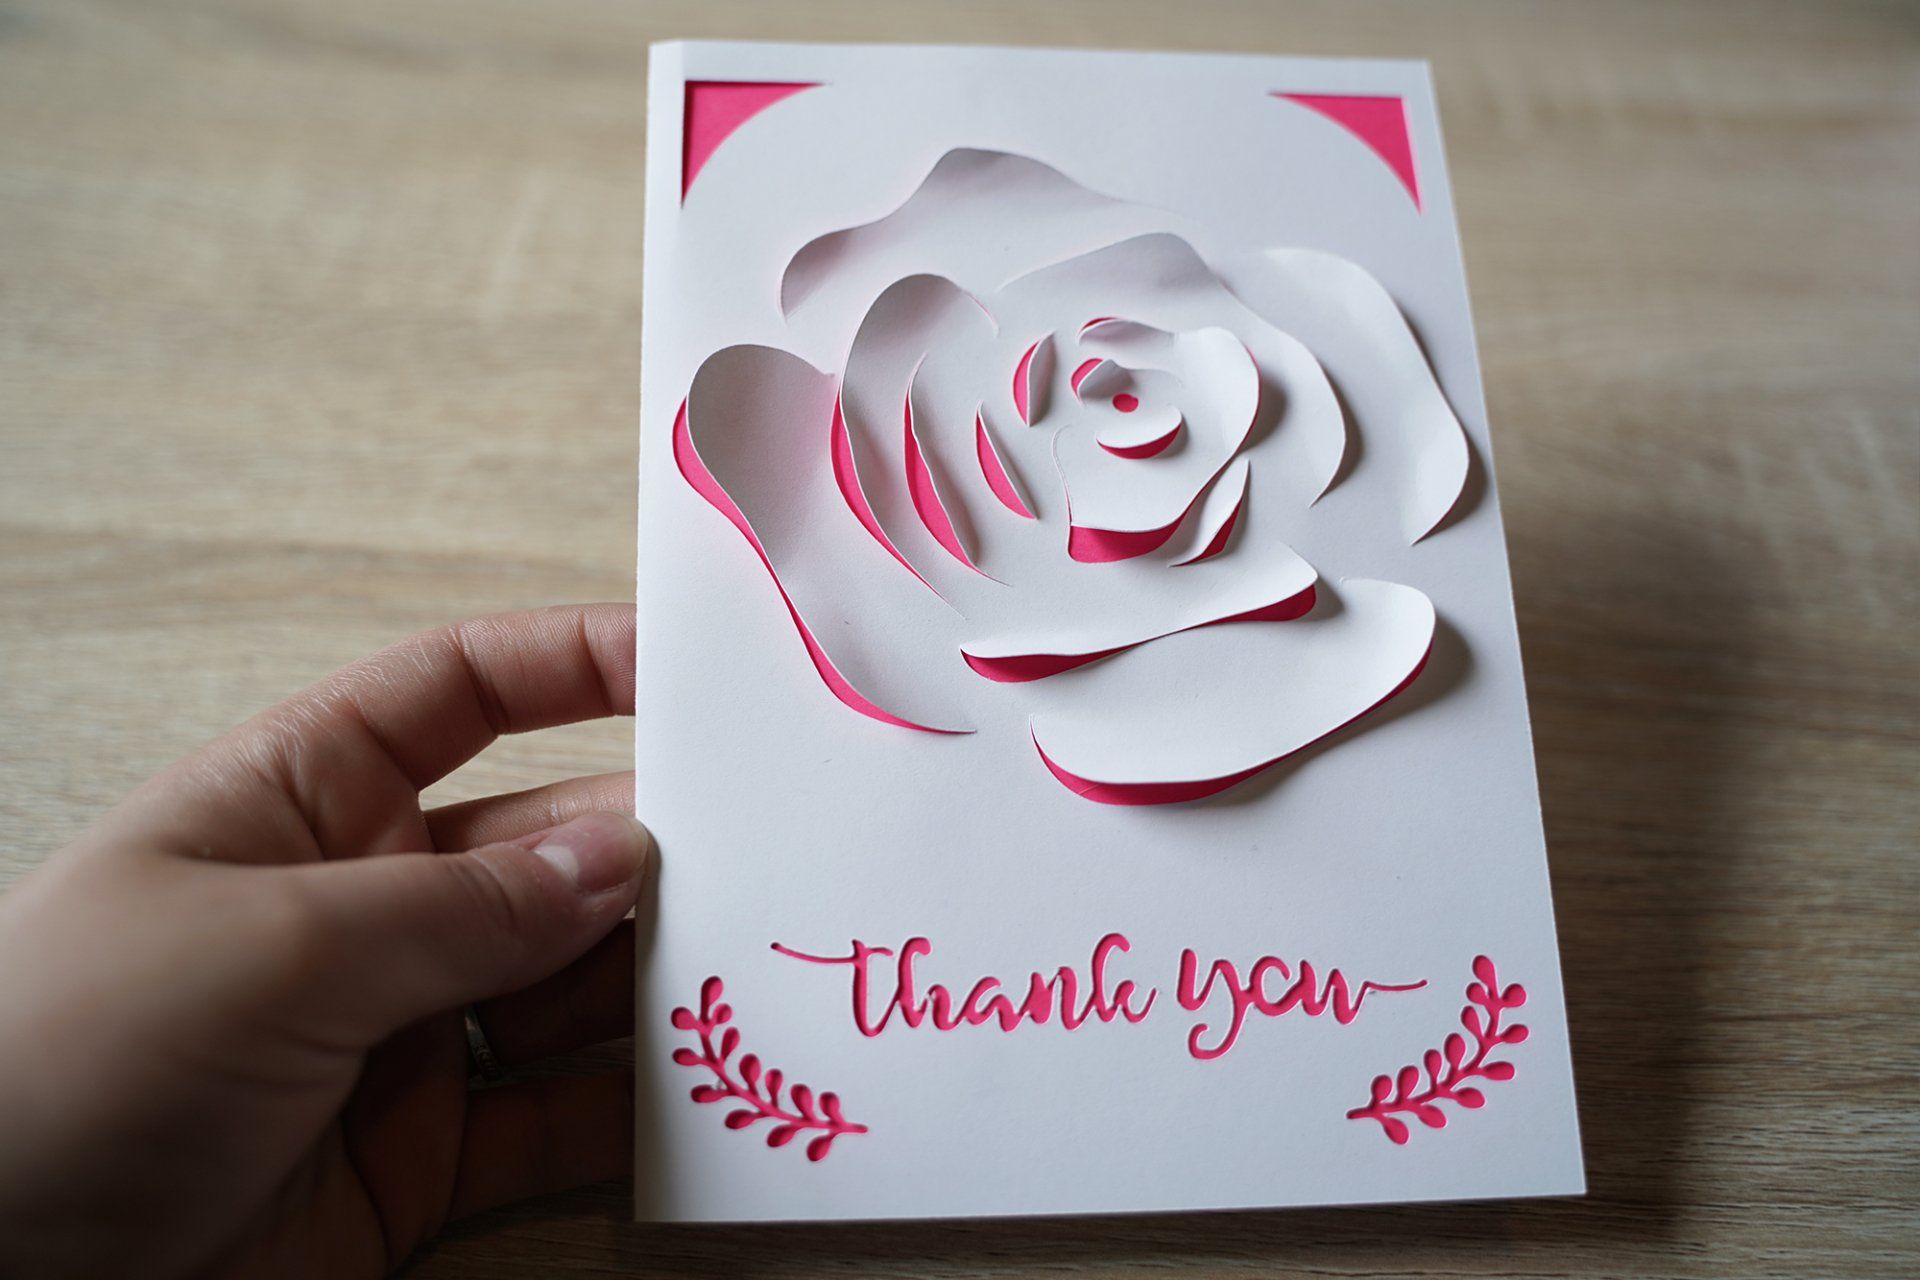
So here’s our finished project, if you enjoyed this project, check out even more awesome designs in our Etsy shop and get 25% off everything by using promo code: CRAFTING SPREE!
Happy Crafting!

Join our Cricut Community
Join our Cricut community on Facebook by joining our Cricut group: Any and All Things Cricut!
Here, you’re more than welcome to post photos of your latest projects, connect with other crafters, share your new Etsy shop, products, other social media accounts and more.
It’s also a wonderful place to share tips and tricks that you’ve learned along the way in your Cricutting adventures, as well as an excellent resource for troubleshooting any Cricut issues and getting answers to any questions you may have. What better place to get information and connect, than where all the Cricut crafters are!?
Check out the Crafting Spree blog for more DIY, Crafting & Cricut Resources:
Share this article with your friends & family.