
Free Father’s Day Card (Cricut SVG & Tutorial)
Publish Date:
June 2, 2021
Author:
By Crafting Spree

If you’re looking for a super fun and FREE Cricut Father’s Day card SVG then you’ve found it! Let your dad, grandparent, father of your children, or other amazing father figure in your life know just how great they are with this super fun world’s best dad Father’s Day card! You can also check get 15% off these Father's Day Card SVGs by using promo code: CRAFTINGSPREE15
YOU CAN MAKE THIS CARD WITH ANY CRICUT MACHINE!
It's compatible with the Cricut Joy, Cricut Explore Air Machines, and Cricut Maker Machines!
If you're looking for even more Father's Day ideas check out the Ultimate Guide to Cricut Father's Day Gift Ideas and see what fun ideas YOU can create for Father's Day this year!
Video Tutorial:
**You may use these SVGs for
personal use only. Commercial use of these files is strictly prohibited. Digital reselling, sharing, redistributing of the files is strictly prohibited. In order to share, use the direct URL to this page.**
In addition to this awesome Cricut cut SVG being free, you can also make it with ANY of the Cricut machines! Its small size is compatible with the Cricut Joy as long as you have the card mat (if not, you might just need to scale the card and card insert down a tad so you can cut it on the regular mat but I highly suggest getting the card mat if you don’t have it already! It’s super cheap and allows you to cut larger cards on the Cricut Joy than you’d be able to with the regular mat. You also don’t need to buy the Cricut Joy cards and card inserts to make cards with the Cricut Joy or with the Cricut Joy card mat, you can just down your own cardstock cards and inserts! More on that below!)
You may use these SVGs for
personal use only. Commercial use of these files is strictly prohibited. Digital reselling, sharing, redistributing of the files is strictly prohibited. In order to share, use the direct URL to this page.
Supplies:
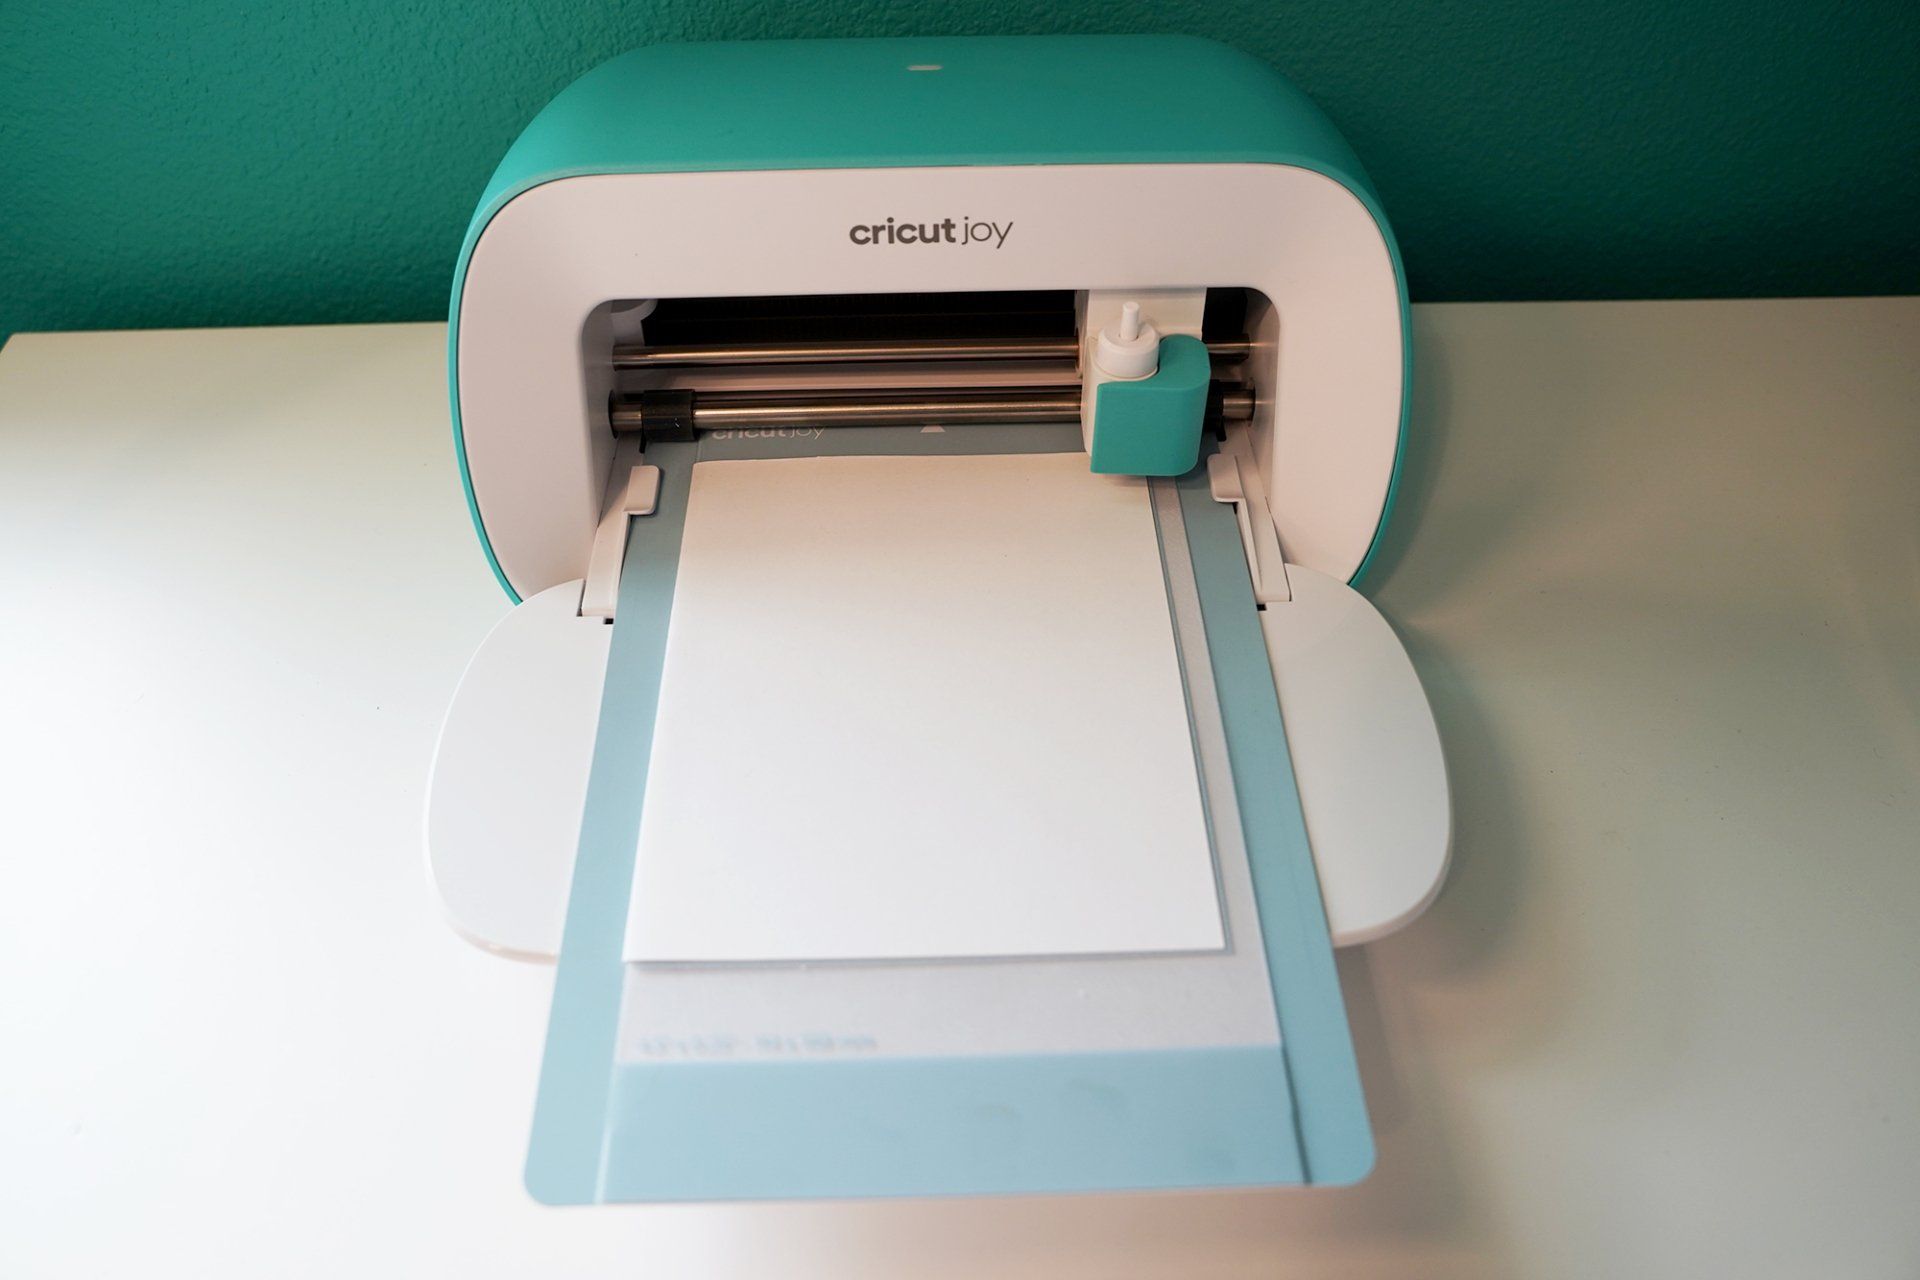
If Using The Cricut Joy:
- Cricut Joy
- Fine Point or Deep Cut Blade
- Cricut Joy Pre-Folded Cards (optional, you can always make your own)
- Cricut Joy Insert Card (optional, you can always make your own)
- Cricut Joy
Card Mat
If Using An Explore Or Maker Machine:
- Cricut Explore Air or Maker Machine
- Fine Point or Deep Cut Blade
- Standard Grip Mat
- Cardstock Paper
- Cricut Joy Insert Card
(optional, you can always make your own)
Step 1: Download the SVG
Download this free Cricut Father’s Day card SVG above. Once you have the proper files downloaded (you will need the “card insert” SVG and the “card template” for whichever machine you will be using), go ahead and open up Cricut Design Space and open up a brand new project:

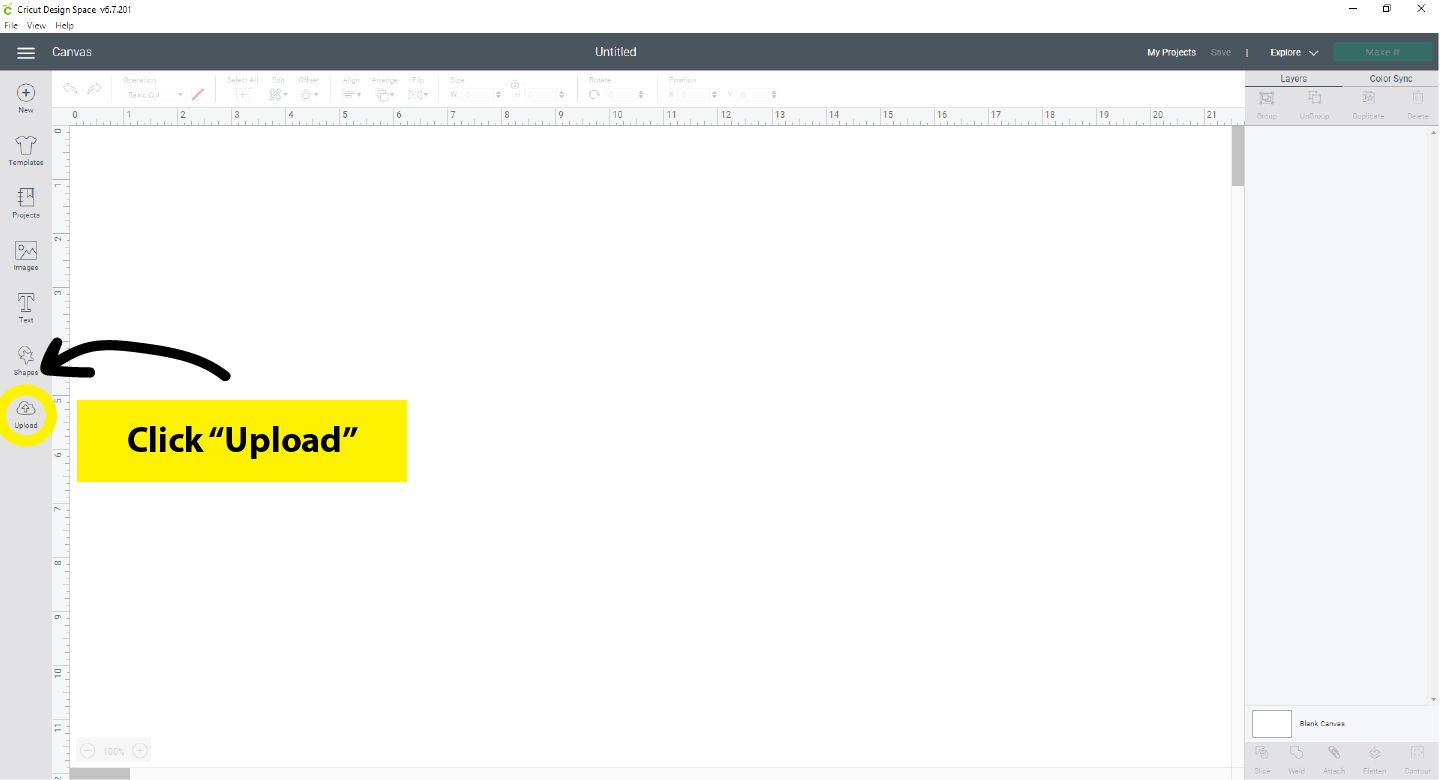
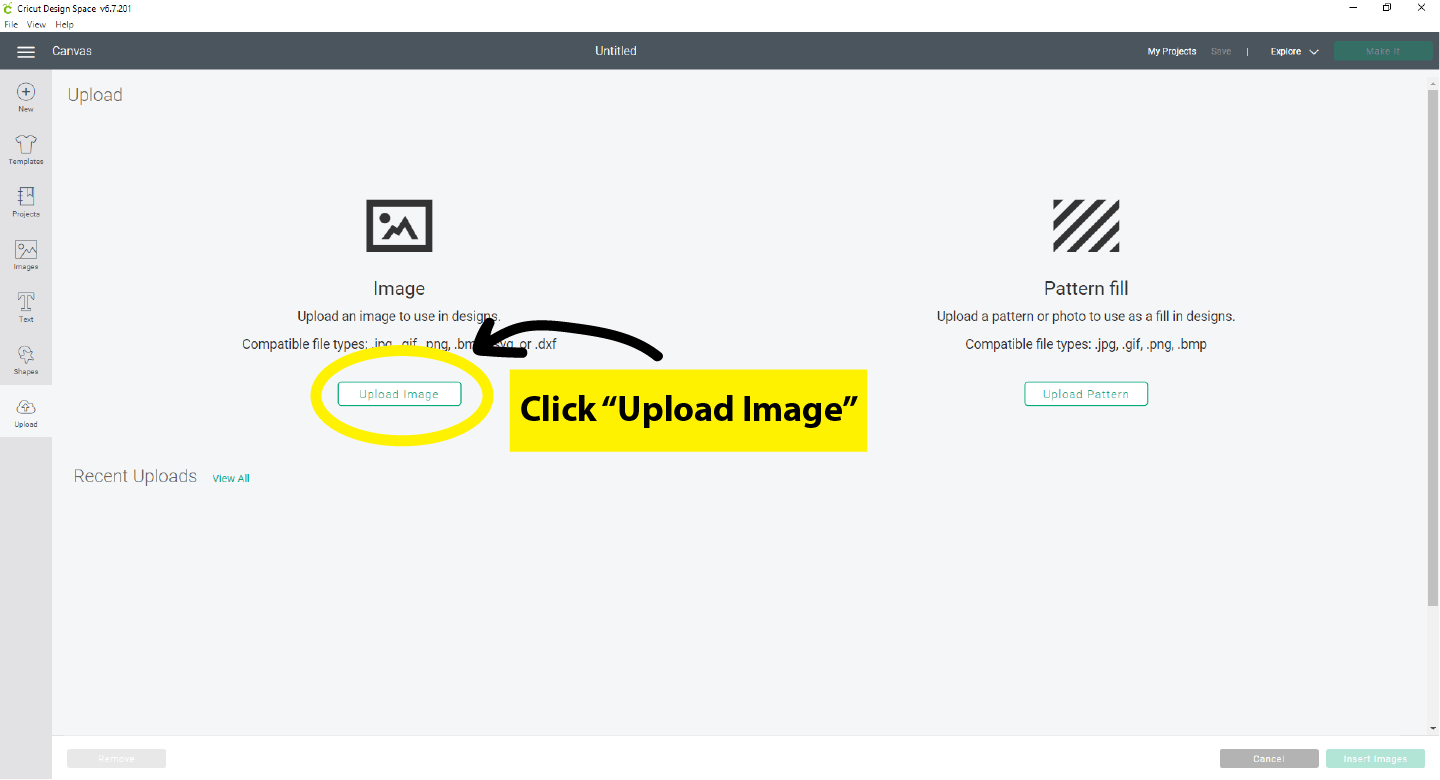
Step 2: Upload the SVGs
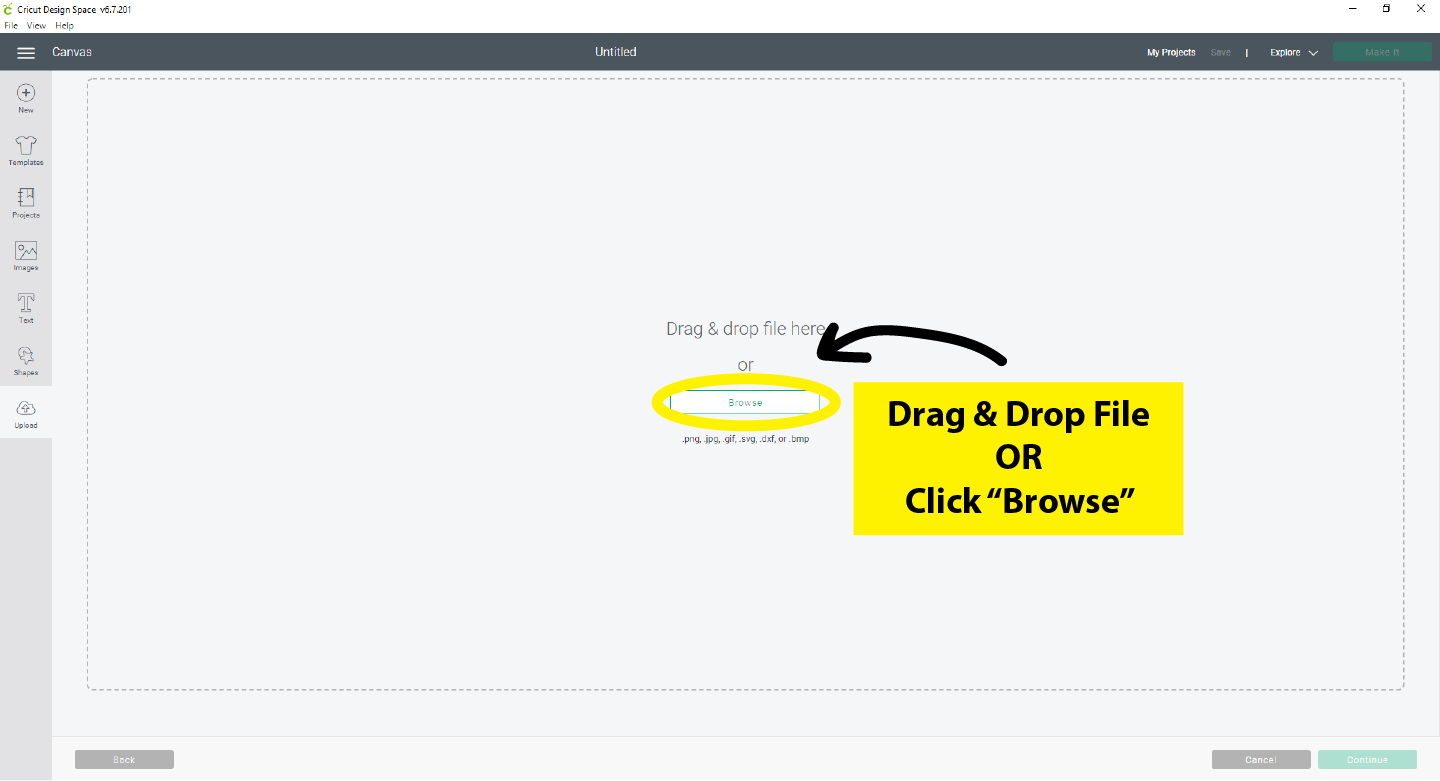
With our new project window open in Cricut Design Space, we’ll click “upload” and then it will take you to a new screen where we’ll “upload image” and either drag and drop our SVGs into Design Space, or click on “browse” to locate your files from where you downloaded them to your device initially.
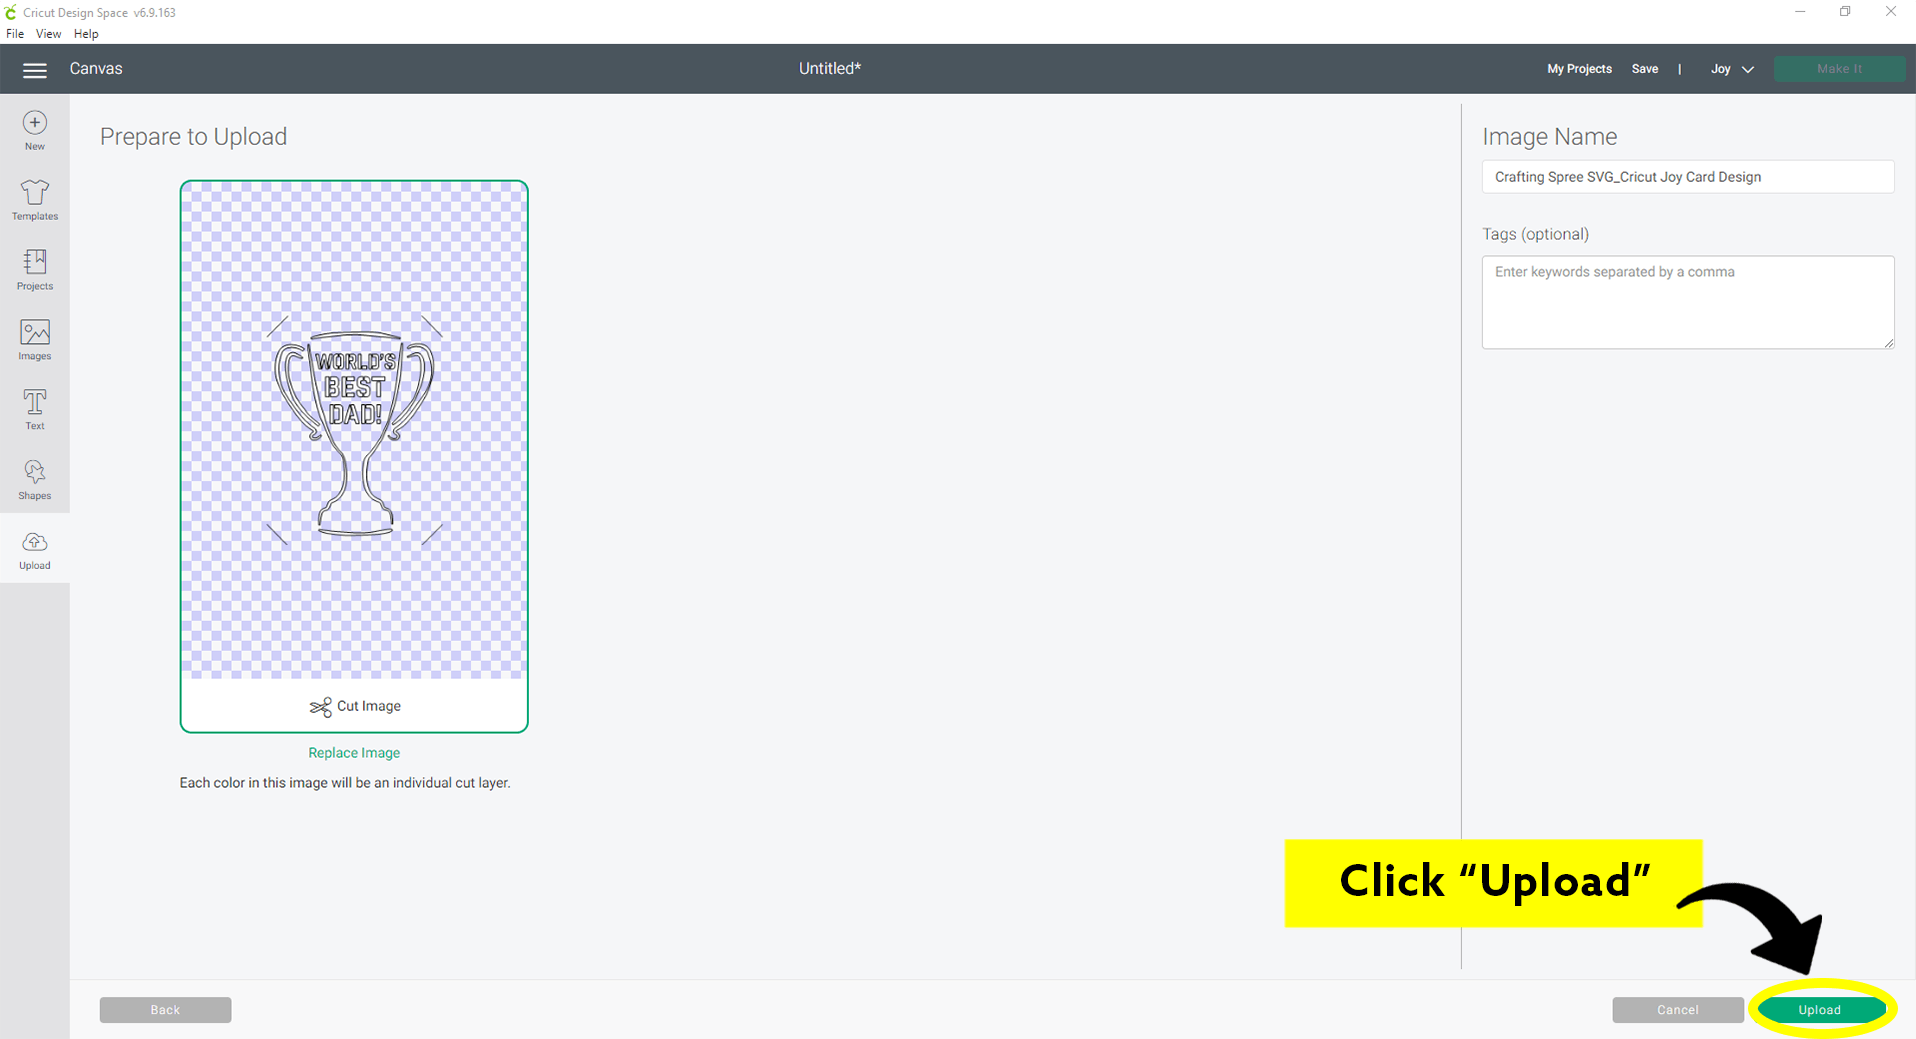
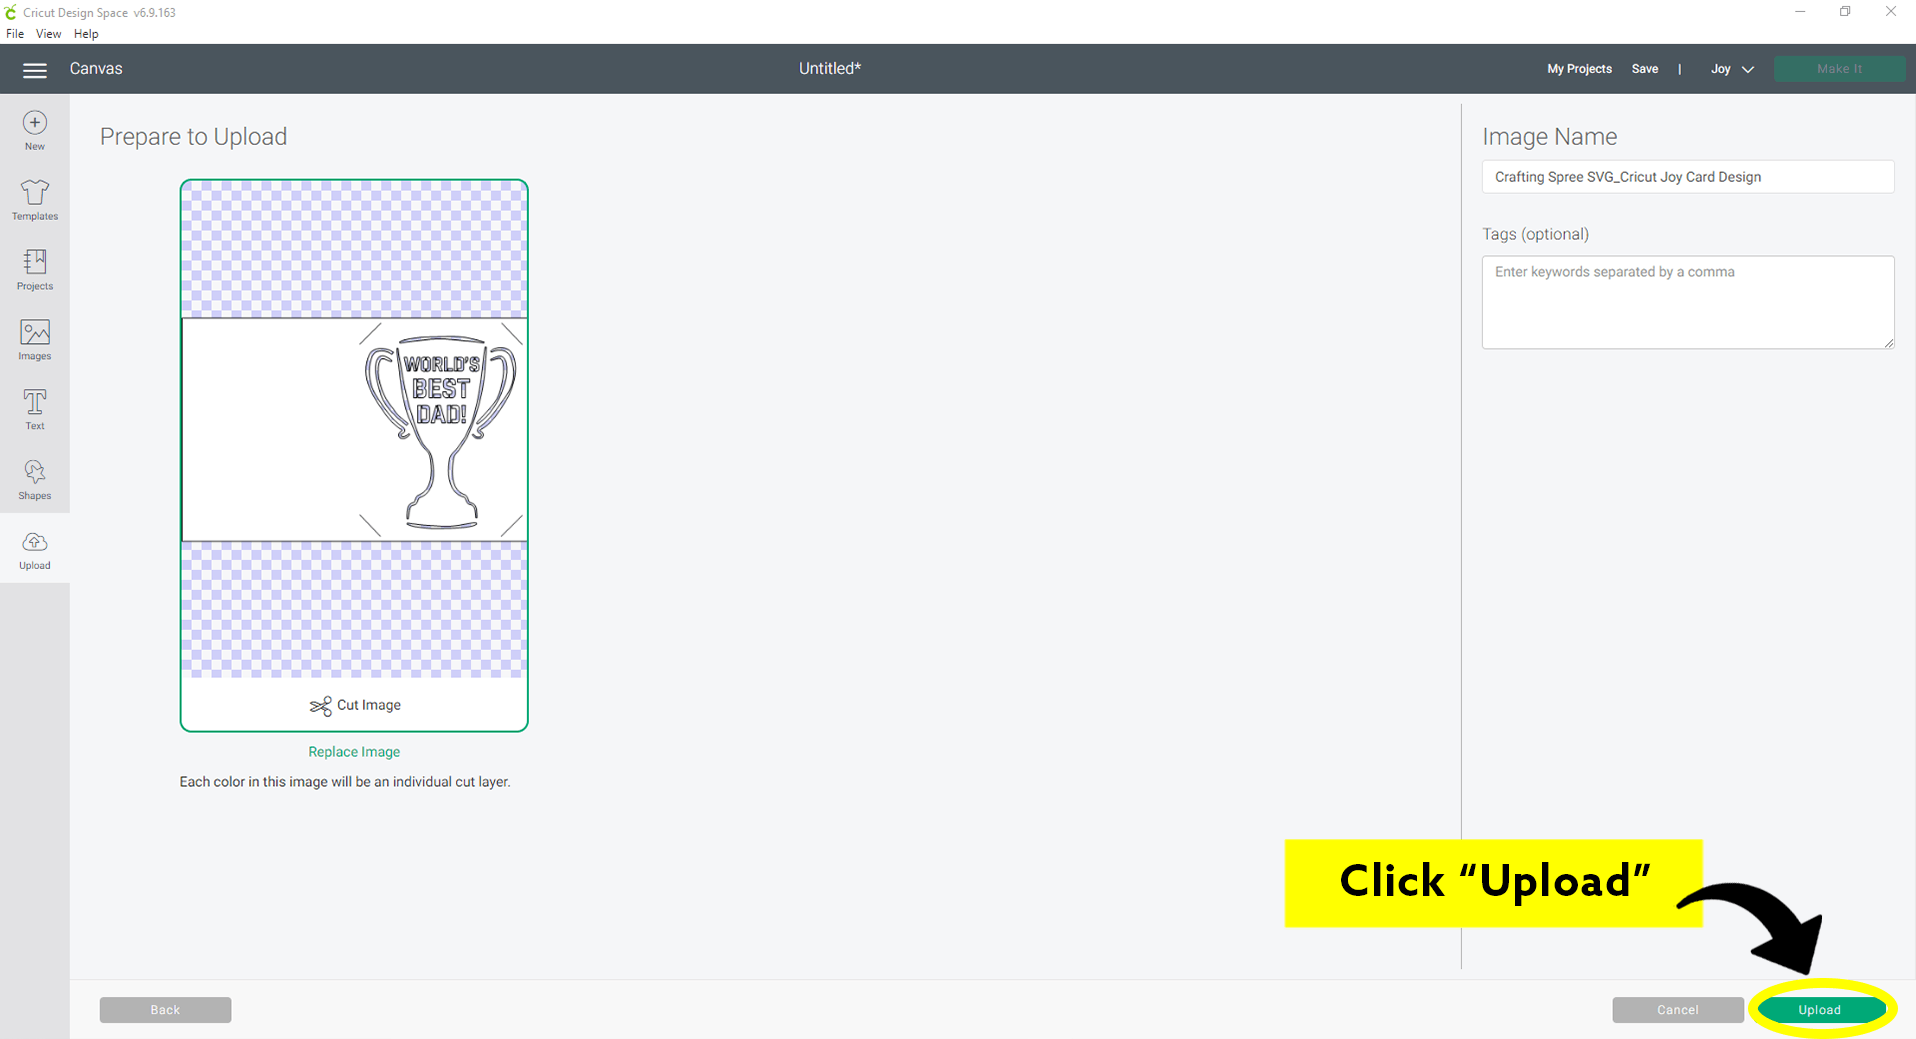
Once you’ve located your Father’s Day card SVG template, Cricut Design Space will show you a preview of the cut file and we will click on “upload” in the bottom right corner.
Cricut Joy:
If it doesn’t look like this, and looks like a black rectangle instead, you’ve uploaded the colored insert SVG and need to upload the "Card Insert" SVG instead. We’ll upload the insert SVG later, but we don’t need it quite yet.
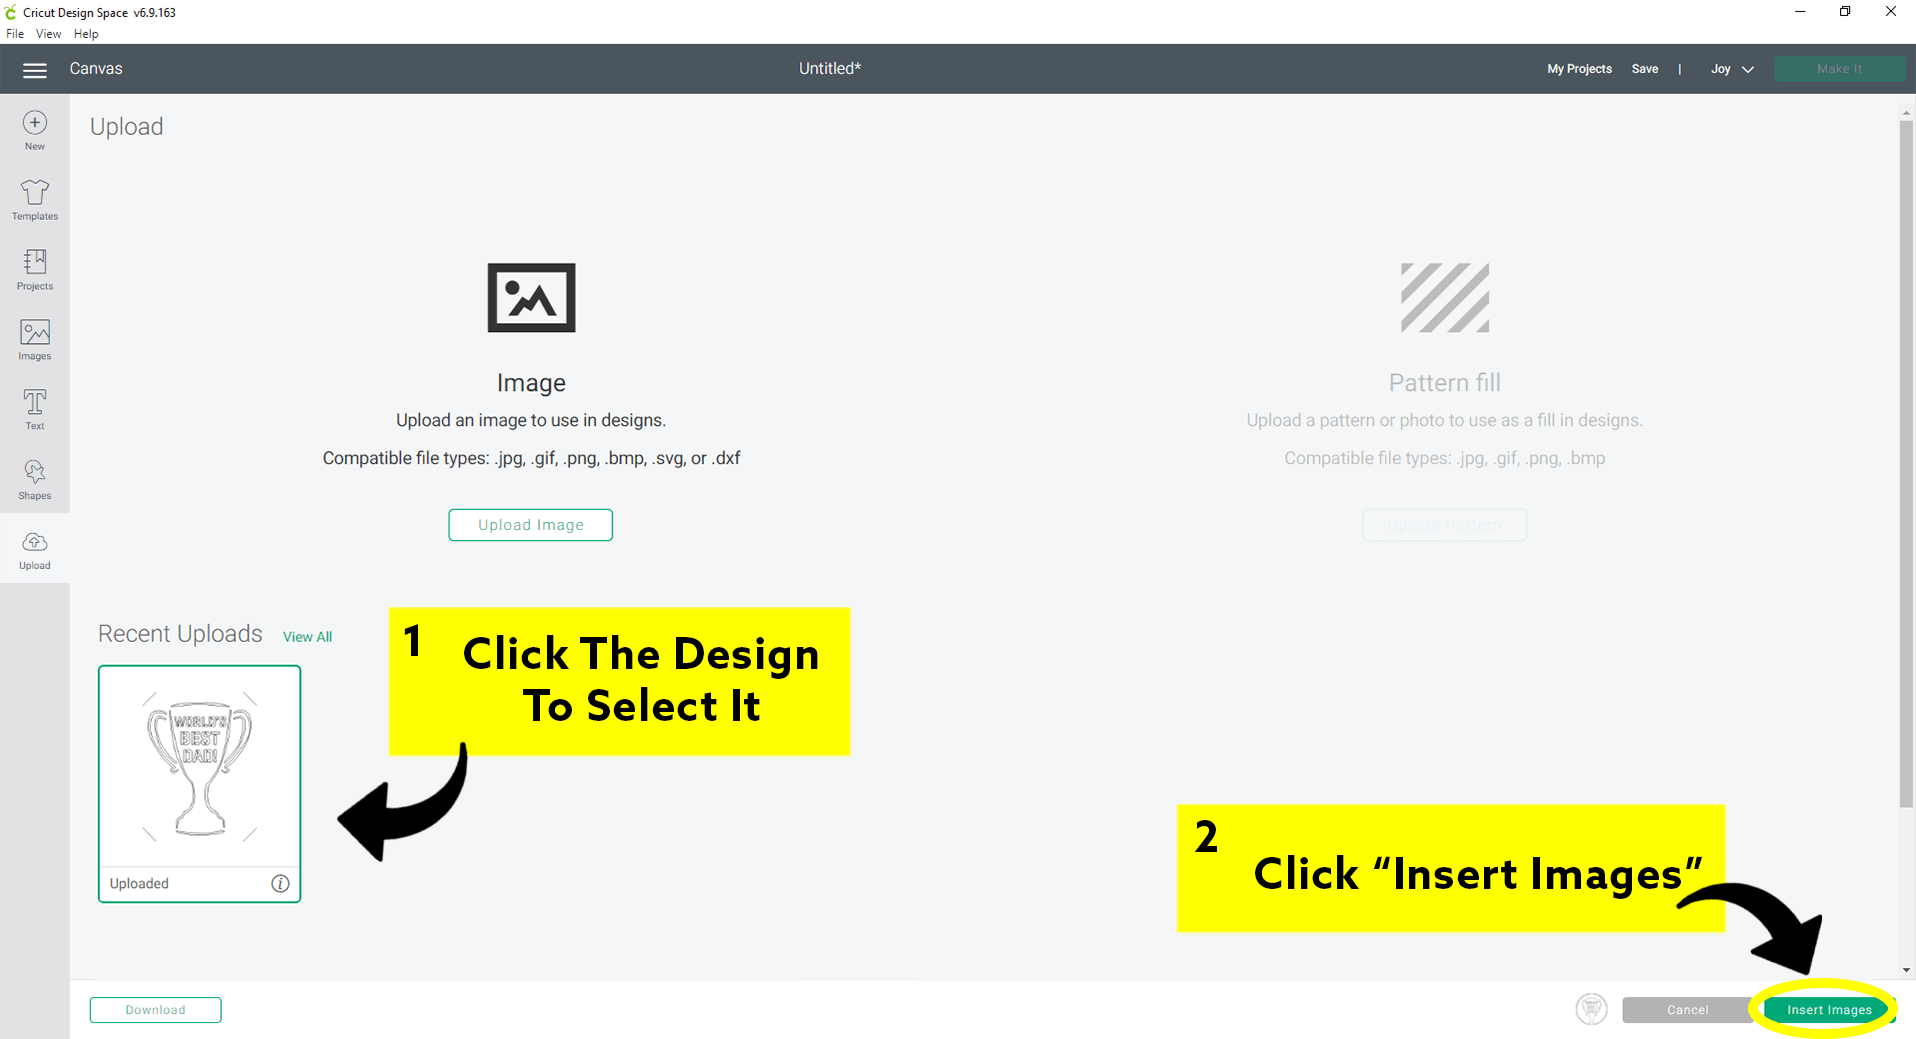
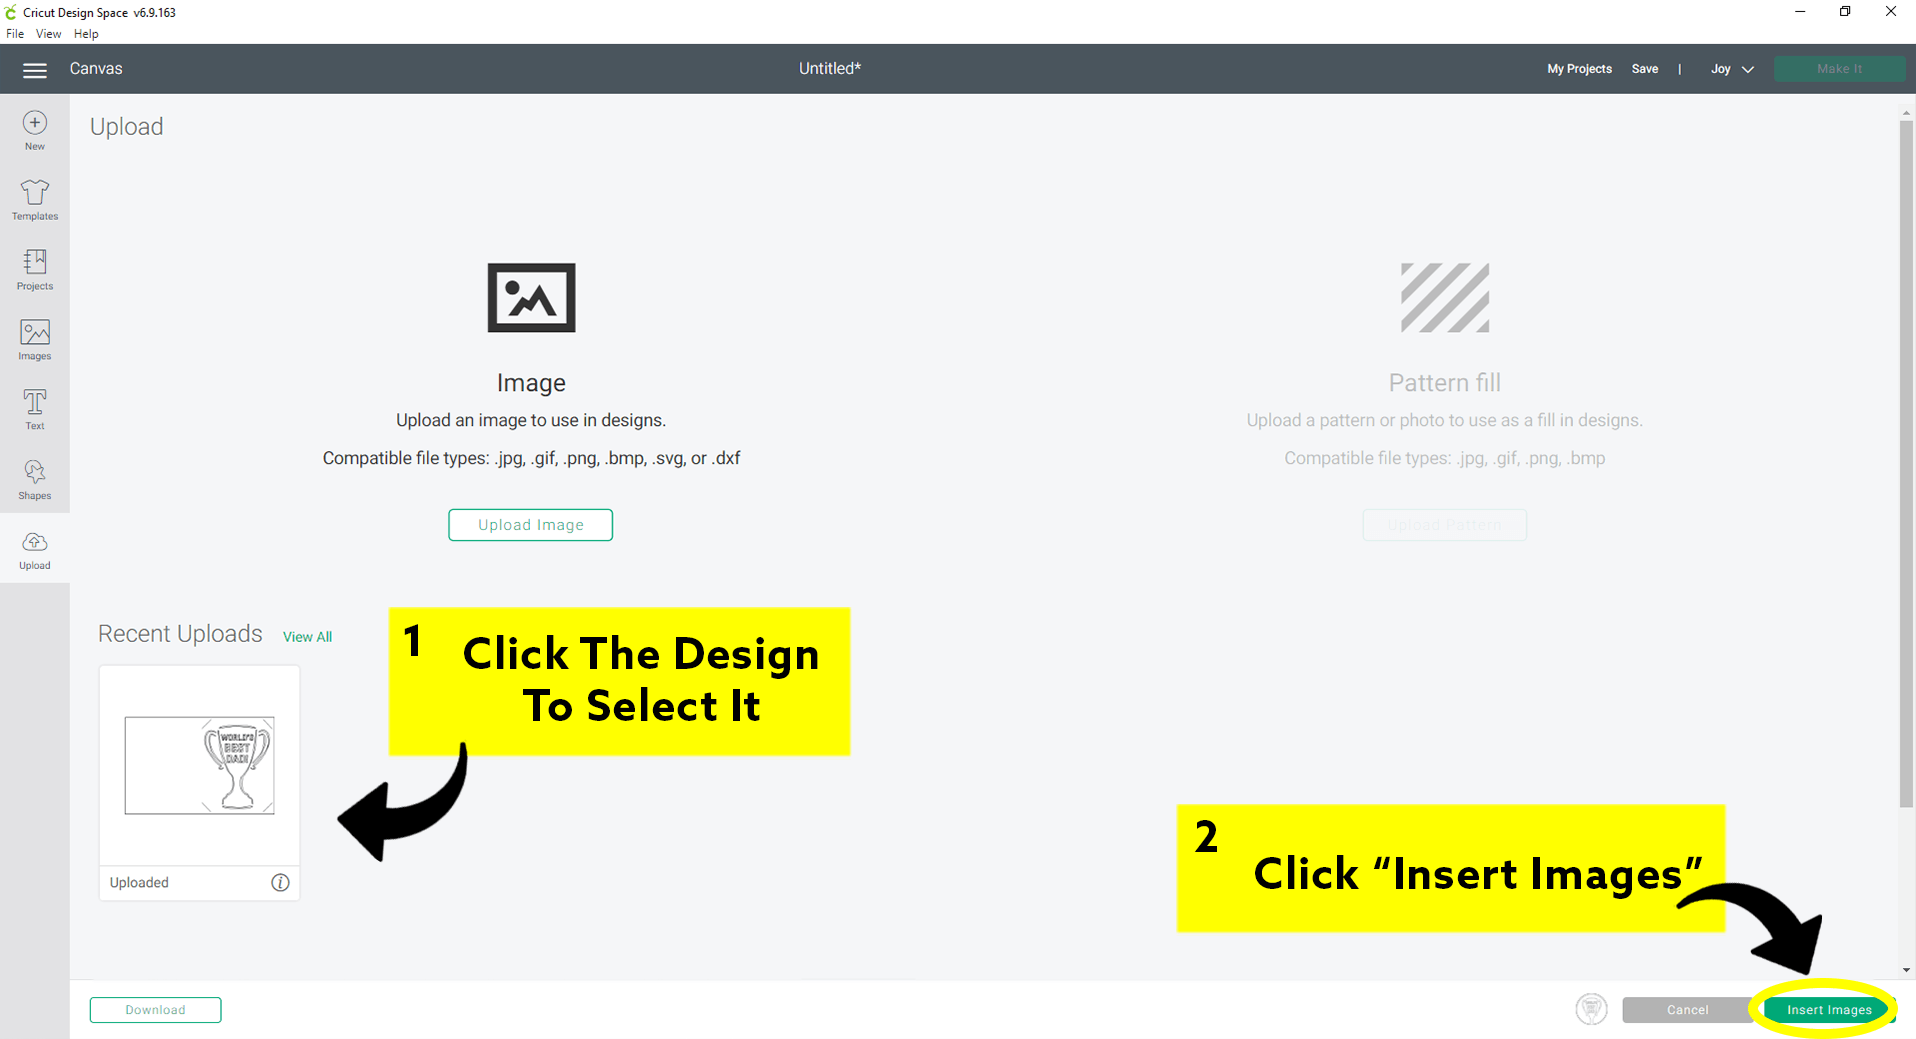
Once everything looks good, click the green “upload” button in the bottom right-hand corner of the screen. You should then see your card SVG under “Recent Uploads” where you will go ahead and select it by clicking on it one time, and then click the green “insert images” button in the bottom right-hand corner of the screen.
Explore & Maker Machines:
If it doesn’t look like this, and looks like a black rectangle instead, you’ve uploaded the colored insert SVG and need to upload the "Card Insert" SVG instead. We’ll upload the insert SVG later, but we don’t need it quite yet.
Once everything looks good, click the green “upload” button in the bottom right-hand corner of the screen. You should then see your card SVG under “Recent Uploads” where you will go ahead and select it by clicking on it one time, and then click the green “insert images” button in the bottom right-hand corner of the screen.
Step 3: Insert Image
Now, you should see your new Father’s Day card SVG file under “Recent Uploads.” Select the card SVG and click the “Insert Images” button in the bottom right-hand corner to insert it into our new project window.
Cricut Joy:
Explore & Maker Machines:
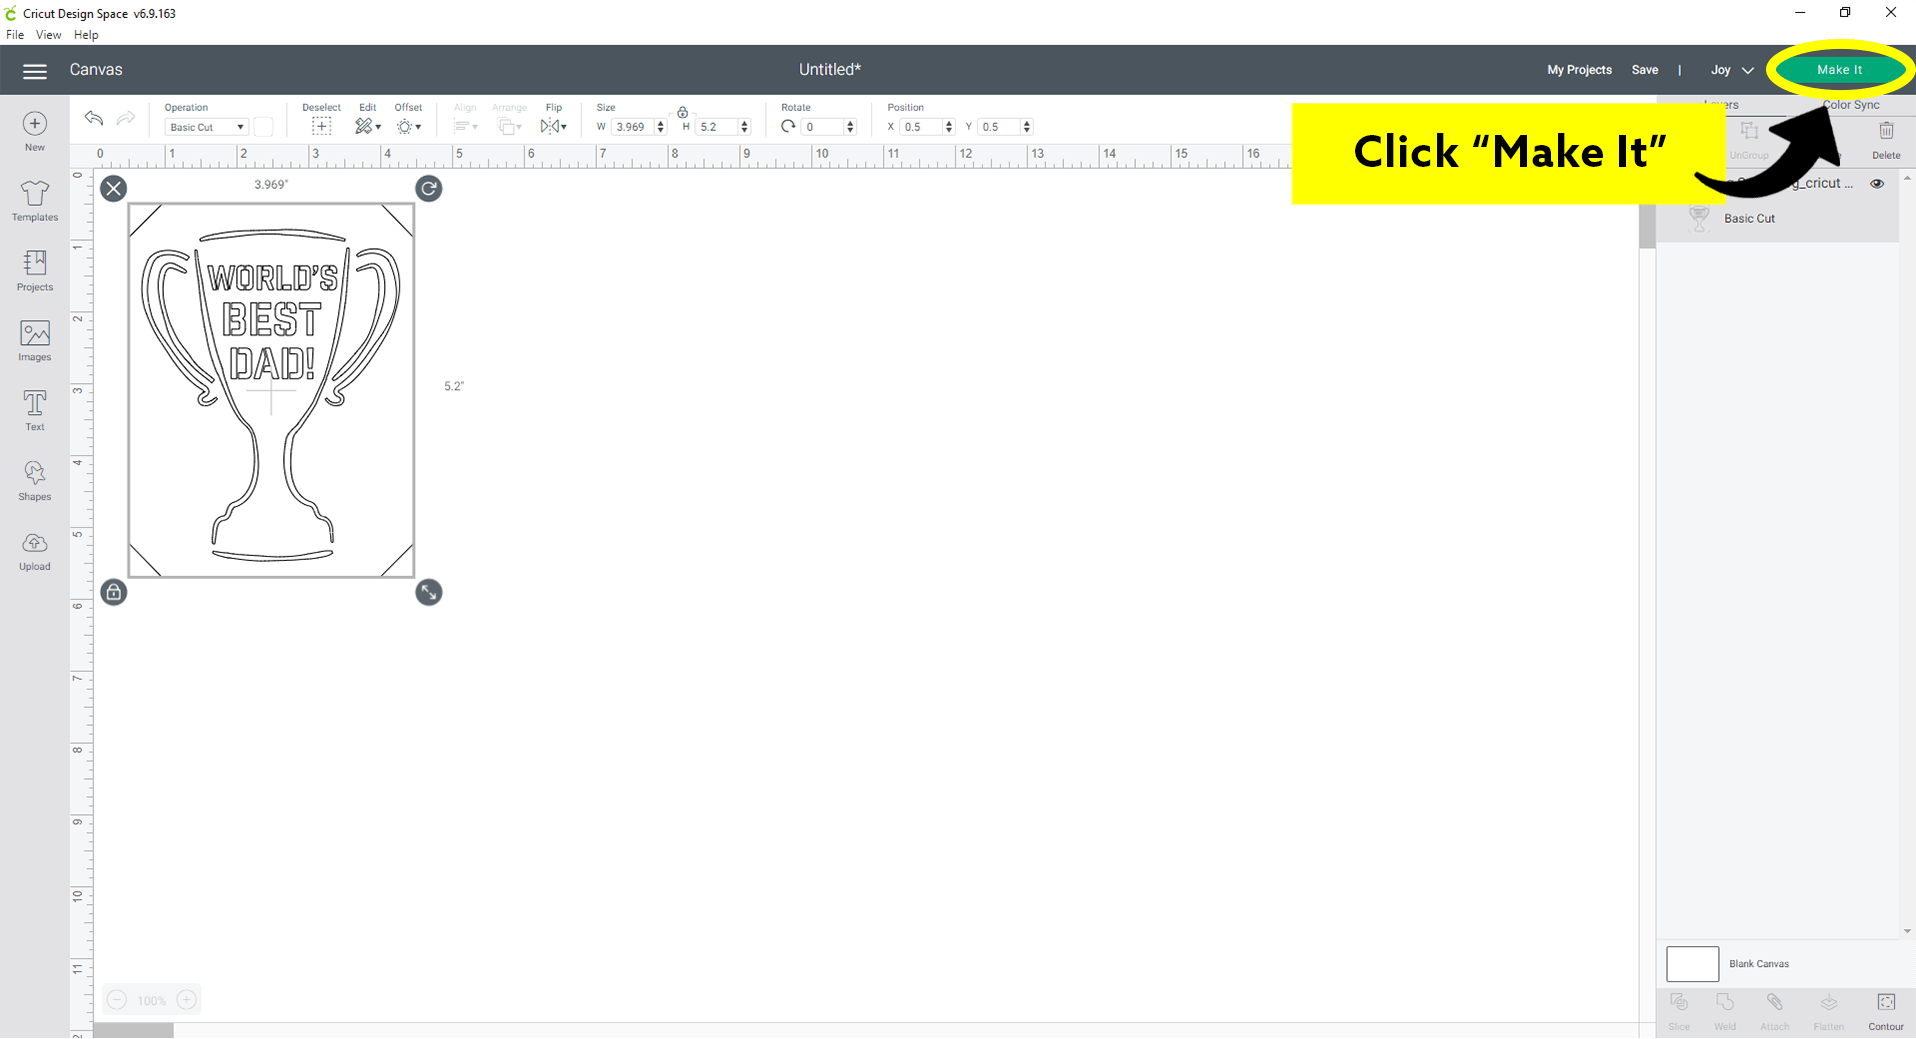
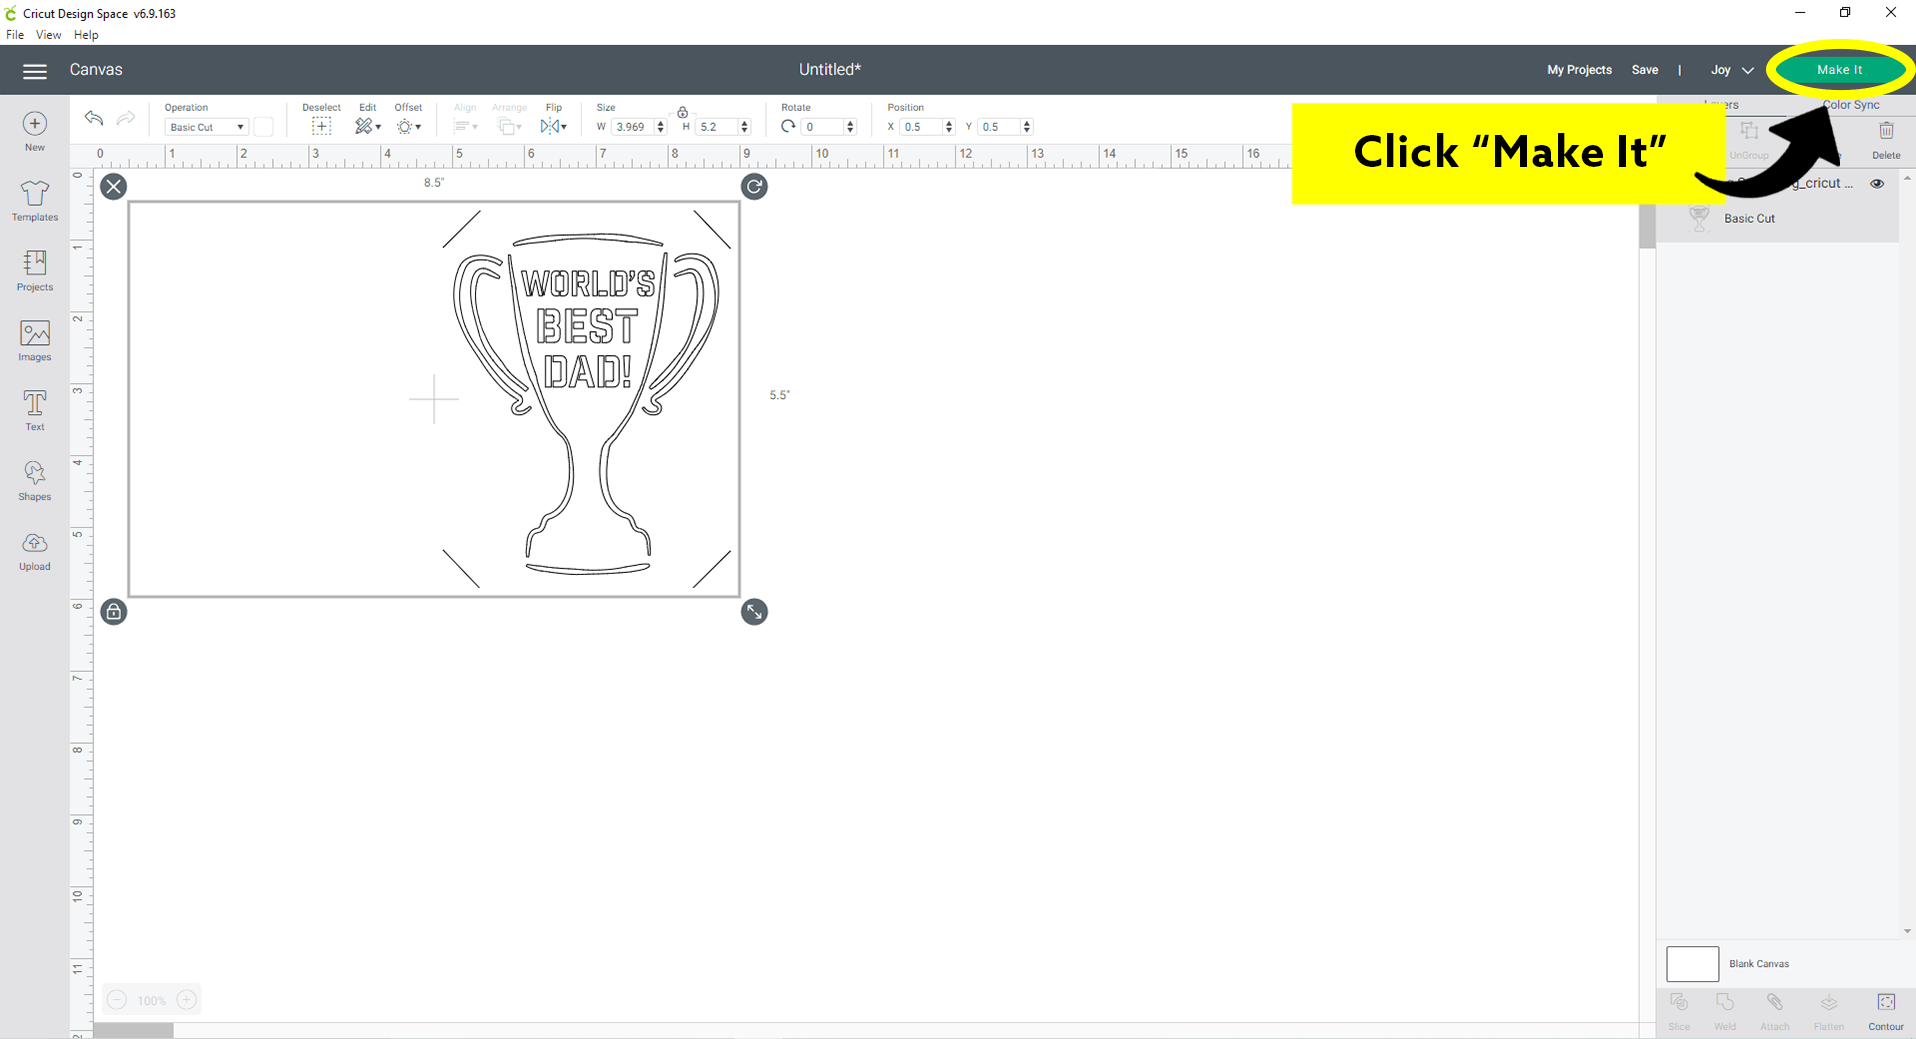
Step 4: Make It!
For Cricut Joy:
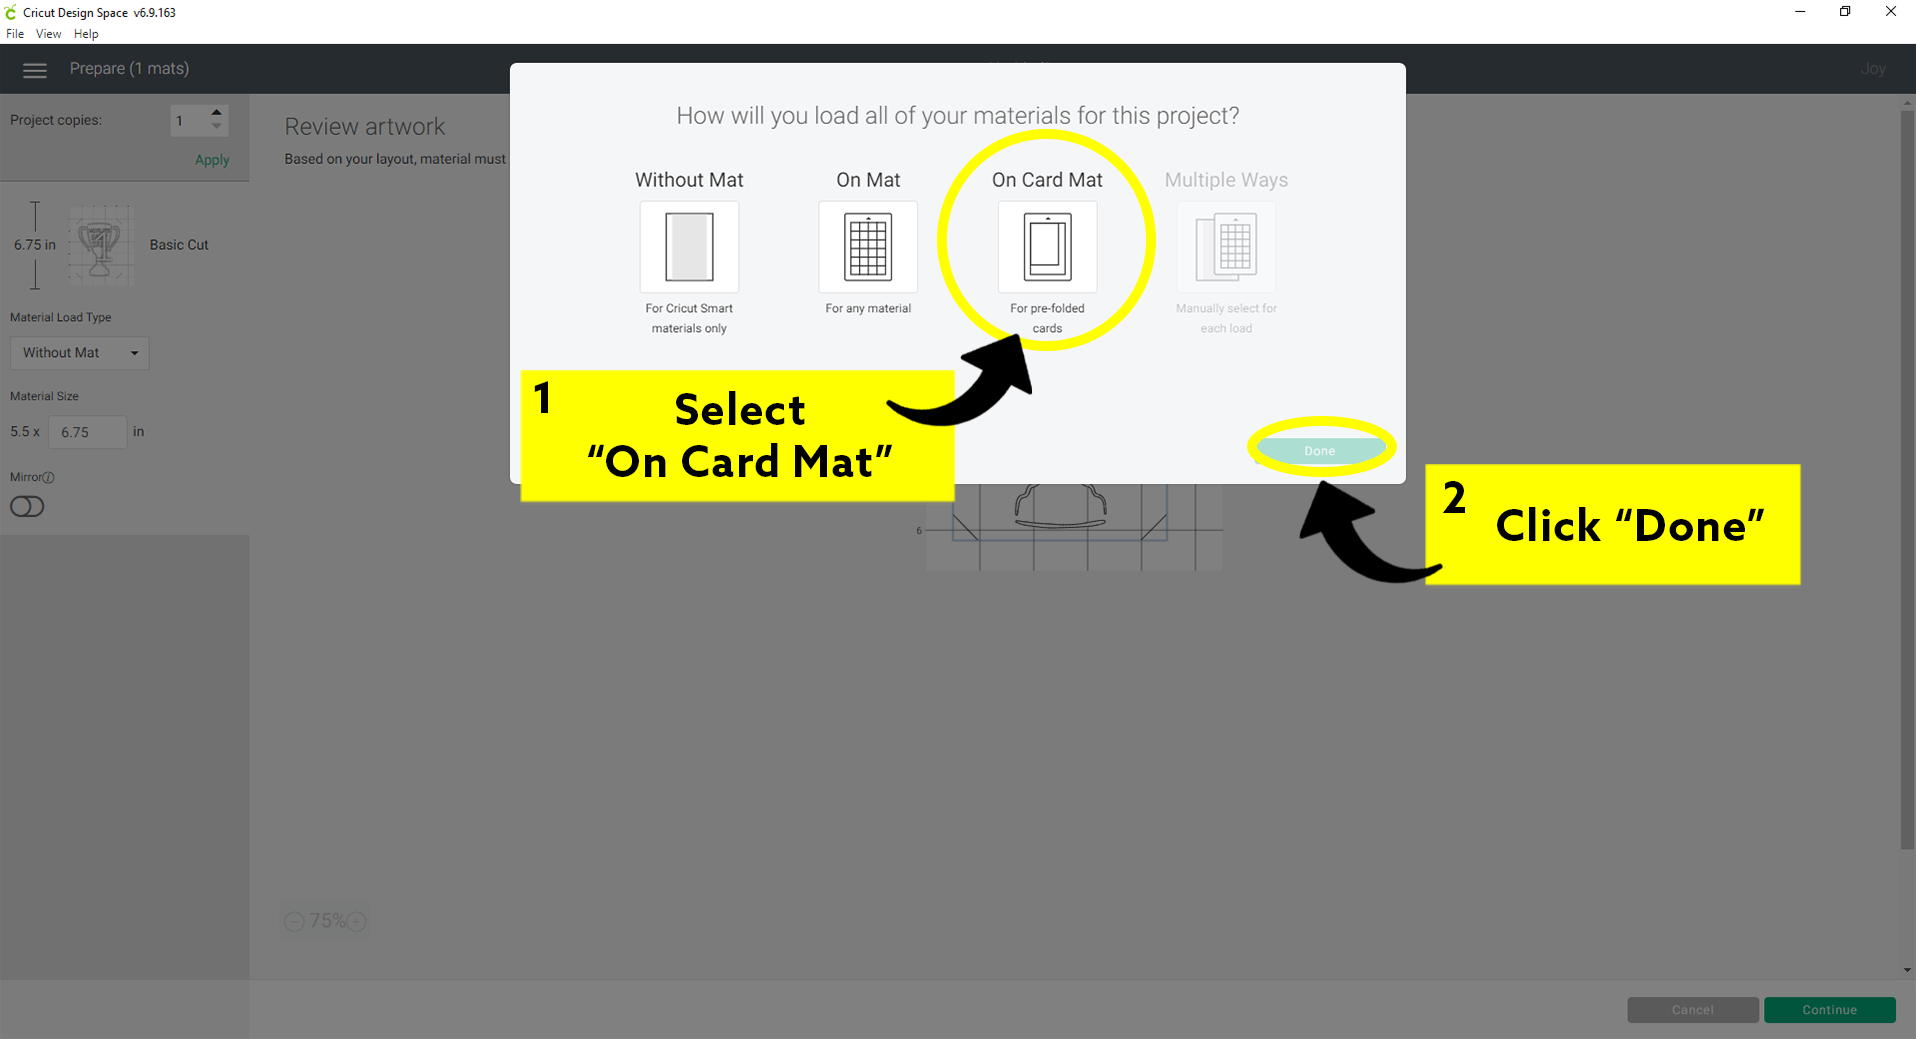
Click the green button that says “Make It” in the top right-hand corner of the screen. Load your cardstock paper onto your card mat and in Cricut Design Space when it asks “How will you load all of your materials for this project?” select “On Card Mat” then click the green button that says “done.”
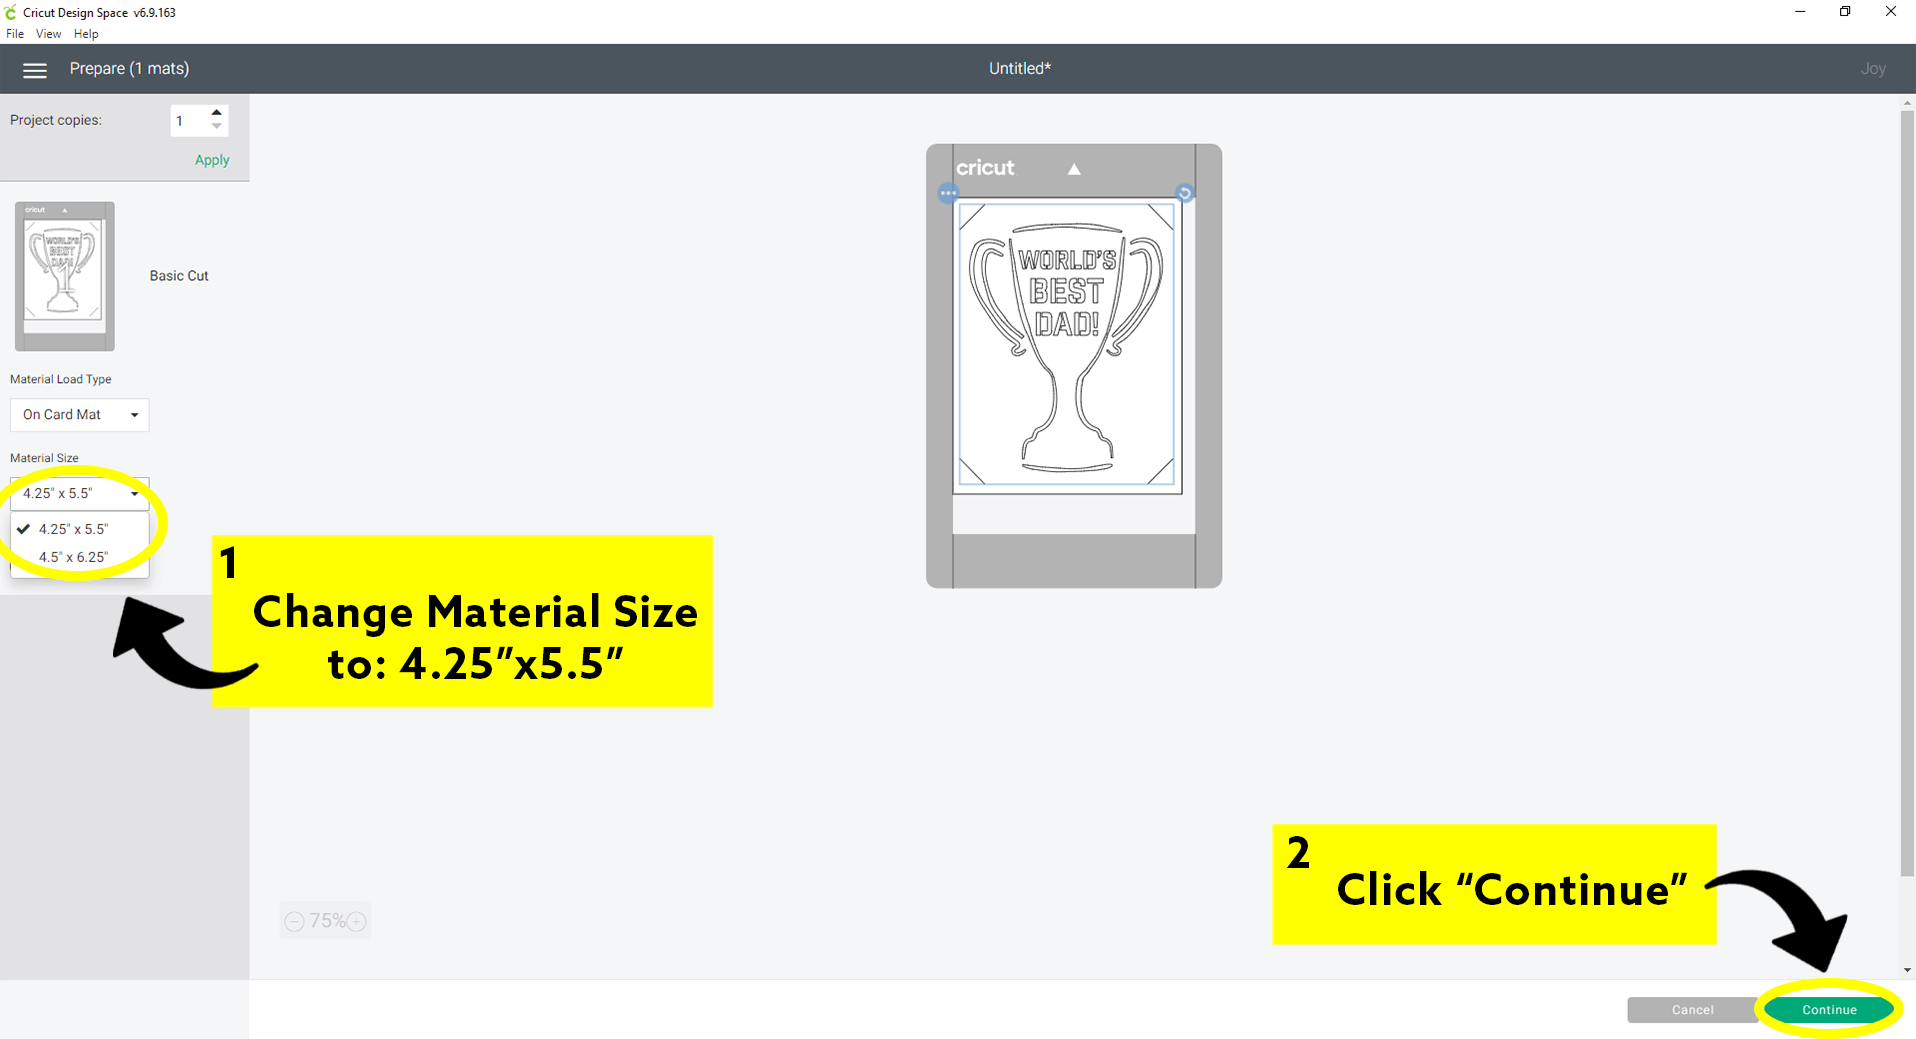
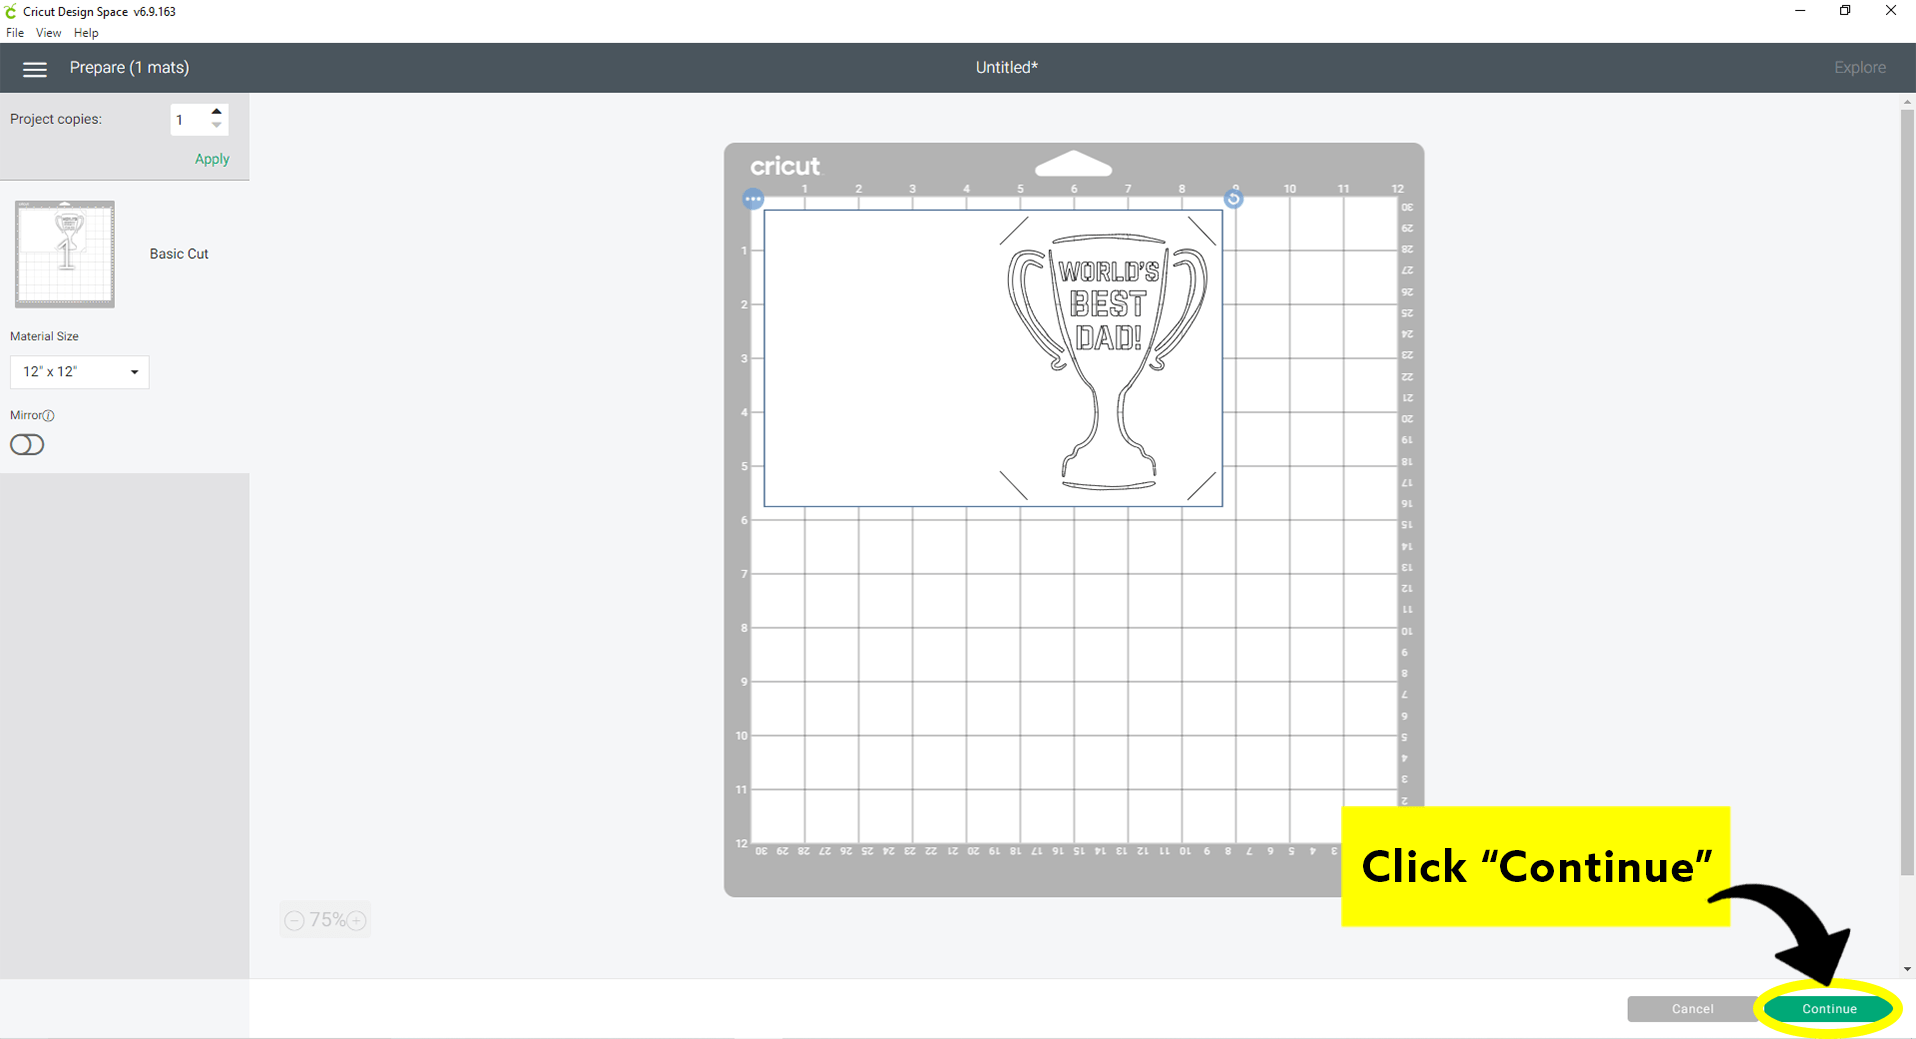
Now, double check your settings by making sure “Material Load Type” is set to “Card Mat” and that your material size is set to “4.25 x 5.5” and click “continue.”
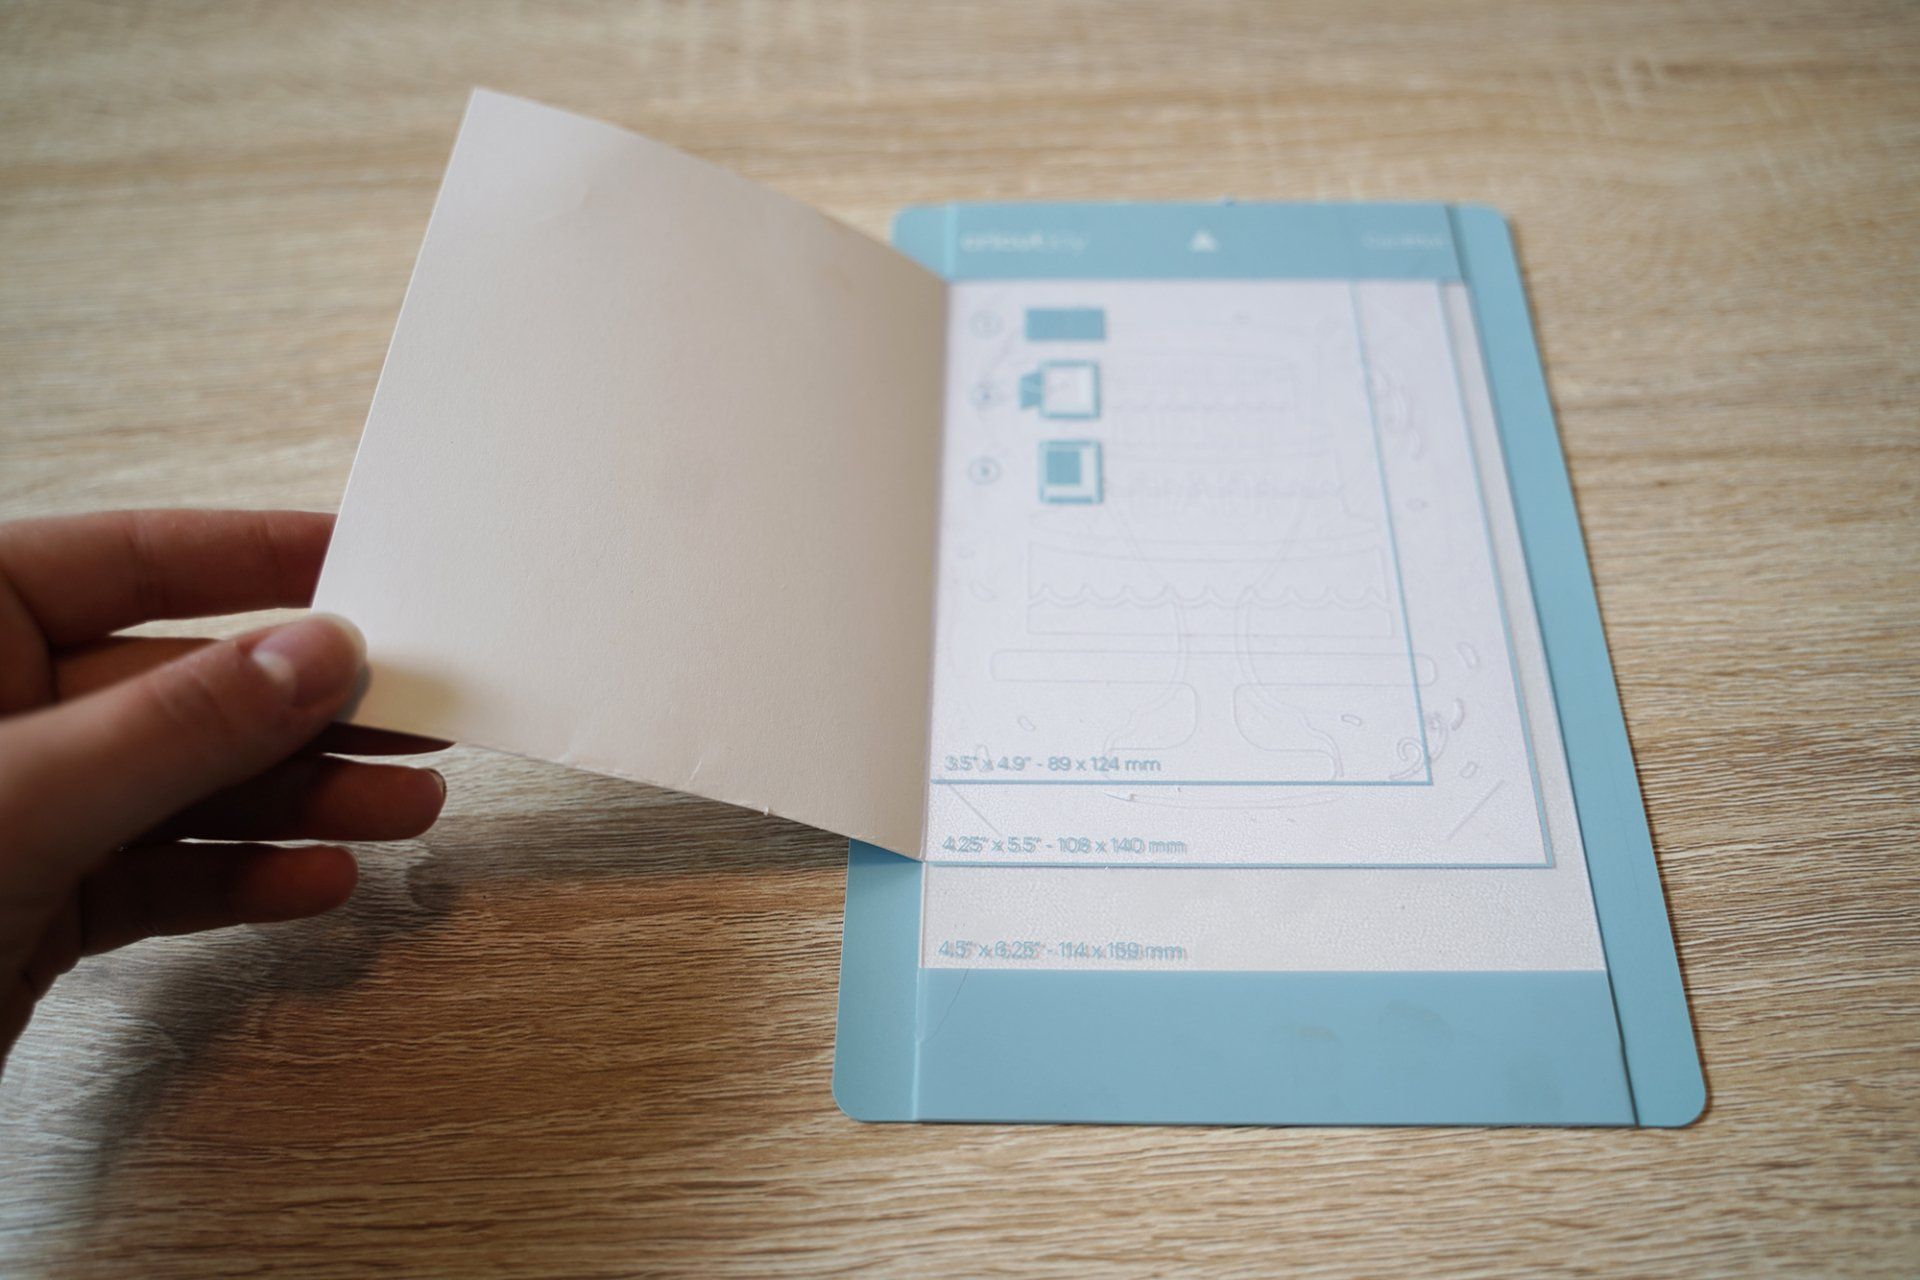
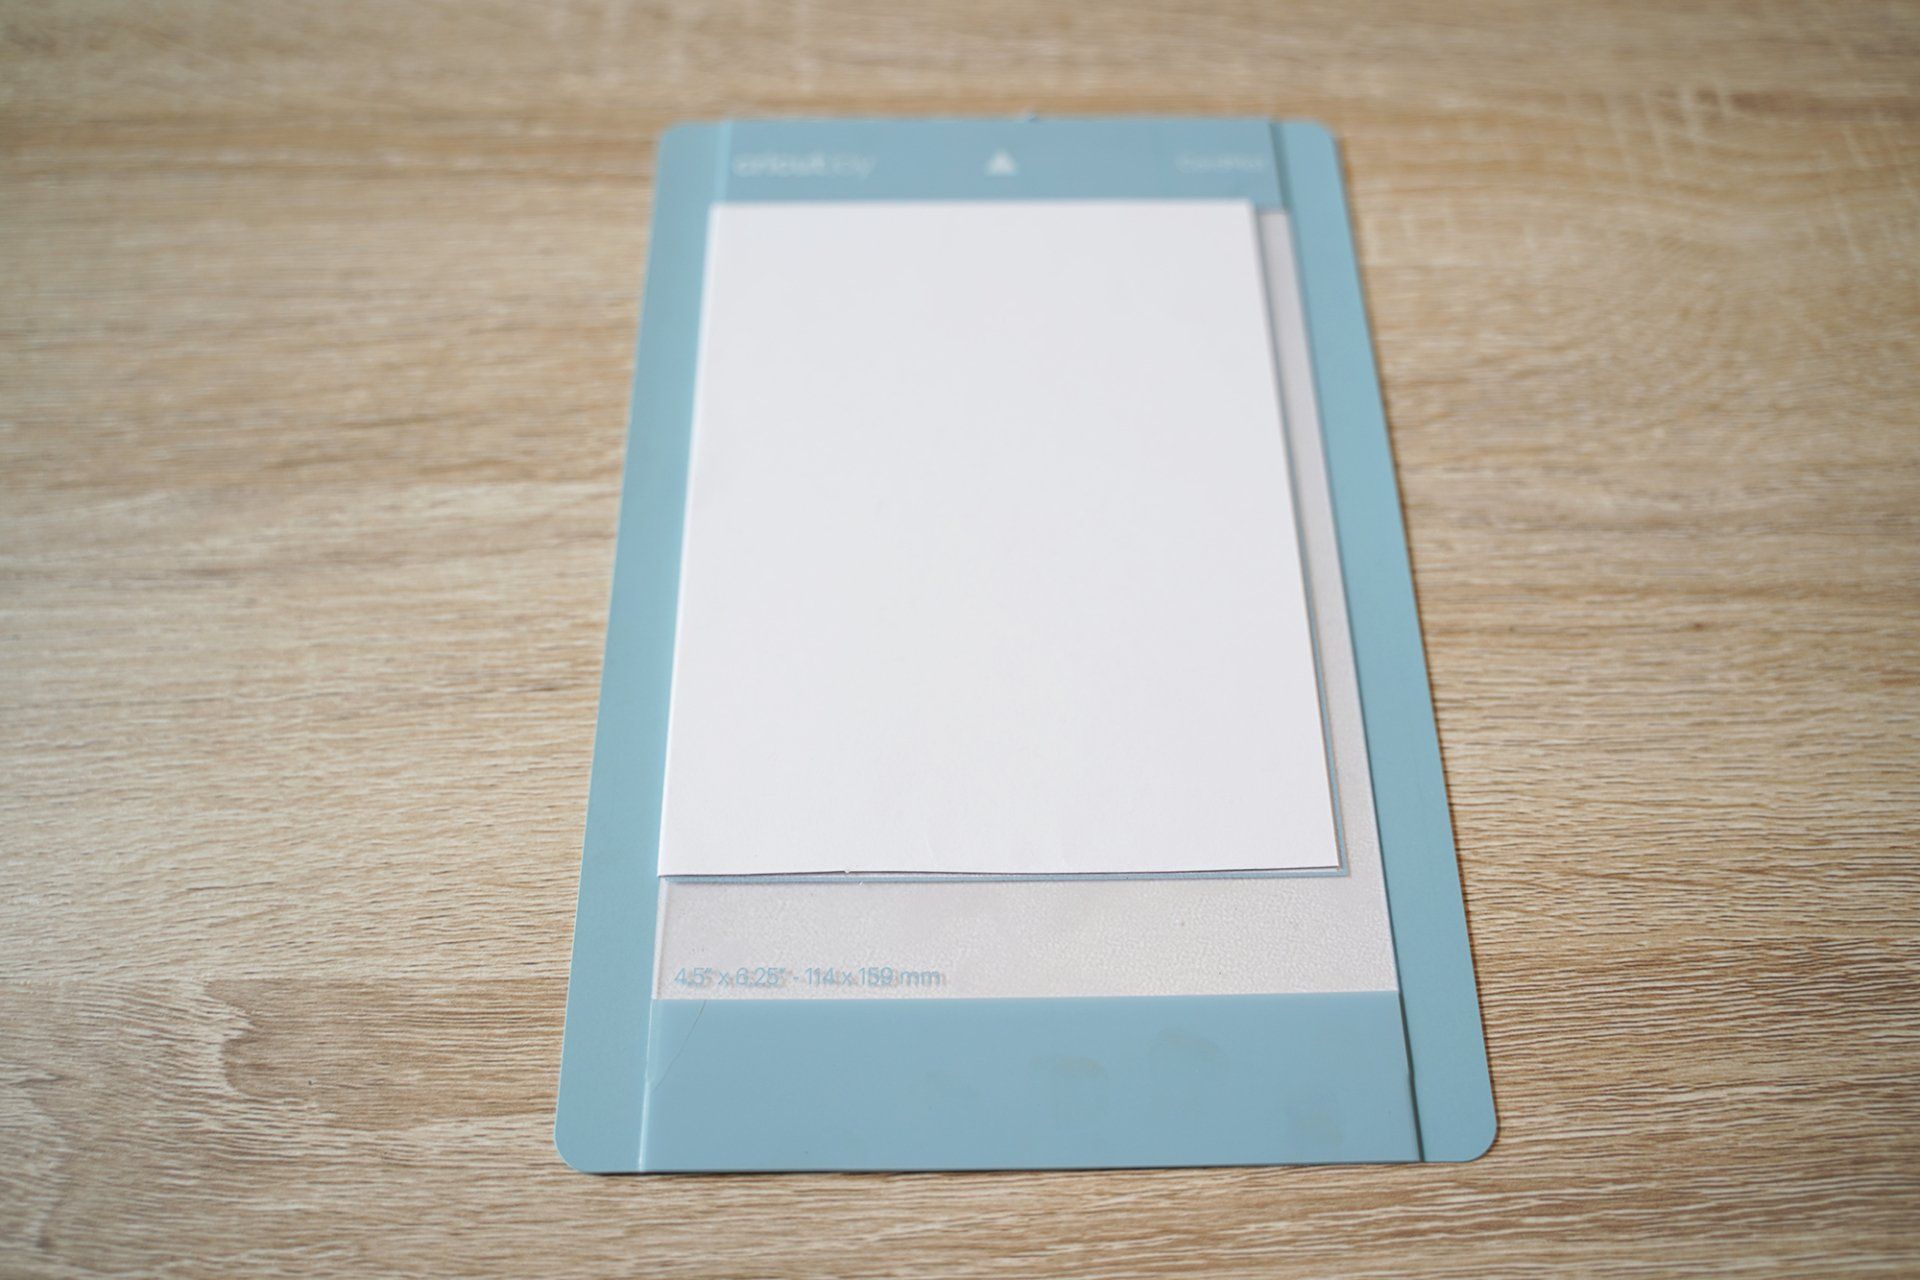
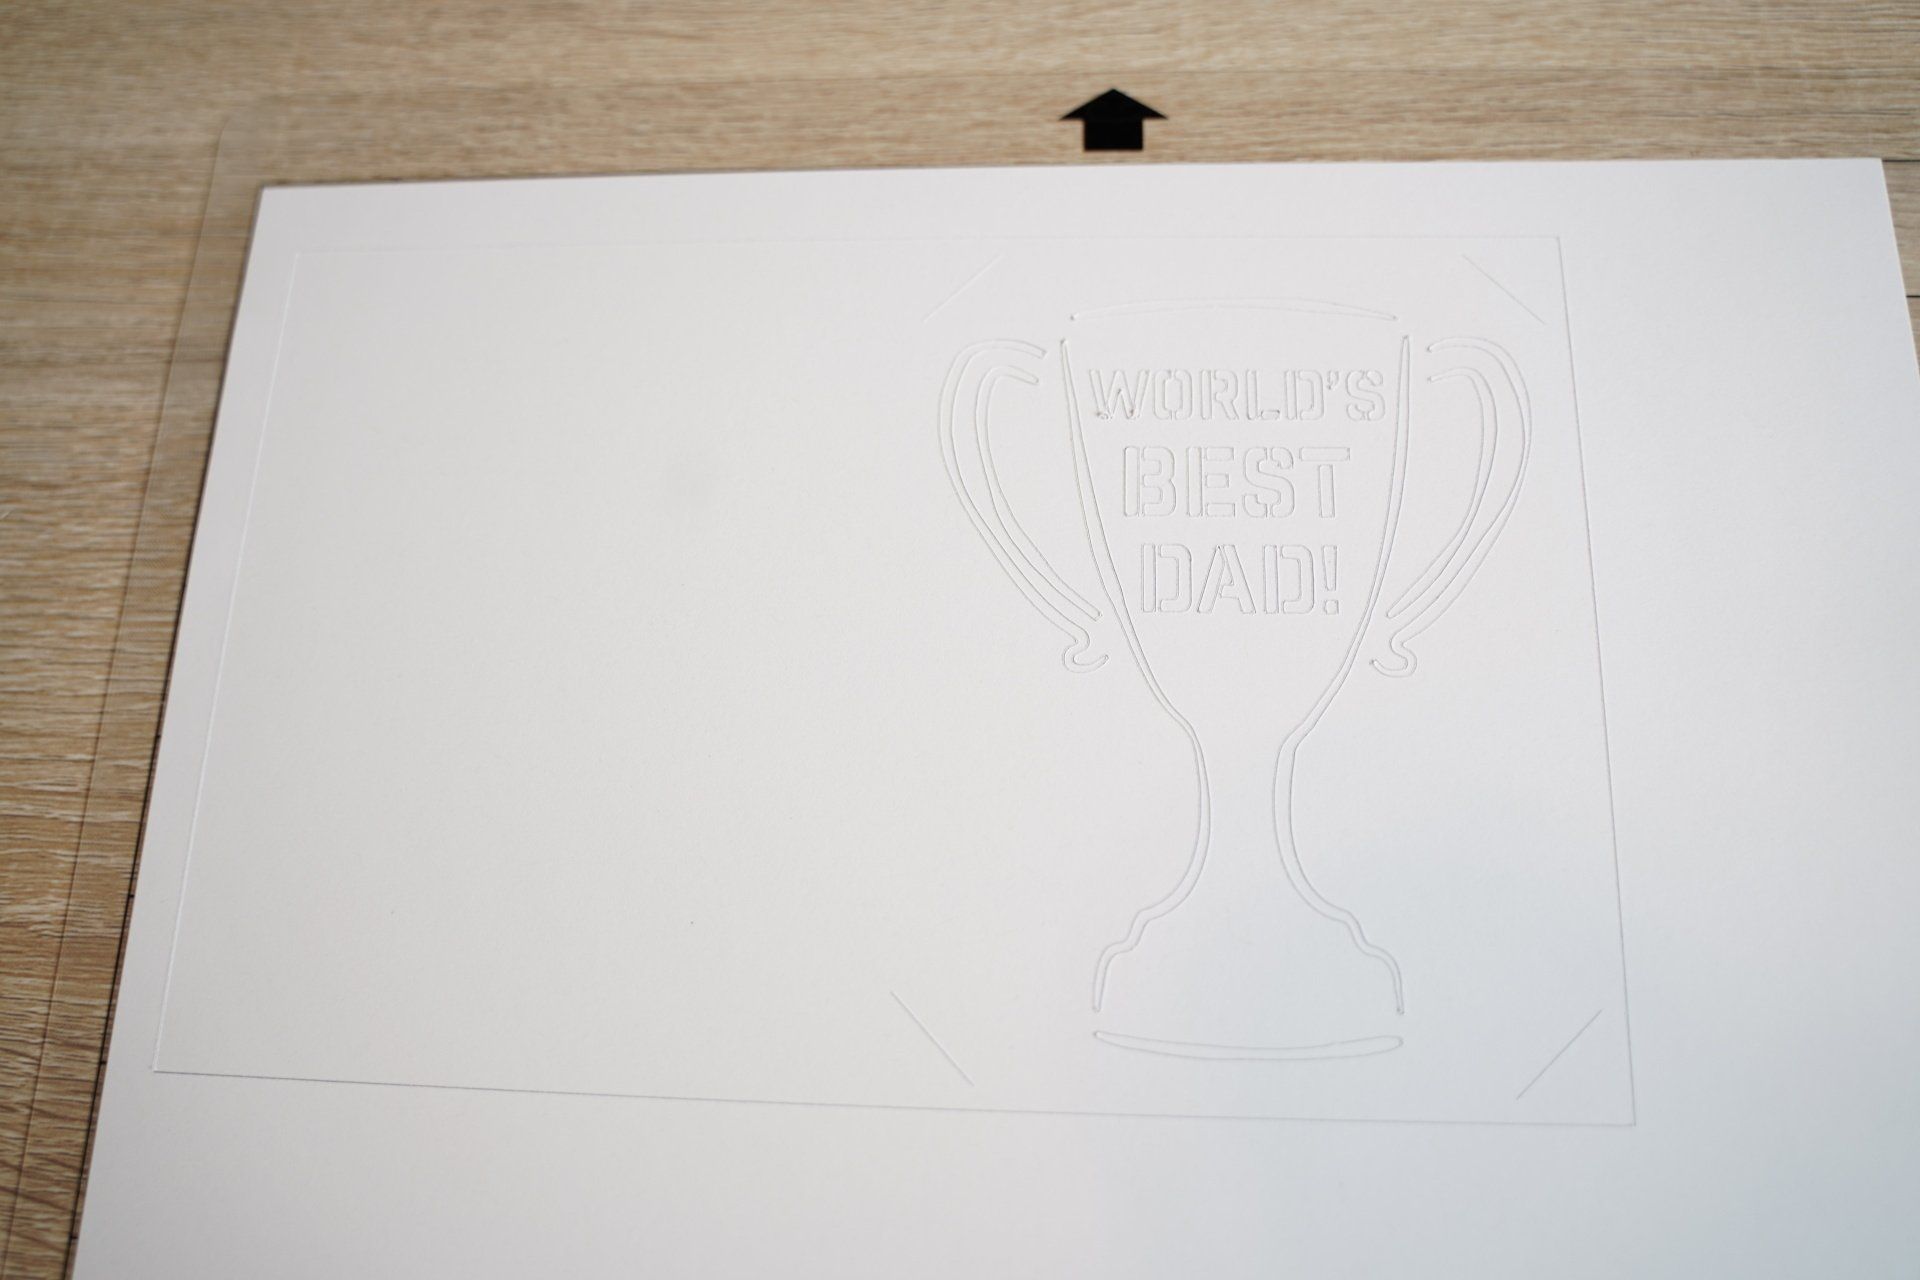
Next, you’ll want to get your card paper ready. You can either load your mat with a pre-made Cricut Joy card, or you can cut your own piece of cardstock down to a 8.5” by 5.5” sheet, and fold it in half to create your own 4.25” by 5.5” card to load onto your Card Mat.
For Explore & Maker Machines:
Click the green button that says “Make It” in the top right-hand corner of the screen. Load your cardstock paper onto your standard grip mat and load the mat into your machine.
Next, double check your mat preview in Cricut Design Space and make sure your paper is oriented correctly on your mat (you don’t want your paper oriented portrait and your card oriented landscape in Cricut Design Space or else parts of your card will get cut off during the cutting process).
If everything looks good, click “Continue”
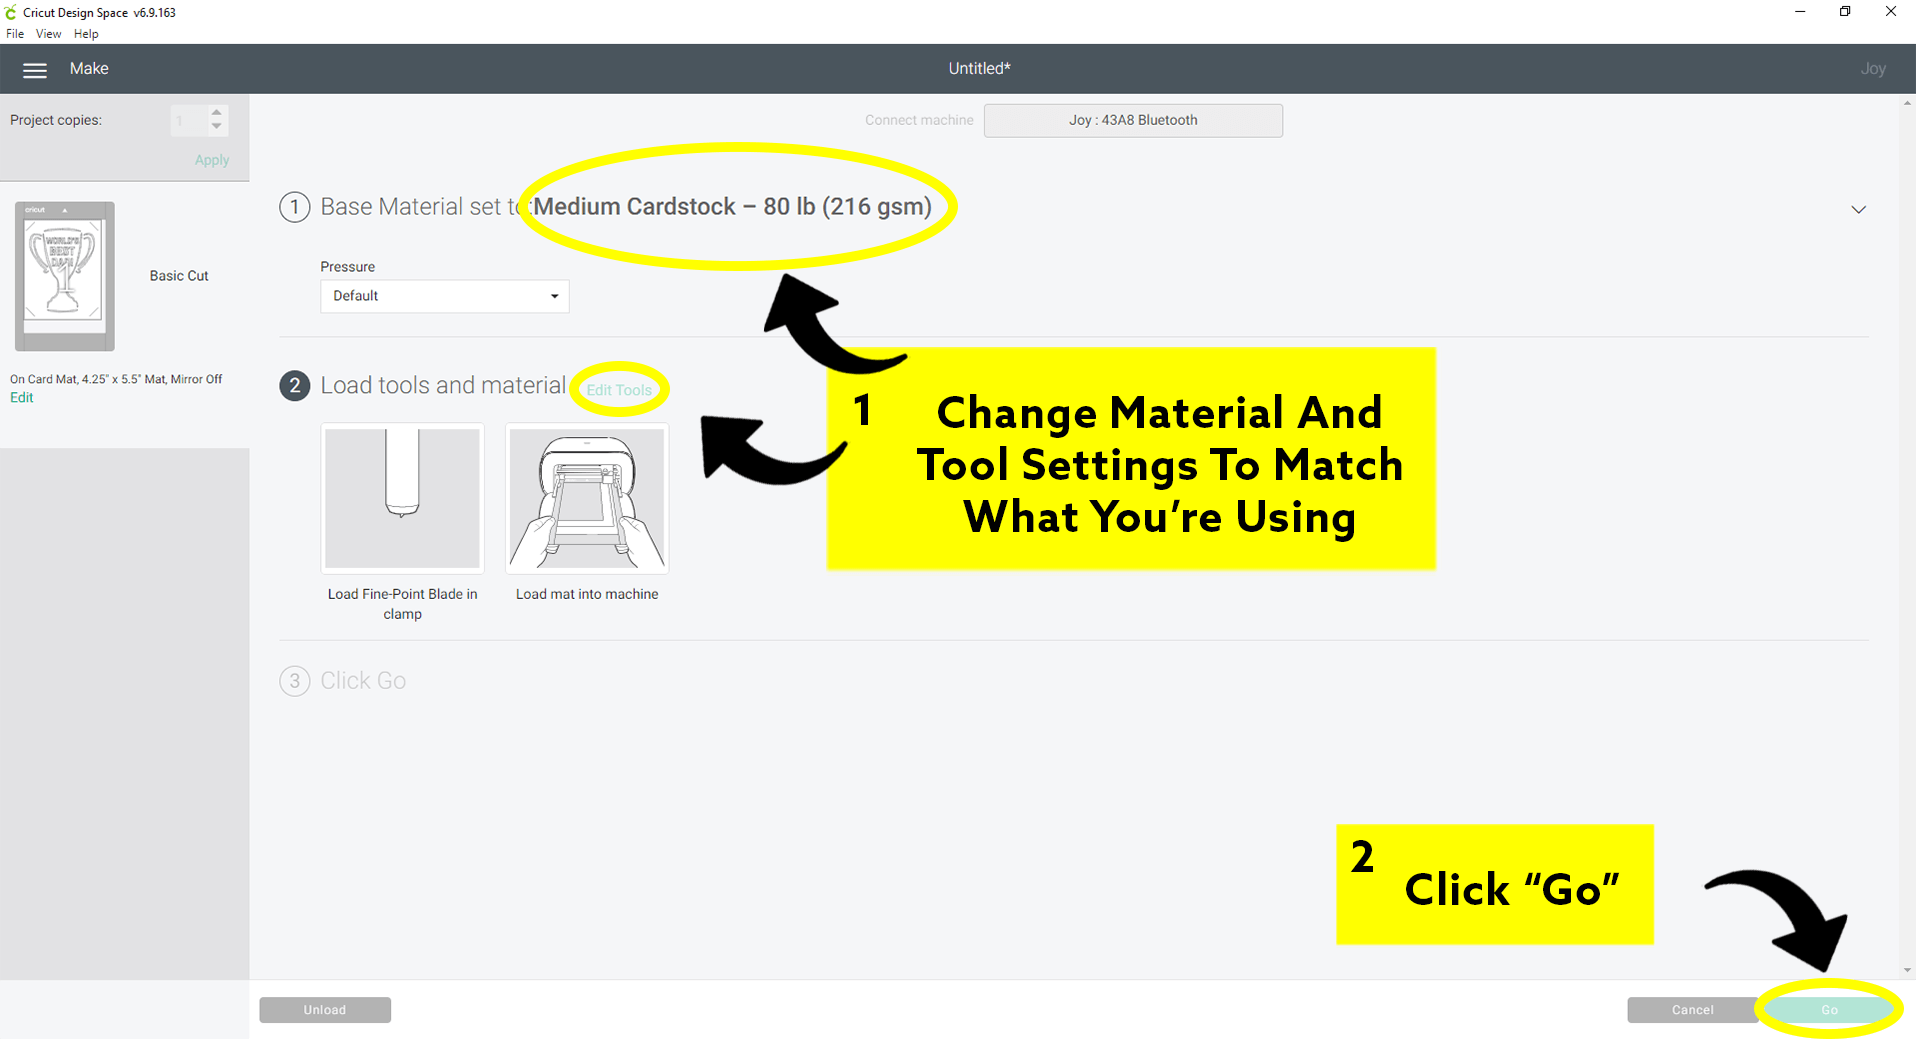
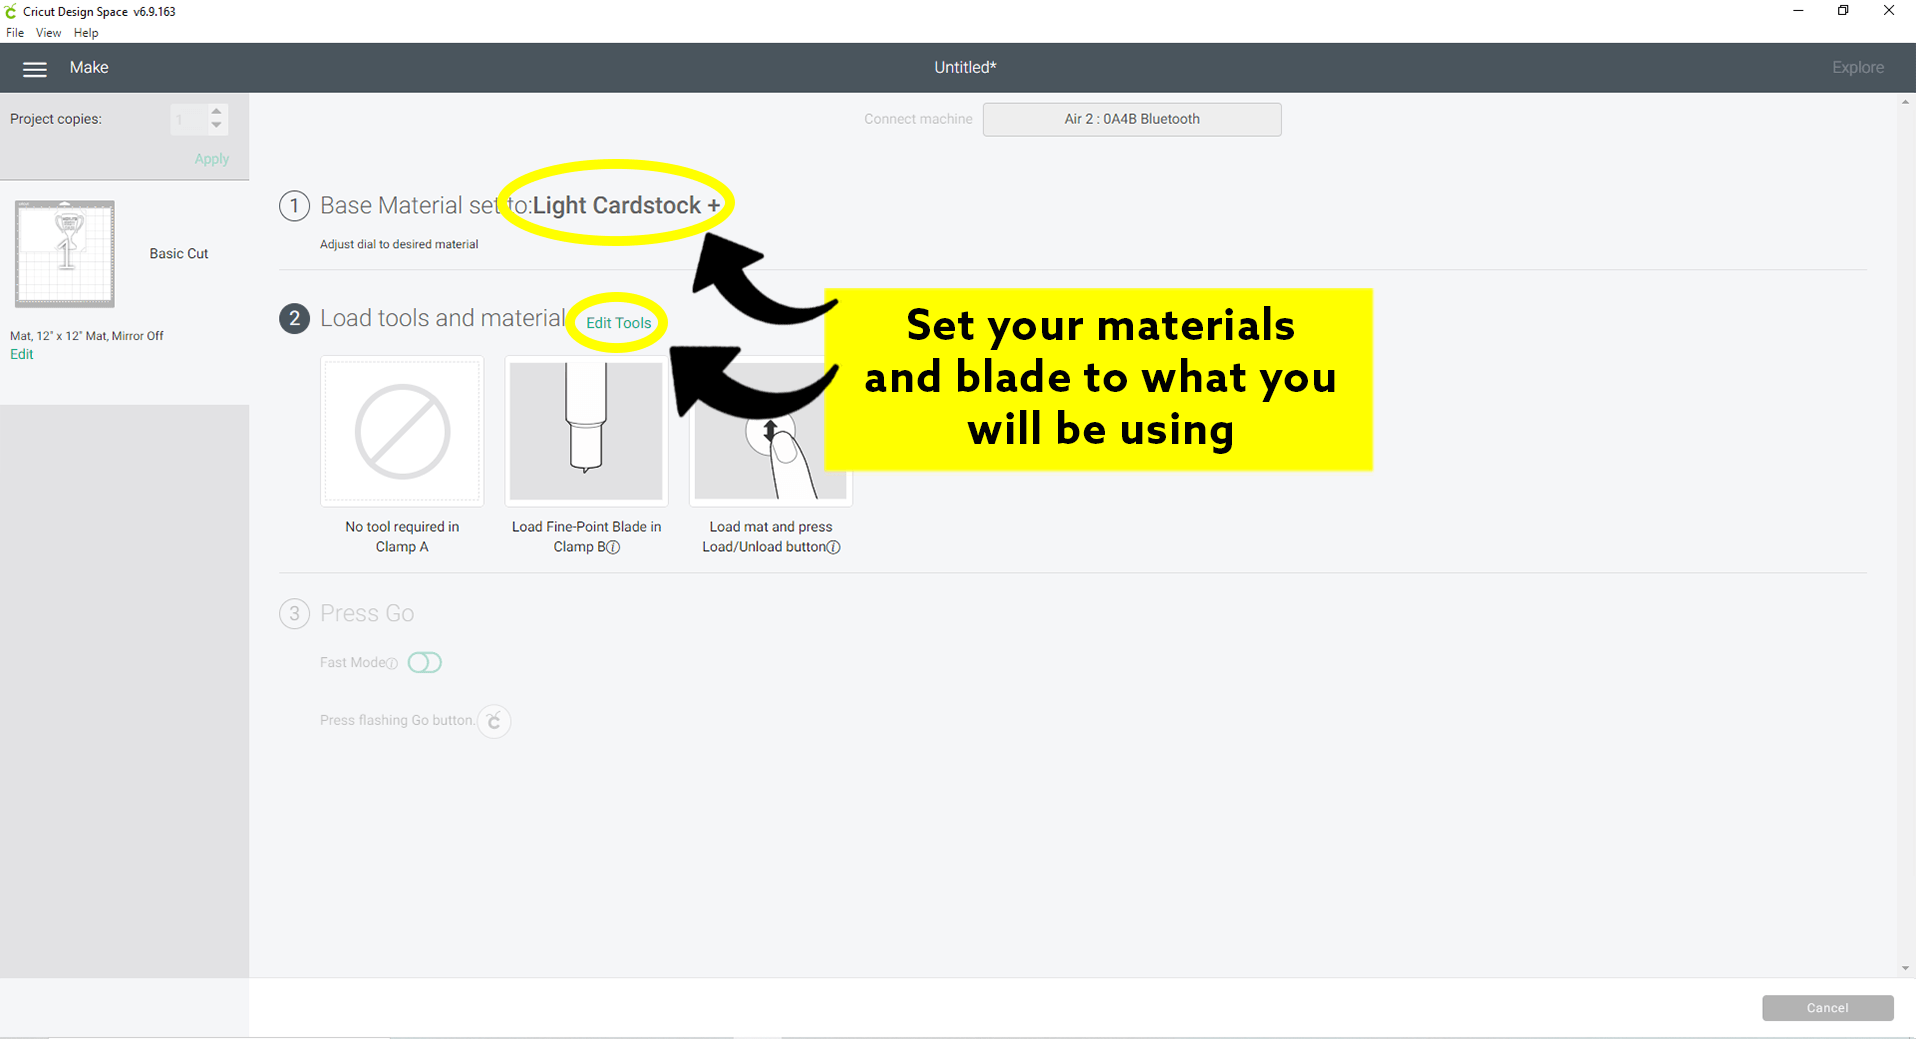
Step 5: Check Your Settings
Make sure your setting is set to the same cardstock weight as the cardstock you’re using. When I use 90-110lb cardstock, the “light cardstock +” materials setting while using the deep cut blade tends to give me the best cut results but ultimately it’s whatever works best for you. You may need to adjust your settings based on the weight of cardstock you're using and which blade you’re using.
TIP: if you ever have issues cutting cardstock (tearing, ripping, etc.) here are some troubleshooting ideas on what might be wrong:
- Dull blade. You cannot sharpen Cricut blades, if it’s dull, replace it. I was able to buy 30 blades for around $10 by using off-brands like these off-brand Cricut replacement blades.
- Grip mat isn’t sticky enough. You can either clean your grip mat, apply new adhesive to your grip mat, or replace your grip mat with affordable off brand grip mats to fix this issue.
- Material setting doesn’t match your material. This may take some trial and error if you’re not sure what weight of cardstock you’re using, or if your settings are correct and it’s still not working. Adjusting the material setting to apply more or less blade pressure may result in a better cut job. Play around with it, get to know your machine settings better and find the sweet spot. Once you find what works, make a note of it so you can remember for next time! (who doesn’t love a good cheat sheet?)
- The fine-point blade isn't cutting it (literally). I had issues with my Cricut effectively cutting cardstock for quite some time and I troubleshooted all of the above solutions with no luck. For me, my problems were fixed when I switched from using the fine-point blade to the deep cut blade whenever I cut cardstock. If you’ve tried all the solutions above and it’s still not cutting properly, try swapping out your fine point blade for the deep cut blade and see if that does the trick!
Cricut Joy:
Explore & Maker Machines:
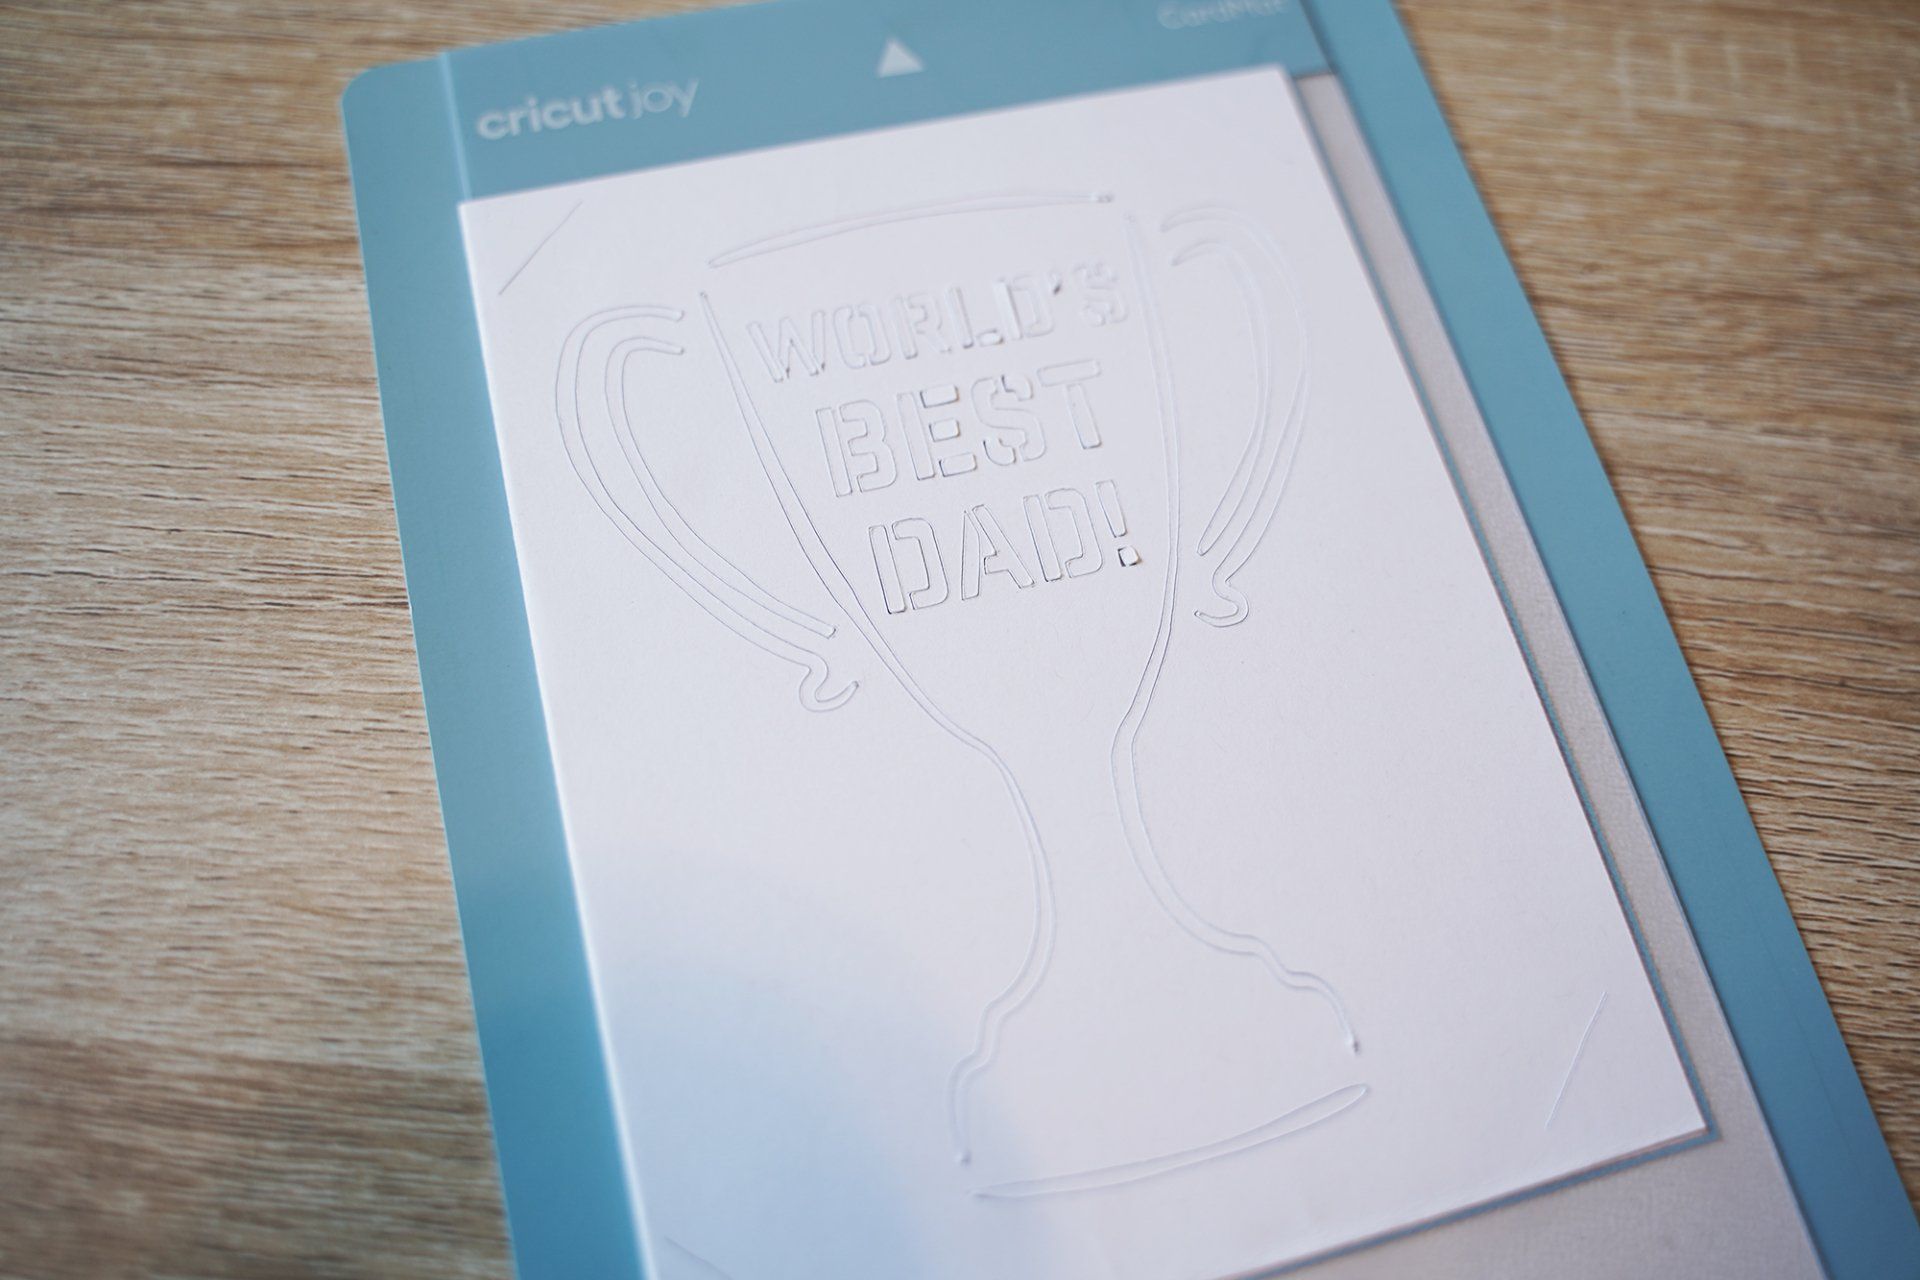
Step 6: Make It For Real This Time!
Now it’s time to load your mat into your machine if you haven’t already, and let your Cricut do the hard part for you! Once your mat is loaded into your machine you can hit that “go” button in Cricut Design Space if you’re using a Cricut Joy, if you’re using a Maker or Explore machine, click the flashing Cricut logo button on your machine and watch it work its magic!
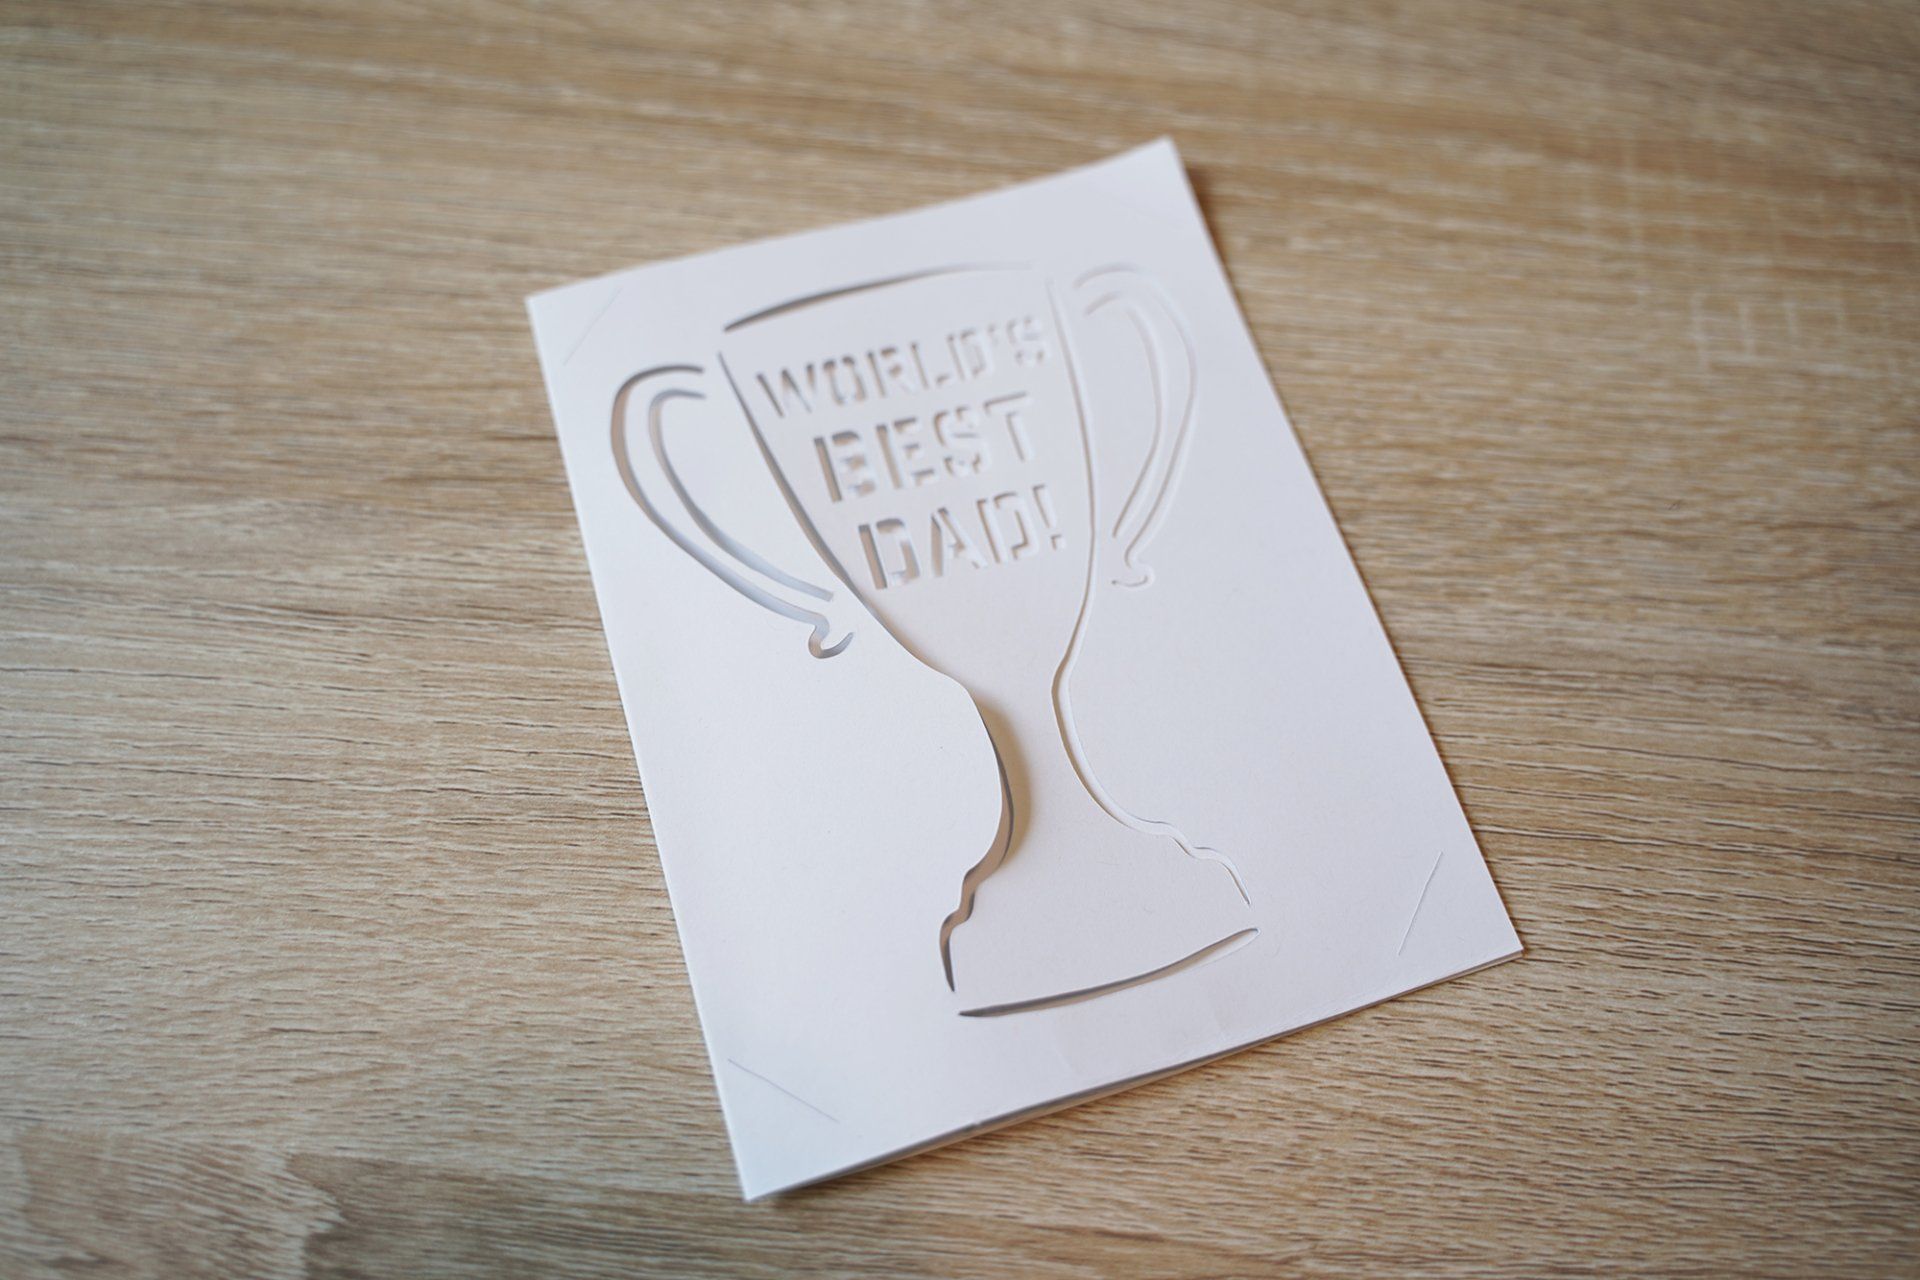
Once it’s done cutting, carefully remove it from the grip mat. Don’t stress too much if it rips, that’s all part of the learning process! Just try it again and chock the first one up to a test cut!
Cards are a delicate craft and it takes practice and patience to get the hang of removing detailed cards from grip mats without accidentally tearing parts of it. Take your time and use your tools! I like using the curved weeding tool that in this Amazon weeding tool set to help me take intricate cards off grip mats, it’s been a life saver!
Cricut Joy:
Explore & Maker Machines:
Step 7: Add your Insert
Regardless of which machine you used to create this card, one awesome thing is true: you can use Cricut Joy Card Inserts!! YES! Whether you have a Cricut Joy or not, you can get some SUPER fun Cricut Joy card inserts that will fit perfectly inside your card!
I started out with a Cricut Explore Air 2 and got SUPER into card making and I loved the idea of adding holographic cardstock inserts into my cards to elevate them to the next level but I discovered it was actually CHEAPER for me to buy a pack of holographic Cricut Joy Card Inserts on Amazon than to buy a big pack of holographic cardstock paper. How cool is that!?
That’s why I decided to adjust my card design dimensions to be Cricut Joy Insert compatible so we can all use these fun card designs in combination with the many ridiculously fun Cricut Joy Card Inserts. You still CAN buy your own packs of patterned cardstock but I found that I love using a variety of different colors and patterns and didn’t really want to spend a bunch of money on a pack of really similar-looking cardstock. I really wanted the freedom to choose from a much wider selection and on top of that, I discovered that I can determine which new pack of inserts I get based on which ones are on sale… kind of a self-imposed “mystery box” which I thought would be super fun AND super affordable to try! Check out these deals on Cricut Joy Insert Cards and see if any catch your eye!
If you want to create your own insert instead, you can do so by repeating steps 2-5 for the “Card Insert SVG.” Upload it to Cricut Design Space, insert into a new project, click “Make It” check your settings, load your mat, and cut away!
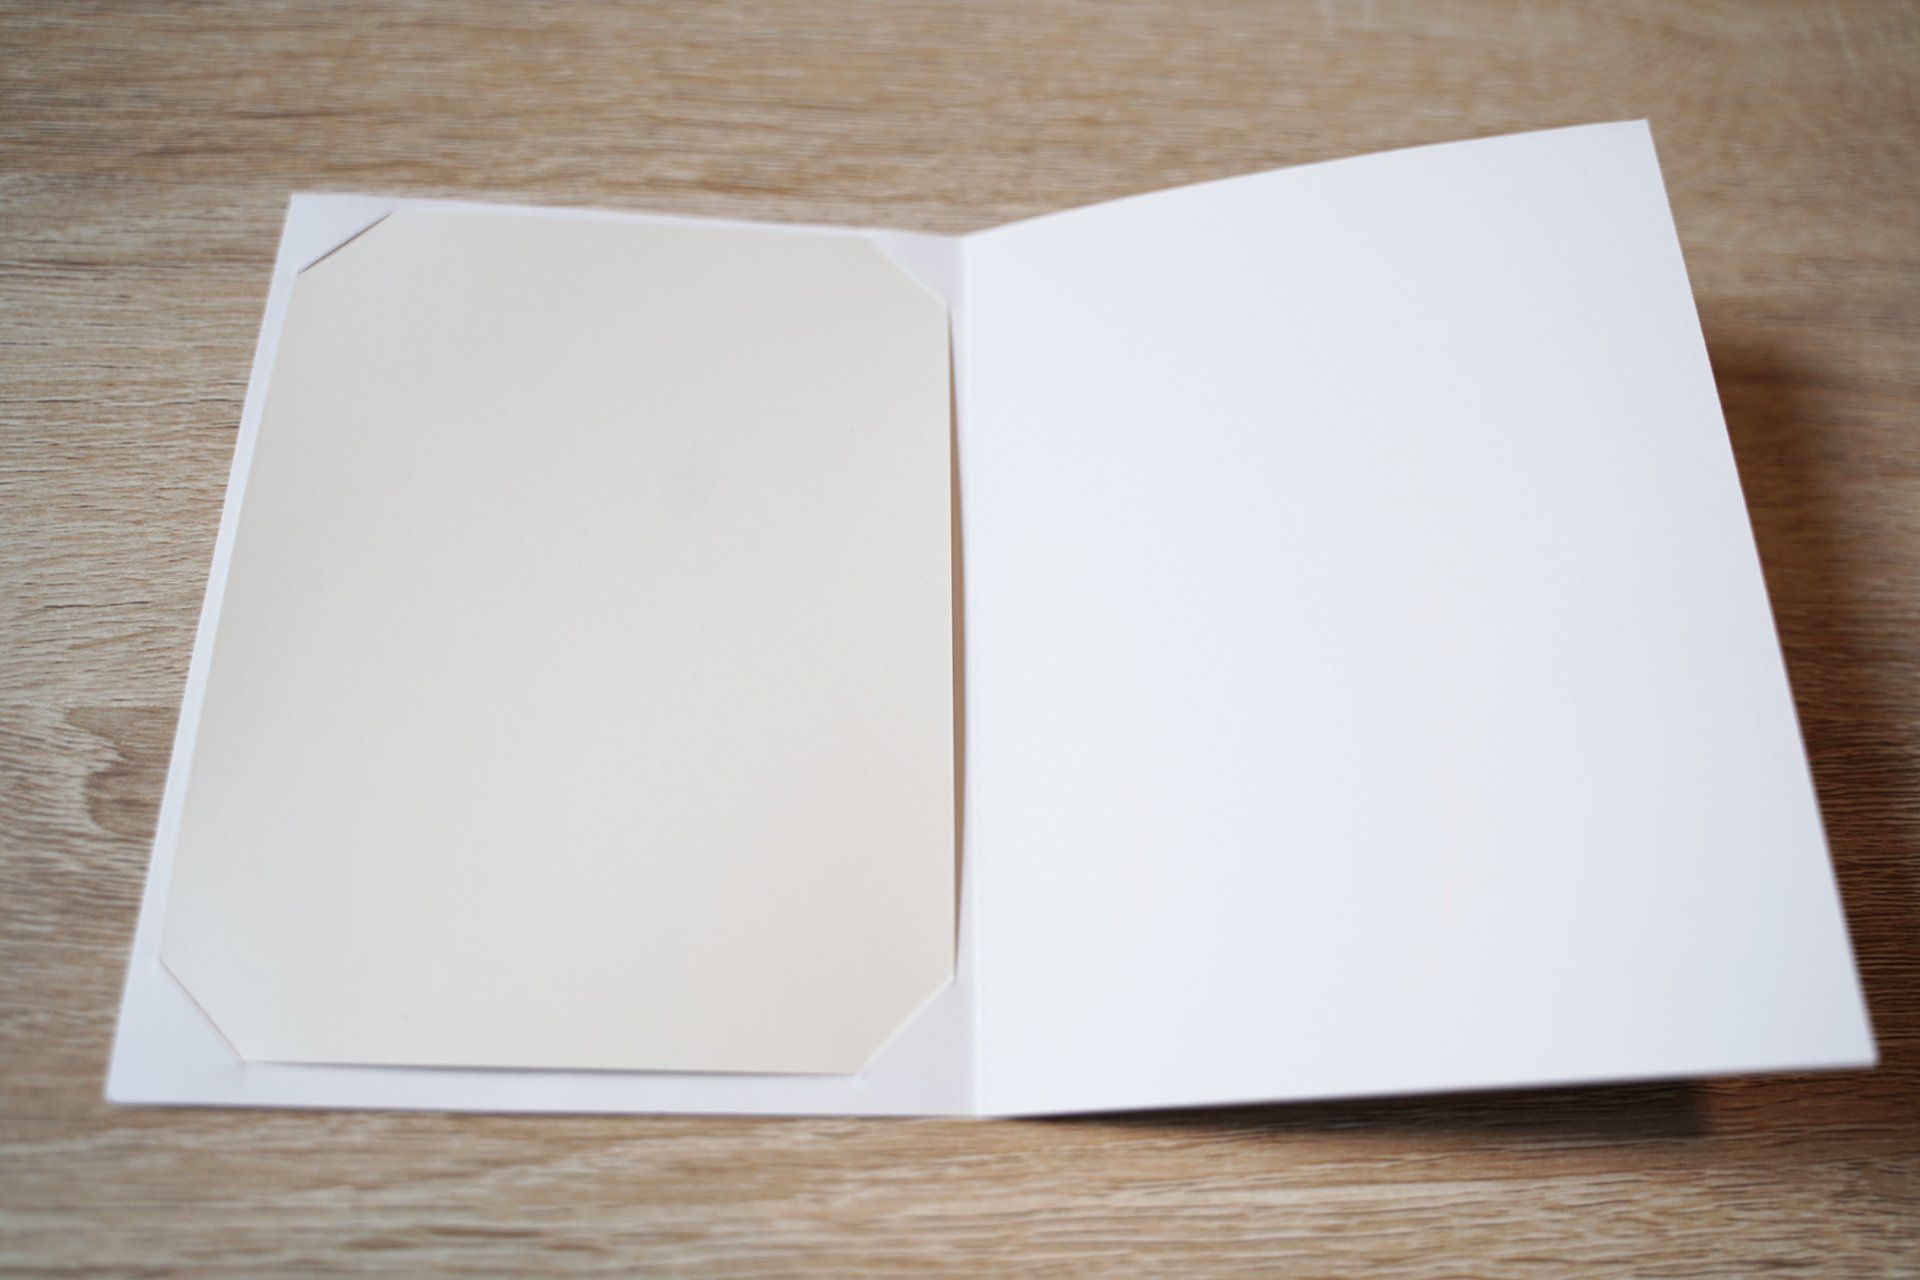
Insert it into your card by loading the corners of the insert into the corner slits of your card and relish in the fact that yes- it was THAT easy to add your insert into your card! No tape or glue required! How great is that!?
Step 8: Admire Your Work
I know this may sound silly but take a step back and look at your card that you just MADE! How amazing does it look? It’s so easy to underappreciated handmade crafts but it’s so important to give yourself credit where credit is deserved and you deserve credit and recognition for EVERY project you complete (and every project you ATTEMPT for that matter). Cricut crafting is NOT as easy as it looks. It can be hard and frustrating but that’s all a part of the learning process! If your card ripped or tore, try not to stress it too much and just try again!
PRO TIP: I’ve messed up projects so much that I've started using cheap plain white cardstock to test out my first project cuts so that if it doesn’t cut right or I’m a potato taking it off the mat and ripping it, it ruins cheap material, and not something more expensive. If you're apprehensive or nervous about ruining more expensive material, do a test cut with cheap material instead!
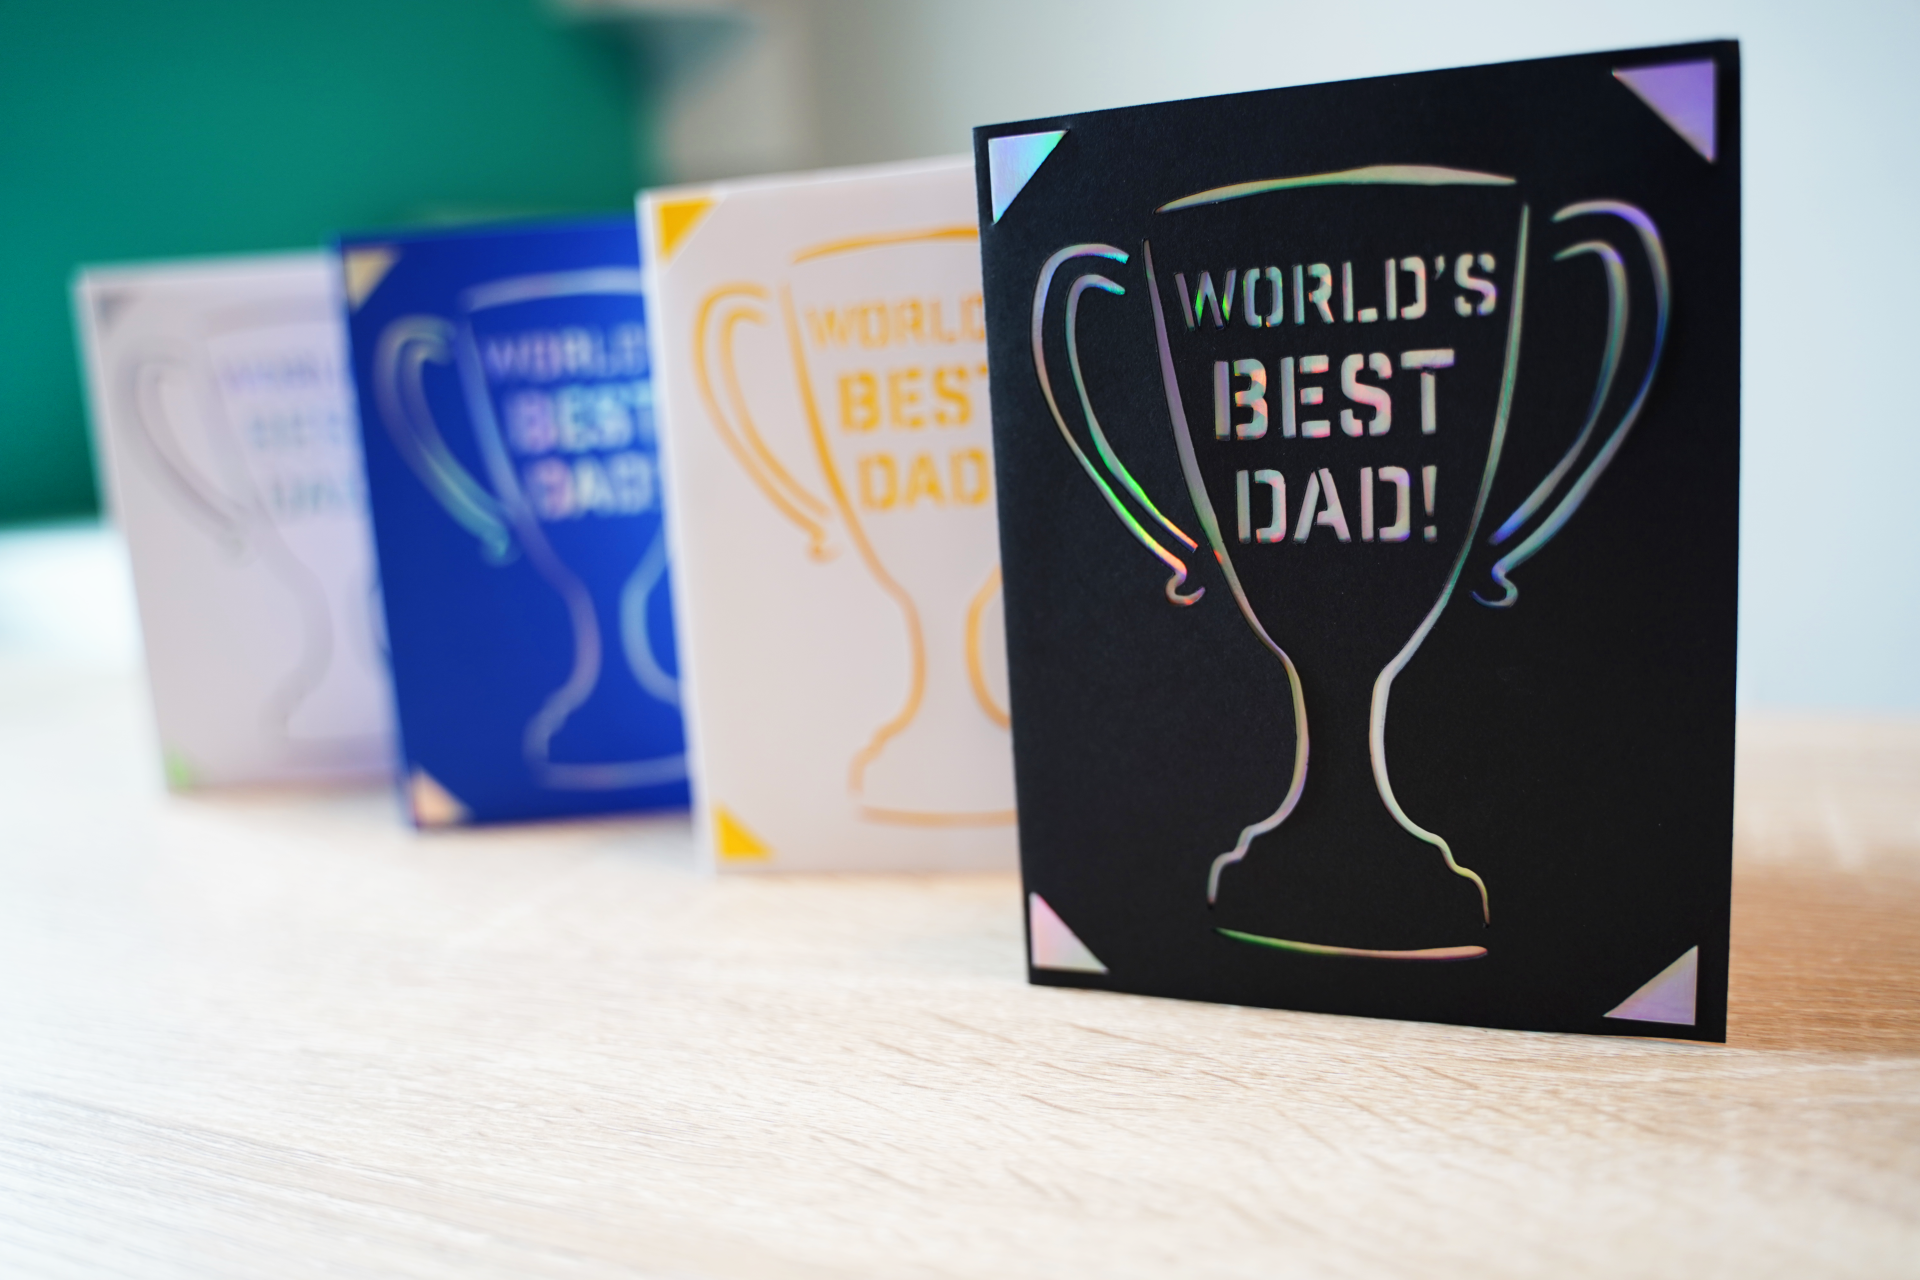
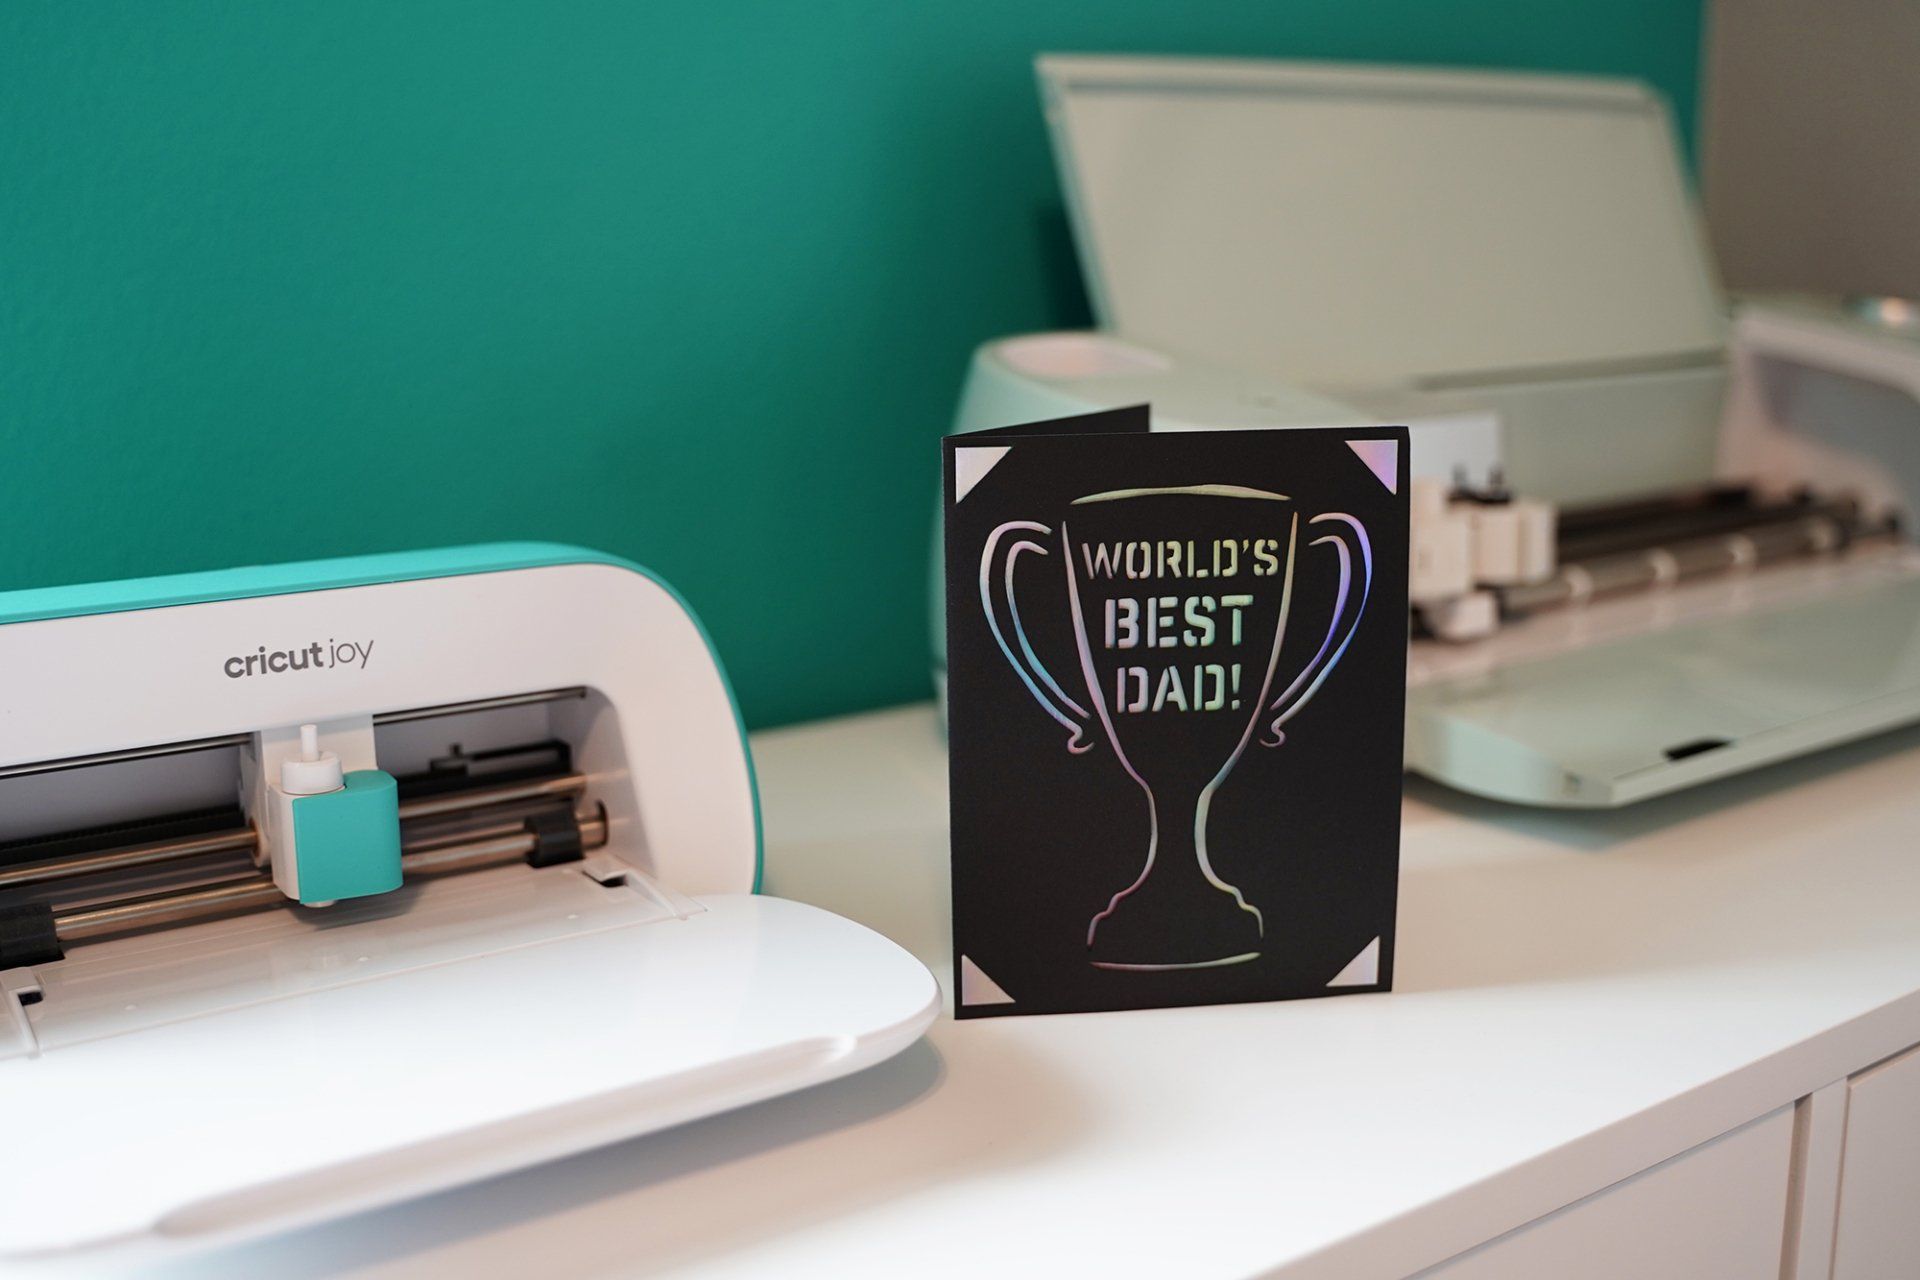
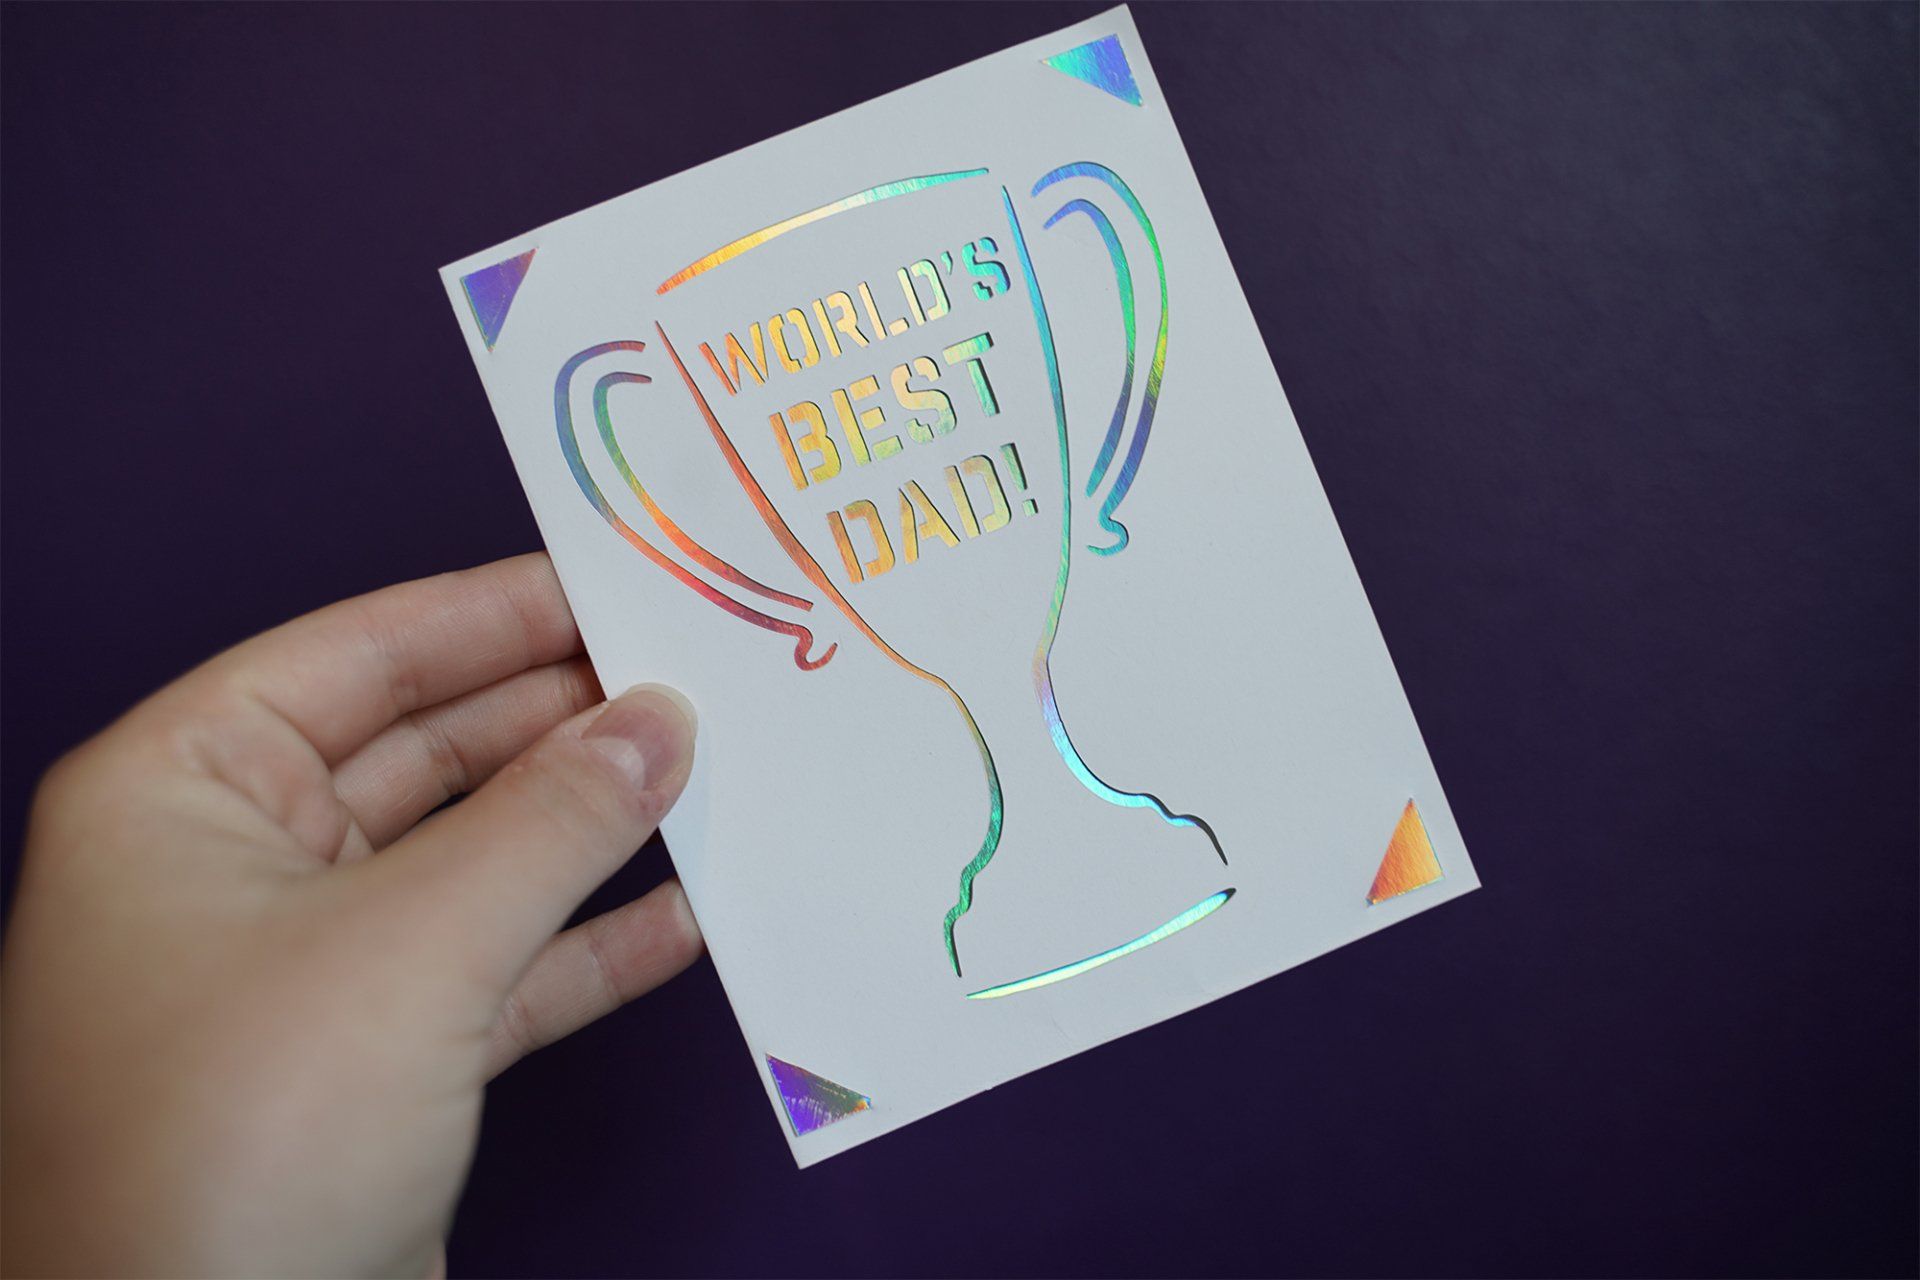
And here’s our finished product!
If you enjoyed this project, check out even more awesome card SVGs in our Etsy shop as well as more of our free tutorials and Cricut hacks on our Youtube Channel.
AND you can save 25% on everything in our Etsy shop by using promo code: CRAFTINGSPREE
You can also check out these awesome free fonts and SVGs we have for you to make some more amazing projects with, as well as these BEST Amazon deals on Cricut and craft supplies we've discovered this far and as always,
Happy Crafting!
Check out the Crafting Spree blog for more DIY, Crafting & Cricut Resources:

Share this article with your friends & family.